Simulating Ion Bombardment on Graphene Sheets
The properties of graphene sheets can be tuned by intentionally introducing defects to the material. A promising method to obtain defects in a controlled way is by bombarding the graphene sheet with high-energy ions. Molecular dynamics simulations can be used to elucidate the mechanisms involved in such processes and to improve our understanding of how external parameters, such as the kinetic energy of the incoming ion, affect the formation of defects. In this tutorial, you will simulate ion bombardment of graphene, following the protocol proposed in Ref. [1].
In particular, you will:
Learn the basic steps required to set up the calculation using QuantumATK.
Learn how to manually introduce modifications to the Python script generated by QuantumATK.
Run the calculation using QuantumATK.
Setting up the Graphene Sheet:
Open the  Builder and do the following:
Use the Nanosheet plugin via to create a graphene unit cell.
Use the tool to rotate the structure and the cell vectors by clicking C<->A and then Z<->X. Now the surface is oriented along the Z-axis.
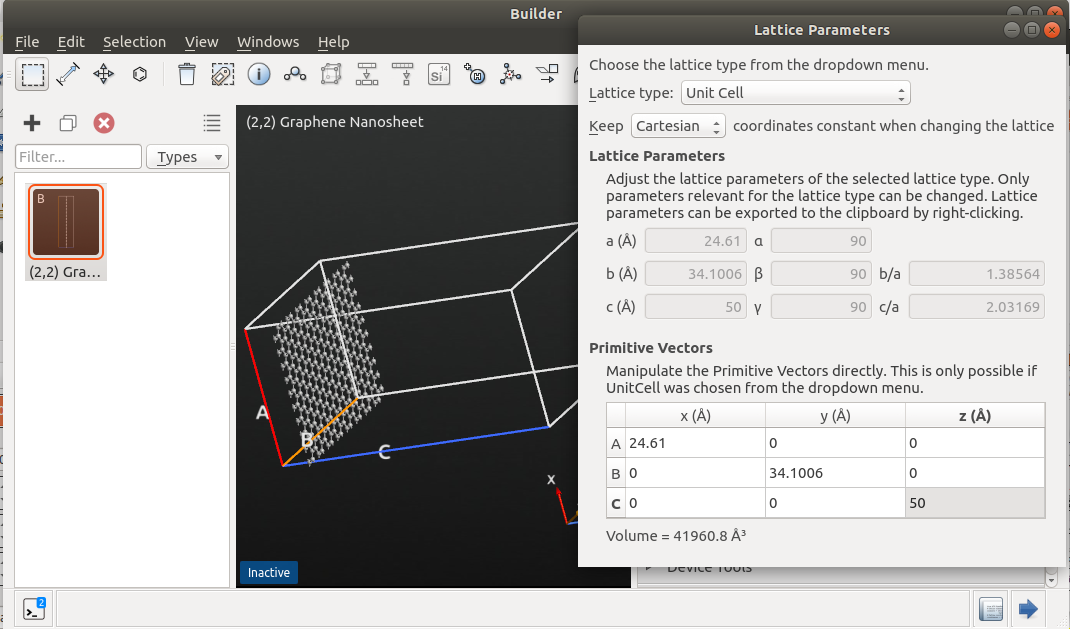
Use to create a suitable supercell by giving a desired number of repetitions in the A- and B-directions, e.g. 10x4.
Use the widget to increase the z-component of the C-vector to 50.0 Å. Make sure to keep the cartesian coordinates when changing the lattice.
Adding a Bombardment Atom
Bombardment atoms can in principle be added at any location above the surface. In the following, you can choose to add a bombardment atom either above a graphene carbon atom (top site), or above the center of a graphene ring (hollow site).
To add an atom at the top site:
Select an atom in the center of the graphene sheet.
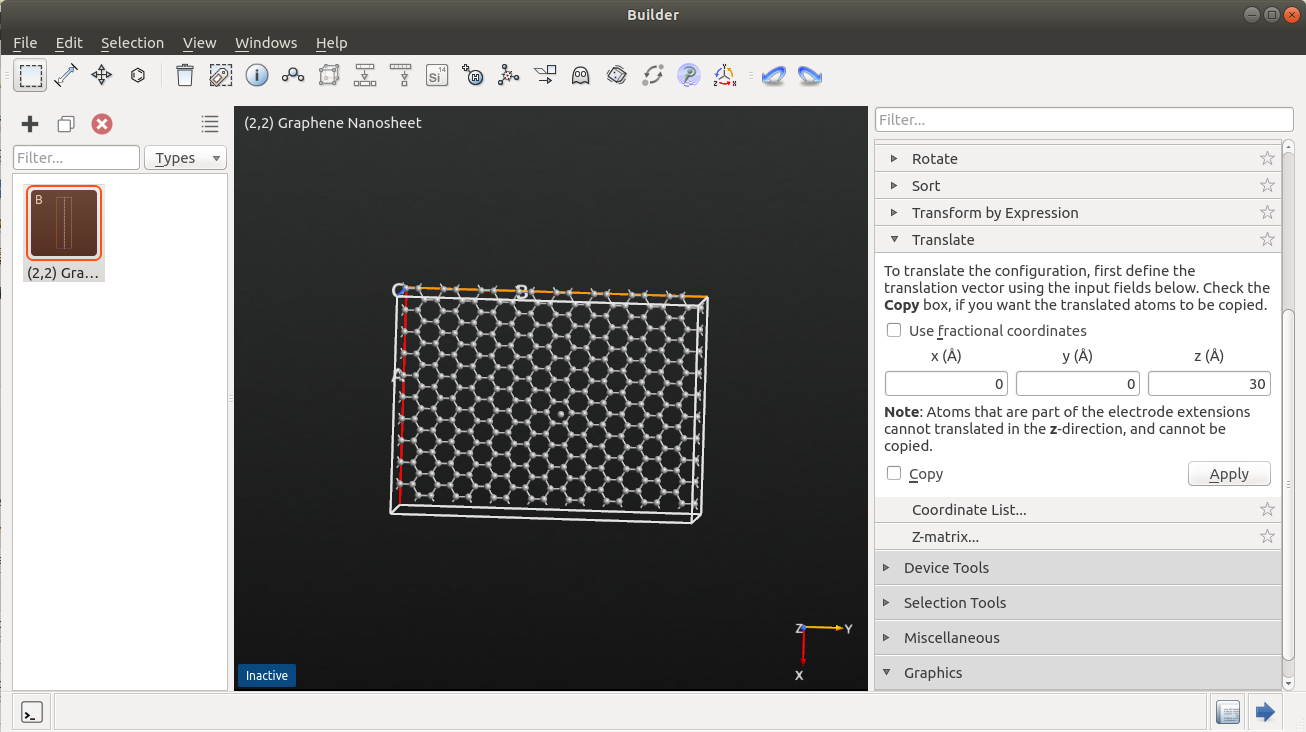
Use to place the bombardment atom at the desired starting height above the graphene sheet (e.g. 30 Å), by entering a suitable z-component for the translation vector.
Check Copy and click Apply.
To add an atom in a hollow site:
Select the atoms belonging to a carbon ring in the center of the sheet.
Click the icon
 in the tool bar of the Builder.
Translate the atom to the desired starting position above the surface by selecting the created atom and use the tool with the following settings.
Note
If you want to modify the exact position of the bombardment atom, you can do this easily, either by using the Translate tool, or by editing the coordinates of the last atom (using the tool).
Setting up the Simulation
You will now set up the calculator for the simulation using the  Script Generator.
It is recommended to optimize the lattice of the graphene sheet with the classical potential before you start the simulations.
Details about the calculator and the classical potential are explained below.
Script Generator.
It is recommended to optimize the lattice of the graphene sheet with the classical potential before you start the simulations.
Details about the calculator and the classical potential are explained below.
First, send the structure from the Builder to the Script Generator by clicking the
 icon .
In the Script Generator:
Add a
 block.
Add two
 blocks.
Open the ForceFieldCalculator widget. Select the Tersoff_SiC_1998 parameter set, then click OK.
Attention
The Tersoff_SiC_1998 potential is very similar, but not identical, to the potential used in [1].
If you feel like using the exact same potential, you can find it in this script: ion_bombardment.py.
Note
For QuantumATK-versions older than 2017, the ATK-ForceField calculator can be found under the name ATK-Classical.
In the first
MolecularDynamics block, set up the equilibration simulation with the following parameters.

The position of the bombardment atom should be fixed during the equilibration calculation. Therefore:
In the
MolecularDynamics block, click Add Constraints to open the Constraints widget.Select the bombardment atom above the surface and click Add tag from Selection.
Set the constraints field to Fixed and click OK.

In the second MolecularDynamics block, you should set the basic parameters of the bombardment simulation:
Select the NVE Velocity Verlet type.
Set 50000 steps and a log interval of 100.
Enter a suitable filename for the trajectory.
Set the initial velocities to Configuration velocities to use the velocities after equilibration.
Uncheck the Remove center-of-mass momentum box.
Decrease the time step to 0.05 fs.
Note
The kinetic energy of the atom is expected to be very high in this simulation. That is why a relatively small time step is necessary to guarantee the convergence. For very high incident energies (>100 eV), the time step may have to be decreased even further to 0.01 fs (cf. [1]).

Send the script to the
 Editor, using the icon.
Modifying the Script
To let the bombardment atom approach the surface at the desired kinetic energy, a few modifications have to be made in the script.
Right before the second
MolecularDynamics block, insert the following lines.
1# Get the velocities from the bulk_configuration
2velocities = bulk_configuration.velocities()
3# Define the incident energy of the bombardment atom.
4incident_energy = 10.0*eV
5# Calculate the corresponding velocity and apply it to the last atom.
6incident_velocity = ((2.0*incident_energy/Carbon.atomicMass())**0.5).inUnitsOf(Ang/fs)
7velocities[-1, :] = [0.0, 0.0, -incident_velocity]*Ang/fs
8bulk_configuration.setVelocities(velocities)
Note
The velocity vector is set to be perpendicular to the surface in this calculation. Arbitrary incident direction can be considered by modifying the velocity vectors in the script lines.
Save the script under a suitable filename, and run the simulation via the
 JobManager or in a terminal.
After the simulation has completed, you can visualize the trajectory using the MovieTool or the
 Viewer to inspect the damage.

References