POV-Ray images from QuantumATK
POV-Ray (Persistence of Vision Raytracer) is a cross-platform ray-tracing program (written in C++) which generates images. This application is already included in QuantumATK platform and gives one more option for editing of the extracted images. This combination of QuantumATK and POV-Ray extends the capabilities of the former to a more artistic perspective

Elementary functionalities through an example
In this simple example (diatomic molecule) we are going to present how to edit an image of a molecule composed by two atoms (red and white). Also, it is a good opportunity to introduce some basic POV-Ray concepts we are going to use. The whole process is shown schematically below:
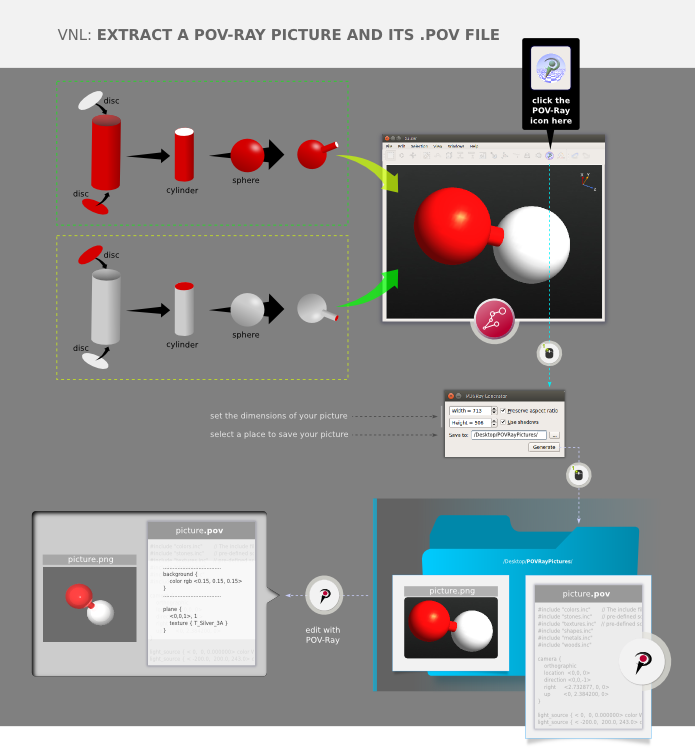
Step 1: Create a structure in QuantumATK. The first step is to create this structure using the QuantumATK Builder. At this point it is good to analyze what our structure has. Here in this example we have two atoms represented by two spheres (white and red colors) connected with a single bond that represented by a thin cylindrical object. This object is composed by two cylinders (white and red cylindrical surfaces) and their top and bottom caps (white and red discs). Namely,
Structure Composition:
sphere (red atom)
sphere (white atom)
cylinder (red atom bond-part)
cylinder (white atom bond-part)
disc (red bottom cap of the red atom bond-part)
disc (white top cap of the red atom bond-part)
disc (red bottom cap of the white atom bond-part)
disc (white top cap of the white atom bond-part)
Step 2: Extracting POV-Ray files. Once we are ready with the molecule in QuantumATK we are ready to extract it as a POV-Ray file (POV-Ray files have the .pov extension). It is quite easy to do that; just click the POV-Ray icon
 at the top-right of the Builder’s toolbar. A pop-up window appears asking you to give a name to the .pov file. Let’s name it as picture.pov. Clicking the Generate button we extract our diatomic molecule in a POV-Ray file and our rendering in picture.png format.
Attention
It is important to mention here that the extracted .pov files (from QuantumATK) cannot be modified with QuantumATK. We can do that only with the POV-Ray program changing and importing parameters and properties.
Examining the .pov file
Header Files. Opening the picture.pov file we see a C++ code that describes each element and every detail of our picture. In the first lines of the code we include some .inc header files that are responsible for handling various colors, textures and shapes. Their role is obvious and it is not necessary to get into more details about that now:
1#include "colors.inc"
2#include "stones.inc"
3#include "textures.inc"
4#include "shapes.inc"
5#include "metals.inc"
6#include "woods.inc"
Camera(s). The next few lines describe the properties of the camera. The camera element is very important because the rendering of the picture is depending on it.
1 camera {
2     orthographic
3     location  <0,0, 0>
4     direction <0,0,-1>
5     right     <2.7, 0, 0>
6     up        <0, 2.4, 0>
7 }
The above lines of code describe the camera view that we have used to extract our diatomic molecule from QuantumATK. The following picture shows some basic camera properties in the 3D space. For more information on editing cameras and their properties look at POV-Ray cameras.
Light Source(s). The next important element is the light_source element. One may control this element by importing and/or changing various light source attributes. In the present example we have two light sources where their locations and their color lights have defined:
1light_source { < 0,  0, 0> color White }
2light_source { < -200.0,  200.0, 243.0> color White shadowless}
Background(s). This element is used to assign a color to all rays that do not hit any object. Here we have defined a grey background providing the proper RGB color coordinates:
1background { color rgb <0.15, 0.15, 0.15> }QuantumATK Object(s). The next part of the code includes the description of the various objects that we have created and rendered in QuantumATK. Namely, the elements and their properties (like textures, colors, relevant positions, radii, etc.) that are mentioned in step 1 above. It is easy to see in these code lines that we have indeed: two spheres, two cylinders and four discs and their properties are defined between the curly brackets. For example, the red atom/sphere is described by the following sphere:
 1sphere {
 2    <-0.3, 0.2, -2.1>,  0.4     // center and radius
 3    texture {
 4        pigment { color rgb <1. 0.06 0.06> }
 5        finish {
 6             ambient .2
 7             diffuse .4
 8             specular .75
 9             roughness .001
10             reflection { .6, metallic}
11        }
12    }
13}
In line 2 we can see the location (in Cartesian <x,y,z> coordinates) of the center of the sphere. The next number after the comma is just the radius of the sphere. The rest lines describe the texture of the sphere. In pigment we can clearly see the color definition (red) while with the finish identifier (staring in line 7) we have a more realistic impression of the object. Finish is quite useful identifier since it gives us the option to control many properties (like roughness, diffusion and reflection effects, and many more) of the surface(s) of an object in a more detailed level. The final result of all these texture-terms are highly correlated with the light sources and the camera view of course. This means that when we change a parameter in finish identifier we must always take into account the light properties that we have already set in our scenery according to our camera view (different camera views give us different impressions of the same object since the light reflections are changing). Cylinders and discs are defined in a similar way.
Step 4: Editing POV-Ray Files. Now we are ready to update our picture. Editing the example1.pov file we are able to control many parameters, to add objects and to create many artistic effects in general (using the POV-Ray program). In our example we just add a plane. The plane we want to have is described by the following lines of code:
1plane {
2    <0,0,1>, 1                         //This represents the plane 0x+0y+z=1
3    texture { T_Silver_3A }   //The texture comes from the file "metals.inc"
4}
Exporting pictures with POV-Ray
Note
The content of this paragraph refers to the general use of POV-Ray as an independent program and does not restricted by QuantumATK or any other software. QuantumATK just has the ability to export complex structures as .pov and .png extensions.
In order to be able to export an edited picture you must have already installed POV-Ray on your system. You can find detailed instructions about this topic at the POV-Ray's download page. So, assuming that you have already a [filename].pov file (in our example here [filename] stands for “picture”) follow the steps below:

| POV-Ray on Windows
Step 5.1: Click the POV-Ray application icon and the POV-Ray interface opens (see picture above).
Step 5.2: Click Open button, and navigate to your files to import your [filename].pov file you prefer (picture.pov for instance). Now you can see and edit the code according to your preferences. Once you are ready just click the green Run button and in some seconds you will create your [filename].png picture.
| POV-Ray on Linux
Step 6.1: Open the [filename].pov with a text editor, make the changes you want (if any) and save it.
Step 6.2: Open a terminal and type
povray [path/to/pov/file]. For example if the picture.pov file is on the Desktop, then type:1$ cd Desktop/ 2$ povray Desktop/picture.povor directly
1$ povray Desktop/picture.povIf you want specific picture size type:
1$ cd Desktop/
2$ povray picture.pov -w320 -h240 +a0.3
Where -w, -h, +a numbers define the width, the height and the aspect ratio respectivelly.
