Carbon Nanotube Junctions
QuantumATK: CNT Junctions Platforms: Links: 3D View, Exploring Graphene An important feature of the NEGF transport model implemented in QuantumATK is its ability to treat heterogeneous systems, meaning device geometries where the two electrodes are not the same. This makes it possible to study a wide range of important systems, such as the contact resistance between two materials (for instance a semiconductor/metal interface) or the capacitance of junctions between nanotubes of different chirality. In this tutorial you will learn how to set up the geometry of such a junction. |
|

The steps involved in the Builder are rather simple, but for this type of geometry it is important to study how the transmission and other properties change depending on how much the two tubes overlap. Therefore, you will also learn how to vary this distance, by adding a few lines of Python code to the script.
Note
CNTs: Types and Properties
The atomic structure of a CNT is described by a pair of integers called chiral indices \((n,m)\in\mathbf{Z}^2\). If \(m=0\) then the CNT has a zigzag structure. Other special values of these indices describe CNTs with special properties as follows:
If \(n=m\) then the CNT is metallic (m) (armchair structure).
If \(n\neq m\) then the CNT is semiconducting (s) (chiral structure).
If \(n-m\in3\mathbf{Z}^*\) then the CNT is semimetallic (sm) (chiral structure).
Possible Combinations for CNT Junctions
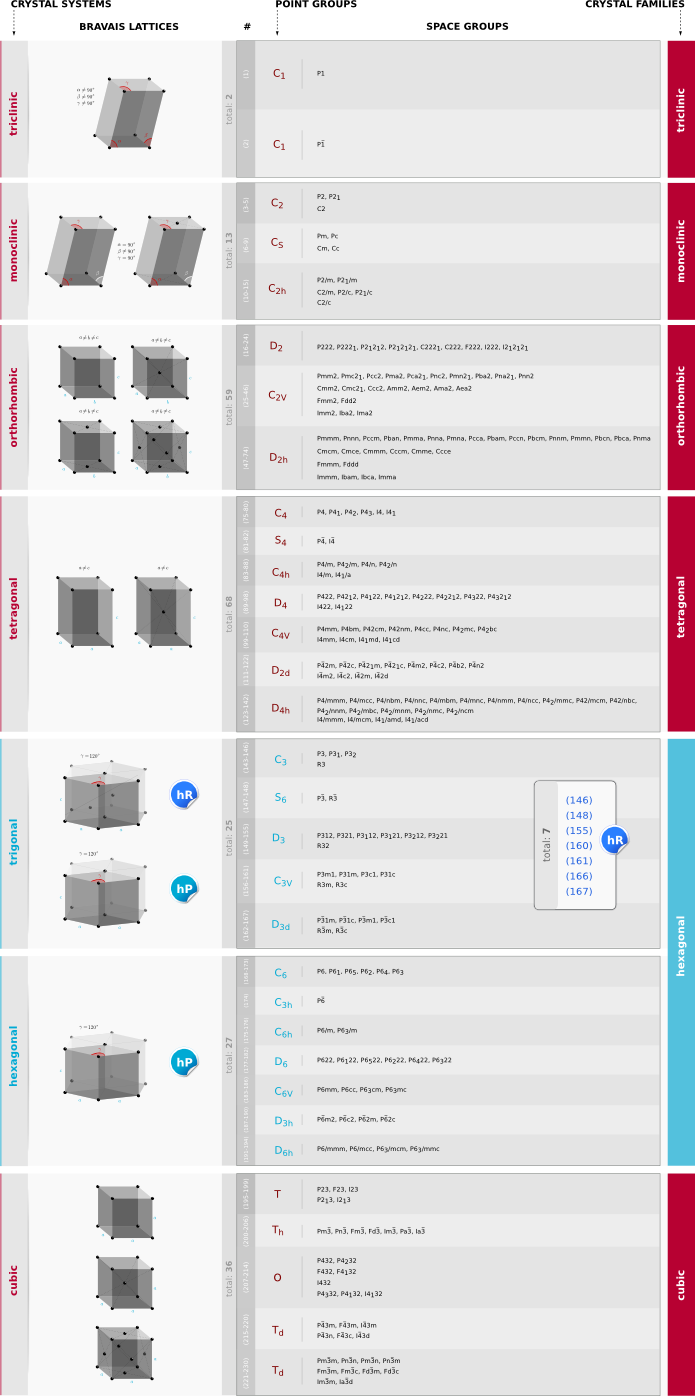
Note 1: Here we denote the junction with a vertical bar: “|”. Note 2: Junctions between metallic and semiconducting would be interesting too, although probably in that case the relevant geometry is m|s|m, rather than m|s.
Setting up the geometry
First, you need to set up the reference geometry where the two tubes are just in contact with each other. It is reasonable to define this as the case where the atoms on the edges of the two tubes have the same Z coordinate.
CNT Junction Example: m|m with (12,12)|(5,5)
The instructions below will be using the m|m case of a (12,12)|(5,5) junction, but the steps involved are identical for any combination of chiralities.
Step 1: Create a (12,12) metallic CNT using the Nanotube plugin following the steps bellow.
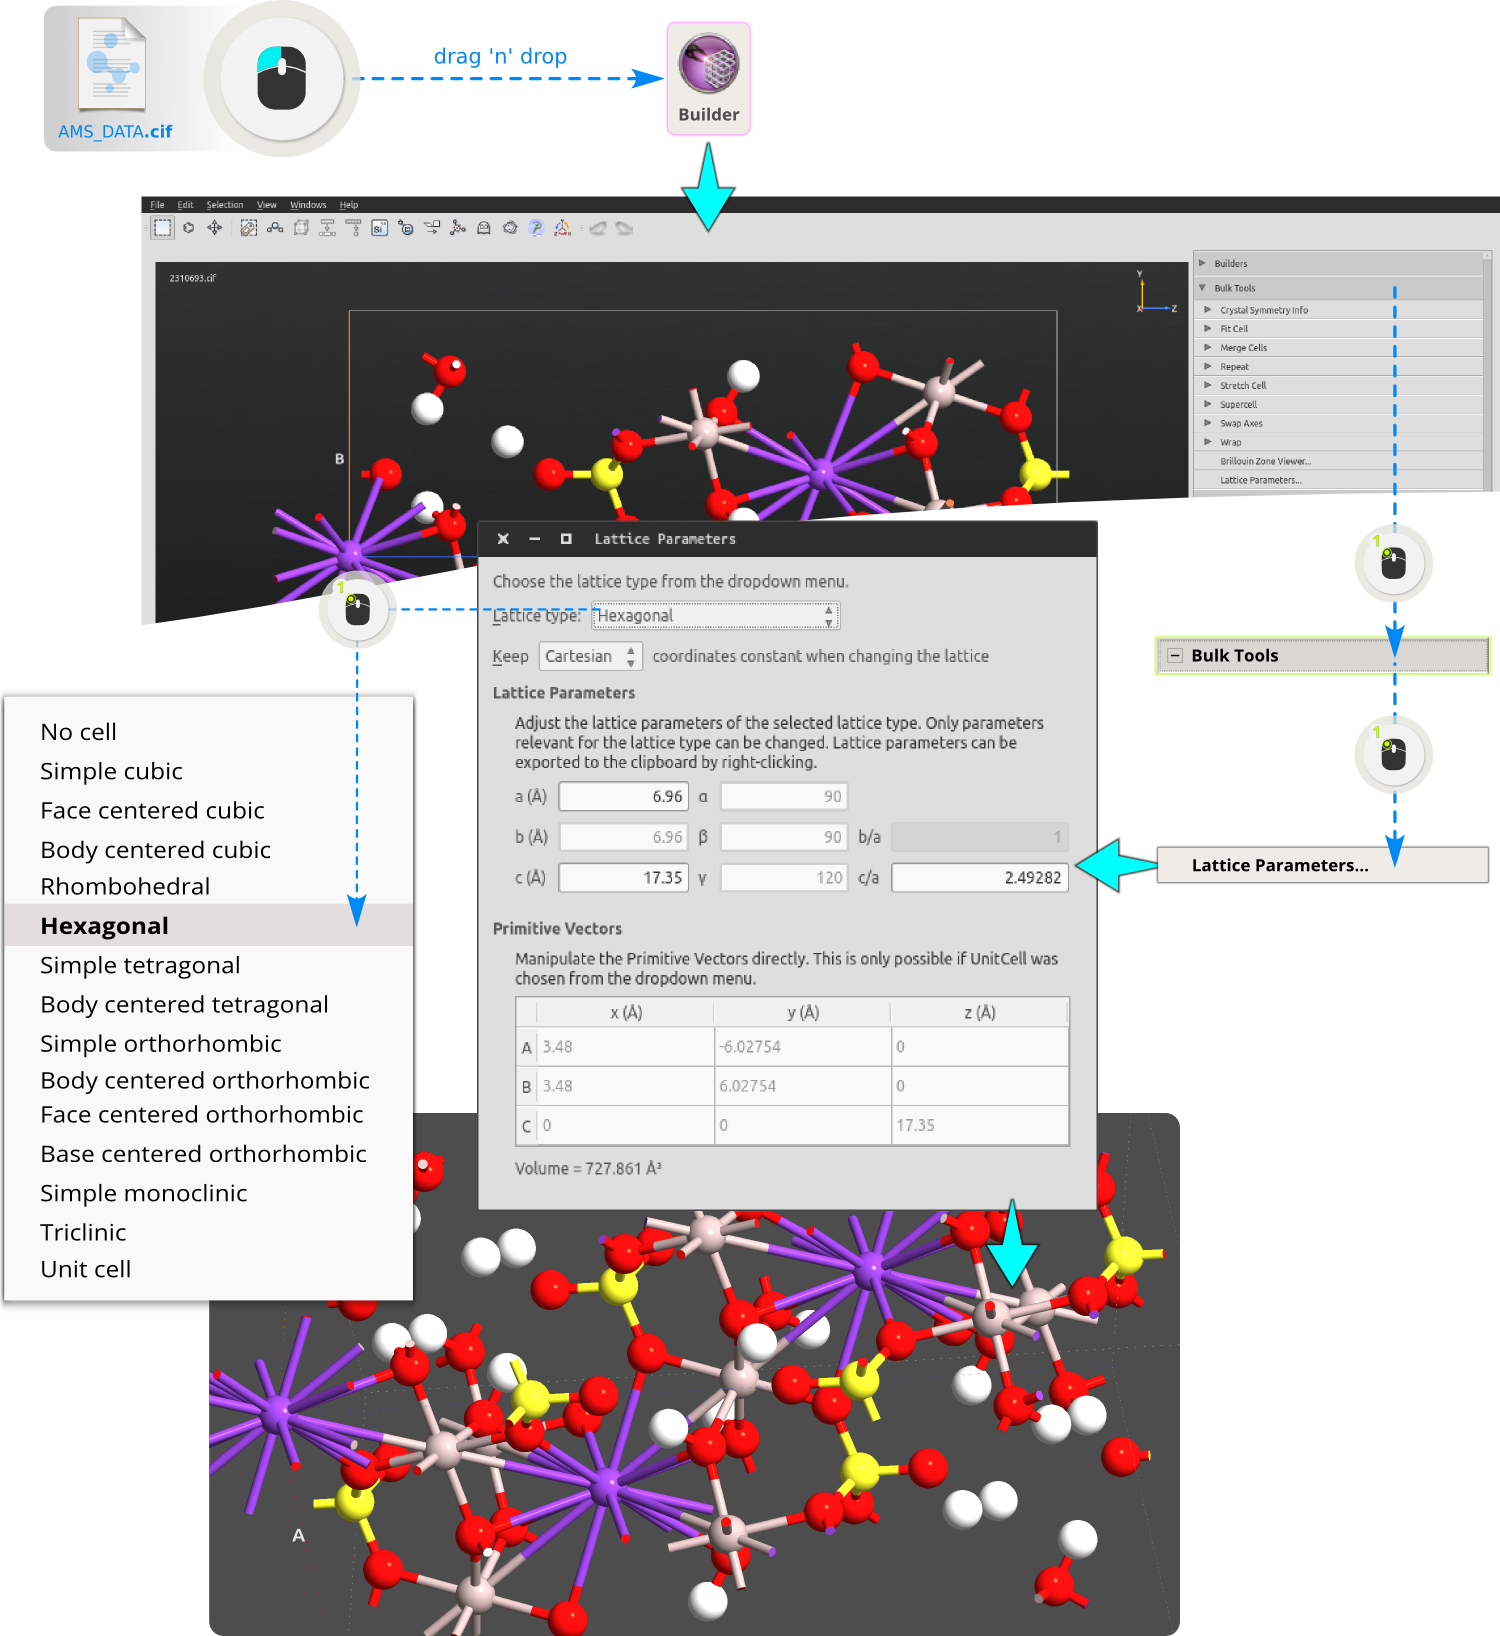
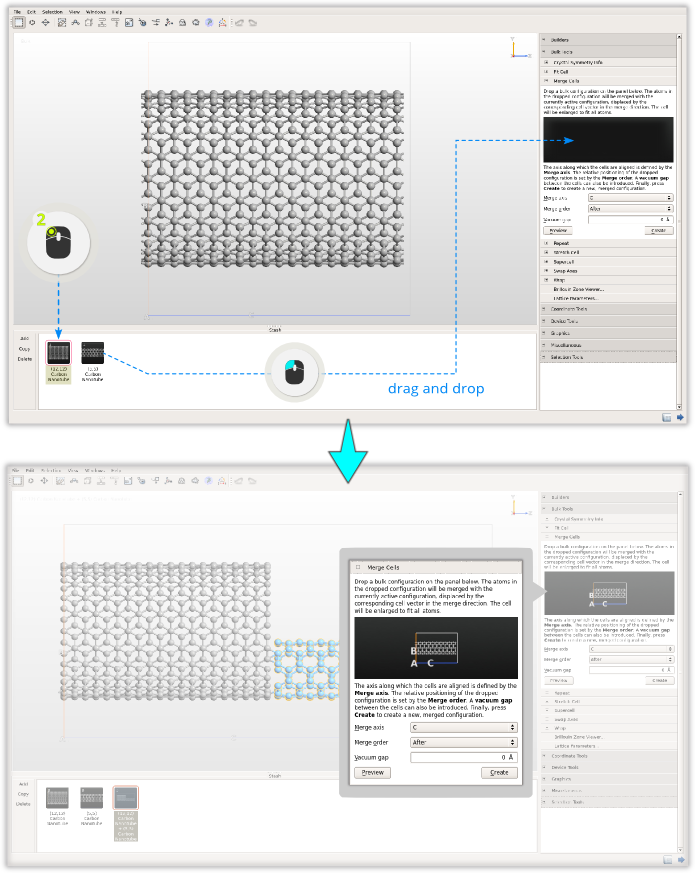
Step 2: The CNT is quite thin and it’s better to increase its length. Let’s repeat the structure 10 times along the C (tube) axis using the tool and choosing C=10:

Step 3: In order to create a second CNT with (n,m)=(5,5) just repeat the previous steps and type N=5 and M=5 in the Nanotube plugin. Also we choose to have the same length as the first CNT and thus we repeat the structure ten times. In the end you will have two CNTs of equal length (one with (12,12) and another one with (5,5) chiral indices) on the Builder Stash.
Tip
Tagging: In order to later on be able to identify the two tubes, add a tag to all atoms in the (5,5) tube by first selecting all atoms (Ctrl+A) and then open . Add the tag cnt55 to all atoms in the (5,5) tube.
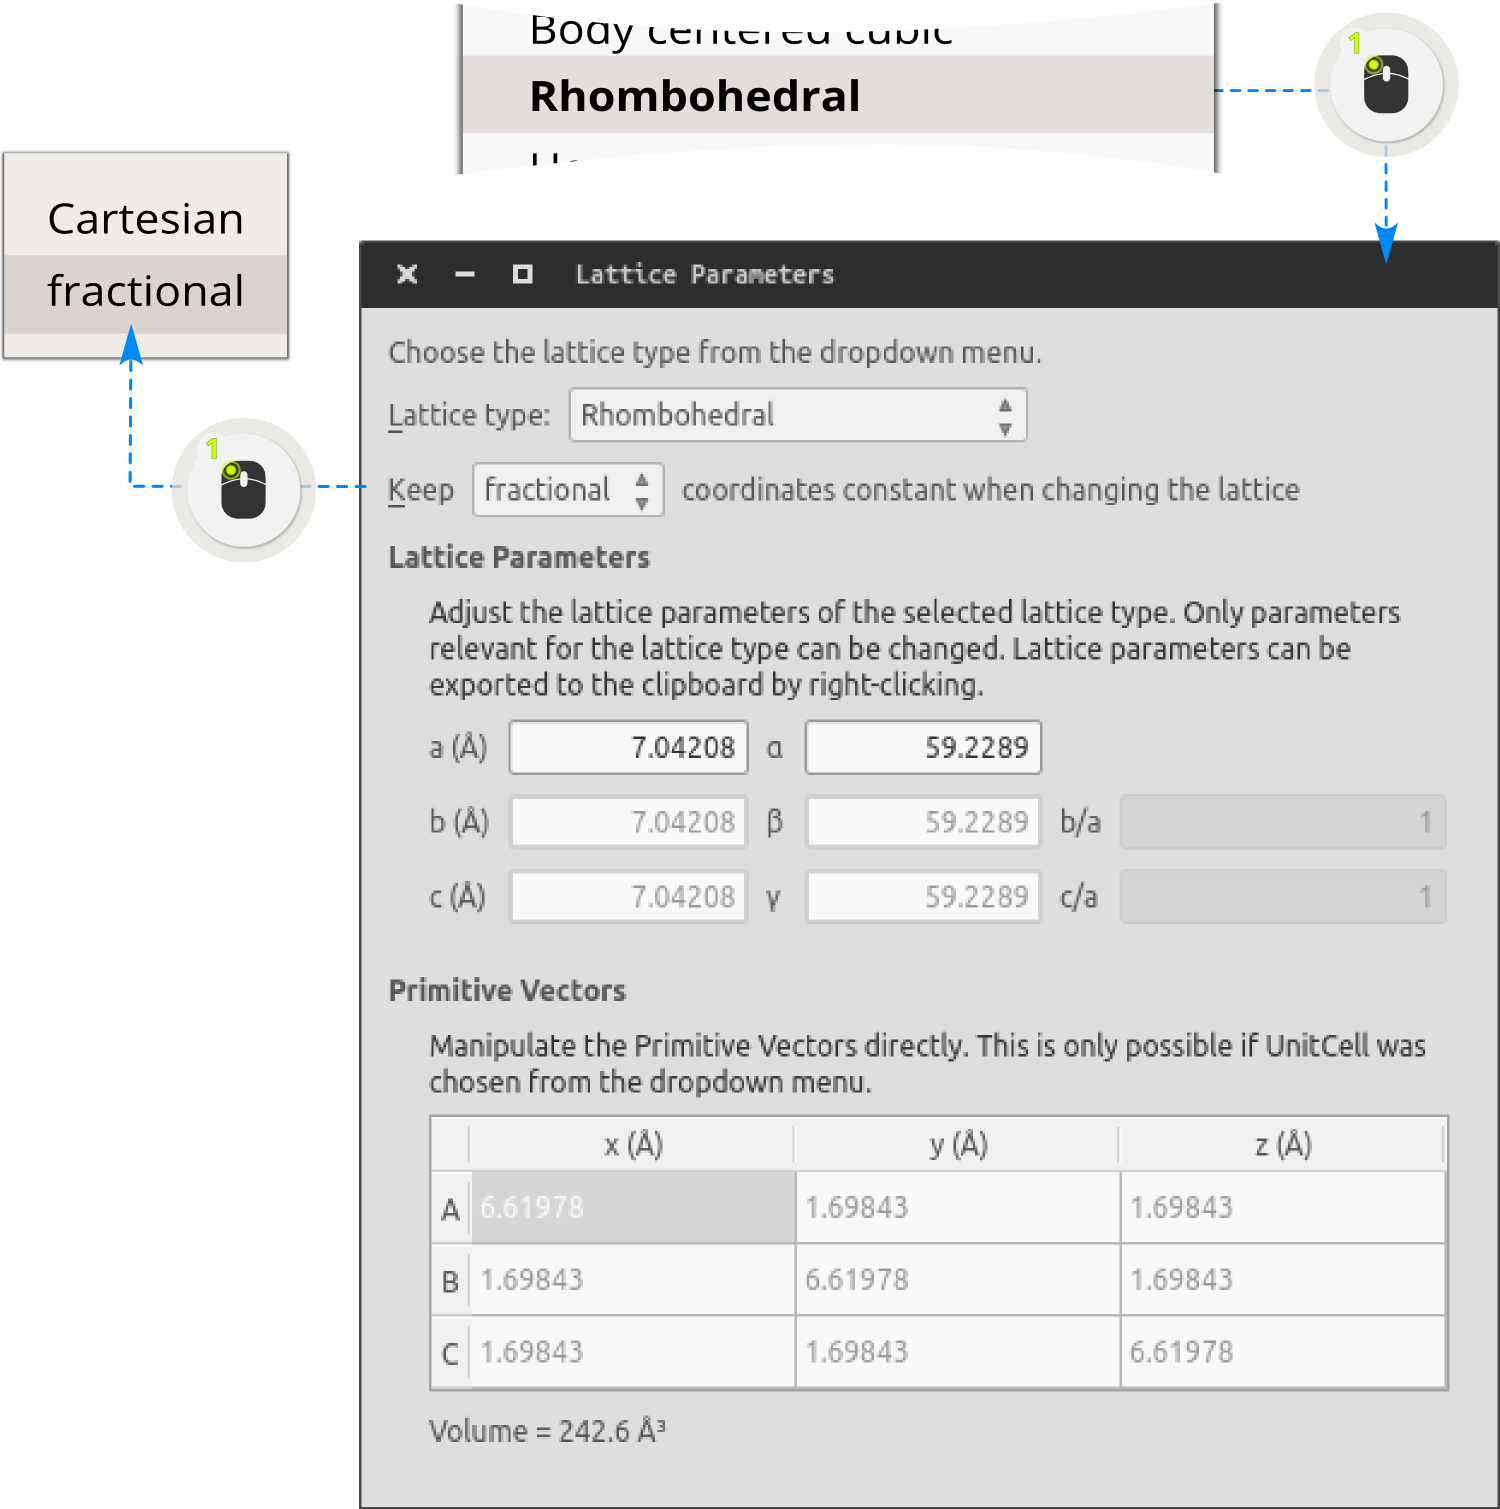
Step 4: Double click to the (12,12) structure on the Stash in order to activate it.
Step 5: There is a specific tool in the Builder for gluing two bulk cells together: . This plugin takes a bulk configuration and attaches it to the active configuration, on a specified side of the existing unit cell. Drag the (5,5) tube onto the 3D window in the plugin panel. The default options are correct - the (5,5) tube should be added after the (12,12) tube in the C direction. Click Create.
Step 6: The (5,5) tube needs to be centered in the z=0 plane (xy-plane), since it’s original unit cell was smaller than that of the (12,12) tube. Therefore, select all atoms in the (5,5) tube by opening the Tag Select tool
 , select the tag cnt55, then OK. Then open
and center the tube in the A,B direction - that is, untick C, and click Apply.
, select the tag cnt55, then OK. Then open
and center the tube in the A,B direction - that is, untick C, and click Apply.

Step 7: The system is no longer periodic in any direction, so remove the unit cell by clicking the Molecule button
 .
An interesting quantity to study for a junction like this is how the conductance changes as a function of the amount of overlap - or “distance” -
between the tubes. To have a clear definition of the distance d between the tubes, it’s important to establish a reference point which we define as d=0.
The most convenient definition is the case when the edges of the tubes overlap, and the next steps will align the tubes into this configuration.
.
An interesting quantity to study for a junction like this is how the conductance changes as a function of the amount of overlap - or “distance” -
between the tubes. To have a clear definition of the distance d between the tubes, it’s important to establish a reference point which we define as d=0.
The most convenient definition is the case when the edges of the tubes overlap, and the next steps will align the tubes into this configuration.Step 8: Activate the Move tool
 and select an atom on the right-most edge of the (12,12) tube (largest Z coordinate). This selects all atoms in the (12,12) tube -
or, more specifically, all atoms connected by bonds to the clicked atom - and the clicked atom becomes an anchor atom, as indicated by the label “0” and the red selection marker.
and select an atom on the right-most edge of the (12,12) tube (largest Z coordinate). This selects all atoms in the (12,12) tube -
or, more specifically, all atoms connected by bonds to the clicked atom - and the clicked atom becomes an anchor atom, as indicated by the label “0” and the red selection marker.Set the Z coordinate of this atom to 0 Angstroms. Press Enter. Exit the Move tool by closing the Move widget, and deselect all atoms by clicking the black background (or by pressing Esc). Repeat these steps for the (5,5) tube, but this time select an atom on the left-most edge (smallest Z coordinate).

Step 9: In order to create a device we need a unit cell, so add back the unit cell (it was primarily removed to make it easier to align the two tubes) by clicking the Bulk icon
 . Finally, open and click OK.

Changing the distance between the tubes: Manual way
You now have the geometry for the d=0 case, i.e. the geometry where the distance between the tubes is defined as zero. To change the overlap distance d between the tubes, you could now in principle carry out the following steps:
Make a copy of the geometry on the Stash.
Convert back to a molecular geometry (
).Select all atoms in the (5,5) tube (
).Open and move the (5,5) tube the desired distance d.
Convert back to a bulk configuration (
) and convert to a device.
Repeat this procedure for all values of d you want to study… Now, that becomes rather tiresome, if you want to scan several distances. So instead, you can make a small Python function that performs these tasks automatically. This will be described in the next section.
Using a Python function for changing the overlap distance
Save a copy of the d=0 geometry as a Python script, for safety. Then, send the structure from the Builder  to the Editor
  , by using the Send To icon (
 ) in the lower right-hand corner of the Builder. Scroll to the bottom of the script, and insert the following lines of code at the bottom of the script:
 1 # ----------------------------------------------------------------------------
 2 def moveTube(device_configuration, d=0.0):
 3     # d is assumed to be in Angstrom
 4     # Extract the central region from the device configuration
 5     central_region = device_configuration.centralRegion()
 6
 7     # Number of atoms
 8     N = len(central_region.cartesianCoordinates())
 9     # Which atoms are in the right tube? Those with tag="2"
10     right_tube = device_configuration.indicesFromTags("2")
11
12     # Set a Z shift of d for these atoms, and zero for others
13     delta = numpy.zeros(N)
14     delta.put(indices=right_tube, values=d)
15     Delta = numpy.array([numpy.zeros(N),numpy.zeros(N),delta]).transpose()
16     # Shift coordinates!
17     new_coordinates = central_region.cartesianCoordinates() + Delta*Angstrom
18     # Extend (or contract) the unit cell by the same amount
19     va, vb, vc = central_region.bravaisLattice().primitiveVectors()
20     vc = vc + [0.0, 0.0, d]*Angstrom
21     new_cell = UnitCell(va,vb,vc)
22     # Rebuild central region (transfer ghost atoms too)
23     new_central_region = BulkConfiguration(
24         bravais_lattice=new_cell,
25         elements=central_region.elements(),
26         cartesian_coordinates=new_coordinates,
27         ghost_atoms = central_region.ghostAtoms(),
28     )
29
30     # Transfer the tags to the new configuration
31     for tag in central_region.tags():
32         new_central_region.addTags(tag, central_region.indicesFromTags(tag))
33
34     # "Device from bulk" the scripting way
35     from NL.CommonConcepts.Configurations.DeviceFromBulk import deviceFromBulk
36     left_electrode, right_electrode = device_configuration.electrodes()
37     left_electrode_length = left_electrode.bravaisLattice().primitiveVectors()[2,2]
38     right_electrode_length = left_electrode.bravaisLattice().primitiveVectors()[2,2]
39     new_device = deviceFromBulk(left_electrode_length, right_electrode_length,
40                                  new_central_region
41                  )
42
43     return new_device
44# ----------------------------------------------------------------------------
45d = -5.0
46device_configuration = moveTube(device_configuration, d)
If you want to understand how this code works, you can study the comments which provide quite detailed explanations. Otherwise, all you really need to know is that by changing the value of “d” (which is assumed to be given in Angstrom) on the second last line, the right tube is shifted in (negative d) or out (positive d) of the left tube.

Tip
To see the result of the operation, send the script back to the Builder, again using the button. This will add no less
than four configurations to the Stash, since the electrodes and central region are also recognized as valid configurations present in the script.
If you instead send the script to the Script Generator  , only the device configuration is transfered.
Comments
The 10x repetition in the C direction gives a rather large system. This is necessary to be able to set the tube distance d to a large negative value, but also increases the computation time considerably. If you limit the values of d you can reduce the number of repetitions to perhaps 6 or 7, either when building the tubes, or afterwards, by using . Just take care so the tubes don’t get too close to the opposite edges of the cell, and make sure to inspect visually the geometry of the largest value for d you choose to calculate.
One can wonder what happens when the tubes are rotated with respect to each other, however the effect is probably small unless perhaps the two tubes have comparable radii such that there is a strong overlap of the pi-orbitals of the two tubes.
An interesting quantity to compute for systems like this would be the capacitance (see [1] and [2]). This can quite easily be done following a similar procedure as described in the tutorial about a Atomic-scale capacitance
References