Exploring Graphene
In this tutorial you will build a range of graphene structures and study some of their properties. With QuantumATK you can easily twist and stretch the structures using plug-in modules. You can then use QuantumATK to calculate their electronic and vibrational properties. You will also learn to automate calculations on large structures using Python scripting.

Hint
In many QuantumATK projects (depending on the study of course) you will need the appropriate plugins/AddOns, which can be installed via the AddOn Manager.
In this particular tutorial, you will need the TubeWrapper.zip and
CNTBuilder plugins. Please check that these are available, and install them if they are not.
You can install addons following the instructions in the AddOns page.
Build a graphene sheet
Open the QuantumATK Builder  . It is then easy to create a graphene sheet
using a plugin; simply click .
Leave the option for Chemical Properties at defaults. In the Geometry options,
choose a chiral vector of (n,m)=(8,0), and click Build.
. It is then easy to create a graphene sheet
using a plugin; simply click .
Leave the option for Chemical Properties at defaults. In the Geometry options,
choose a chiral vector of (n,m)=(8,0), and click Build.
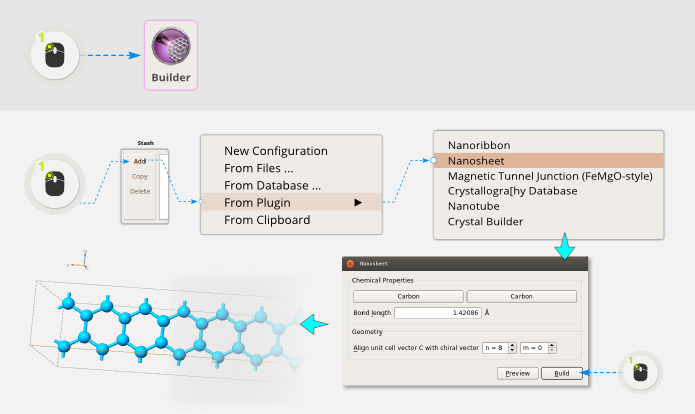
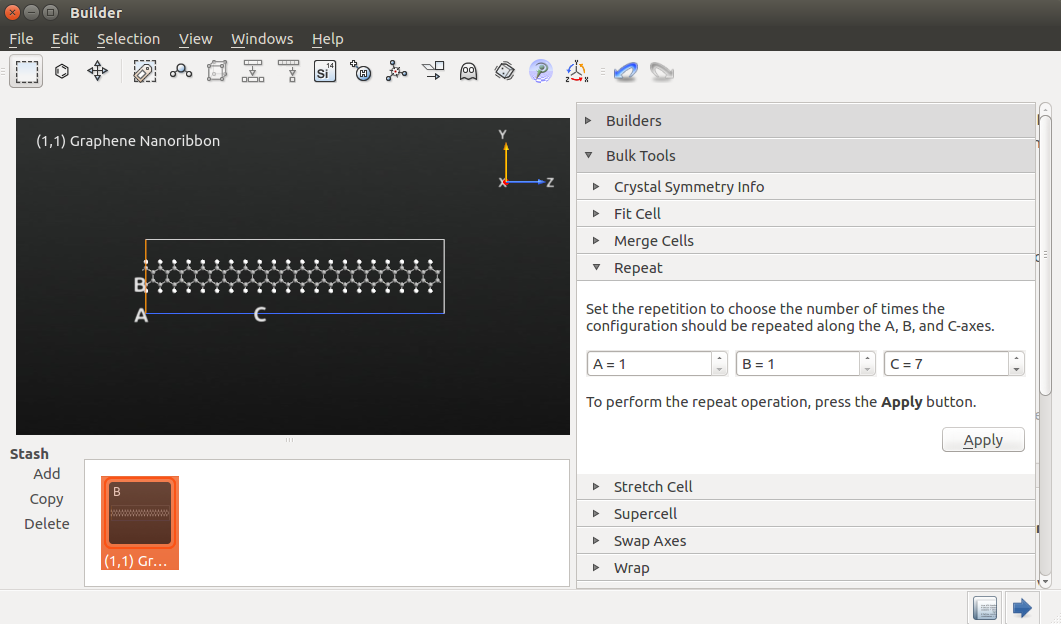
You now have a basic “building block” for the structure. Use the plugin to repeat it 10 times along the C-direction:

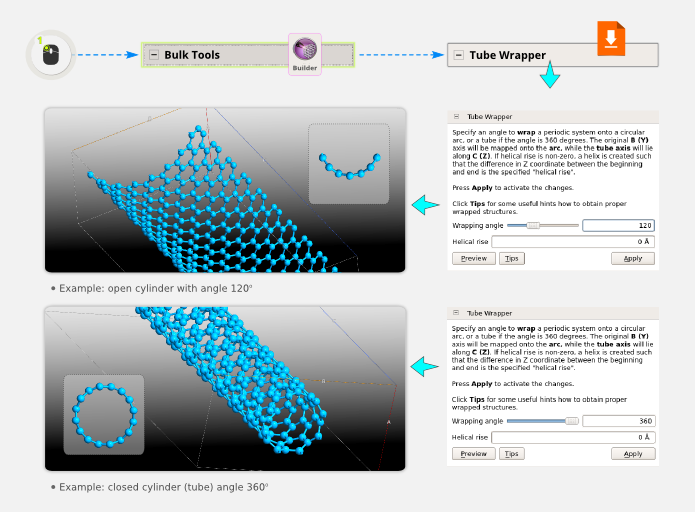
Build a CNT
You can now use the TubeWrapper plugin to wrap the nanosheet into a carbon nanotube (CNT). It is possible to turn the nanosheet into an open or a closed cylinder:
Transmission spectrum of a GNR
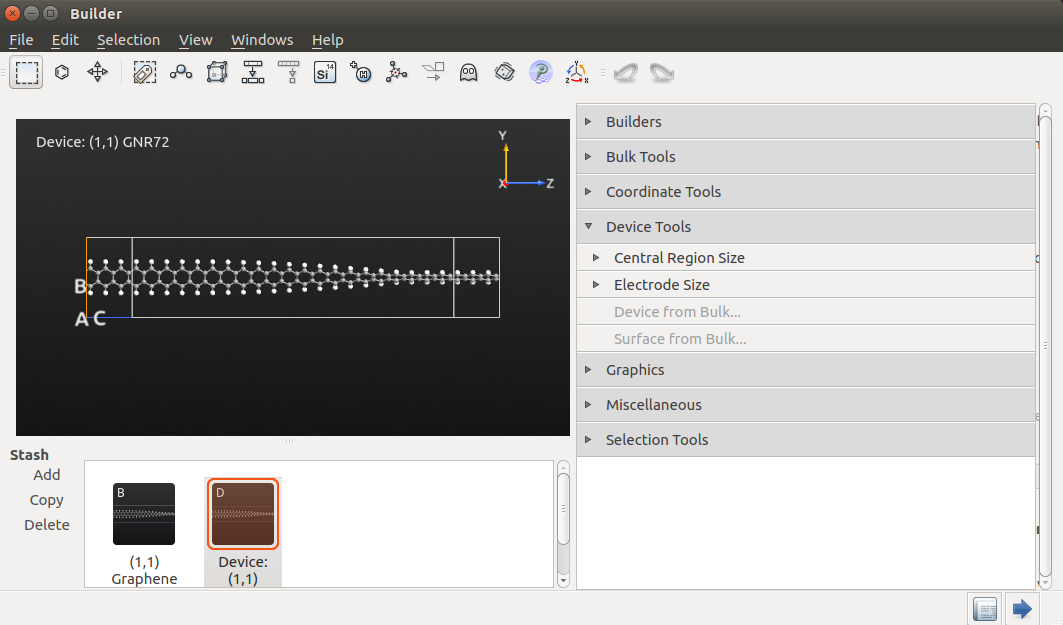
Let us calculate the electronic transmission spectrun of a graphene nanoribbon (GNR). First, build the ribbon using the plugin. Choose chiral indices (n,m)=(1,1) and repeat the structure 3 times the C-direction:
Note
In order to correctly calculate the transmission spectrum for a bulk system, the bulk must qualify as a valid device electrode. This requires that the C-axis is perpendicular to the A,B plane, and that it is sufficiently long that the atoms in the unit cell only have Hamiltonian matrix elements with atoms in the nearest neighbour cells along C. This condition is usually fullfilled if the C-vector is longer than 7 Å.
Next, transfer the structure to the Script Generator  using the
  botton, and double-click the
  New Calculator icon to add a calculator block to the script.
First, change the default output file to
ribbon11_bulk.hdf5.Then open the added calculator block to start editing the settings.
Select the Extended Huckel calculator, and make sure the number of k-points is 1 for the A and B directions, and high for the C-direction, e.g. 100 k-points along C.
In the Huckel basis set options, select Cerda.Carbon [graphite] for carbon and Cerda.Hydrogen [C2H4] for hydrogen.
Finally, add a
 TransmissionSpectrum block to the script,
and save the Python script as
TransmissionSpectrum block to the script,
and save the Python script as ribbon11_bulk.py.
Send the script to the Job Manager  in order to execute it.
The job starts when you click the
in order to execute it.
The job starts when you click the  icon.
icon.
When the calculation is finished (it will run extremely fast), locate the output file ribbon11_twist0_nscf.hdf5 in the QuantumATK file browser window. Select the file and notice that the contents of the file are displayed in the QuantumATK panel:

You can now select the TransmissionSpectrum object, which has this icon:
 and use the 2D Plot or Transmission Analyzer plugins to plot
the electronic transmission spectrum.
and use the 2D Plot or Transmission Analyzer plugins to plot
the electronic transmission spectrum.
Twisted nanoribbon
In this section you will learn how to twist a graphene nanoribbon using the QuantumATK Twister plugin, and then compute the transmission spectrum.
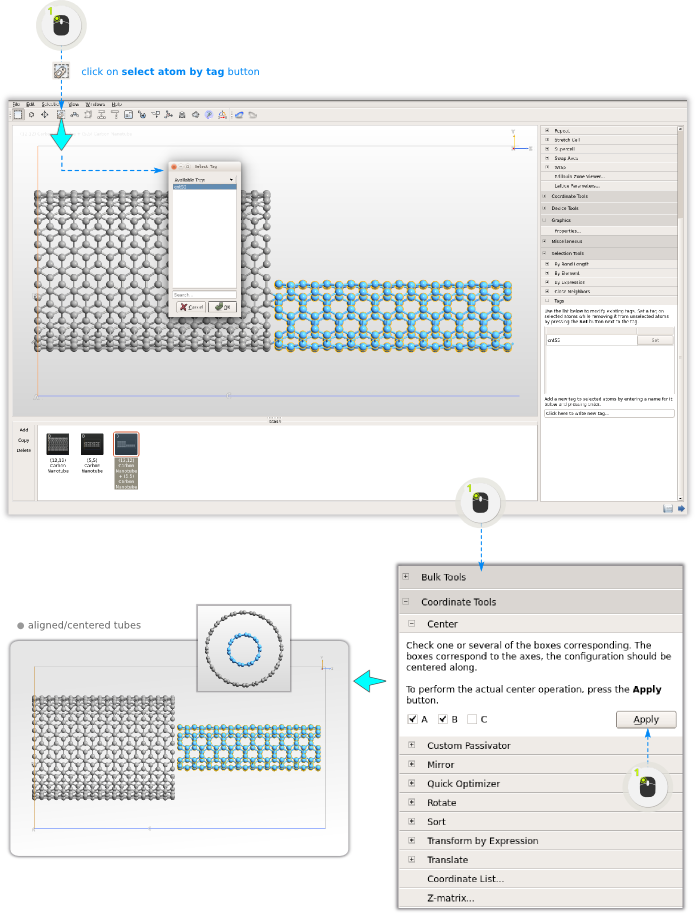
Open the Builder, and select the nanoribbon created in
the previous section. Then use the
tool to repeat the configuration 7 times in the C direction:
Then open the plugin, and set a “Twist angle” of 72 degrees and a “Non-twisting zone” of 9 Å. Click Apply to perform the twisting operation.

Certain parts of the system to the left and right of the structure are not twisted; the length of the non-twisted part is specified by the value of “Non-twisting zone”. The rest of the structure is twisted by the sepcified angle.
Transmission spectrum
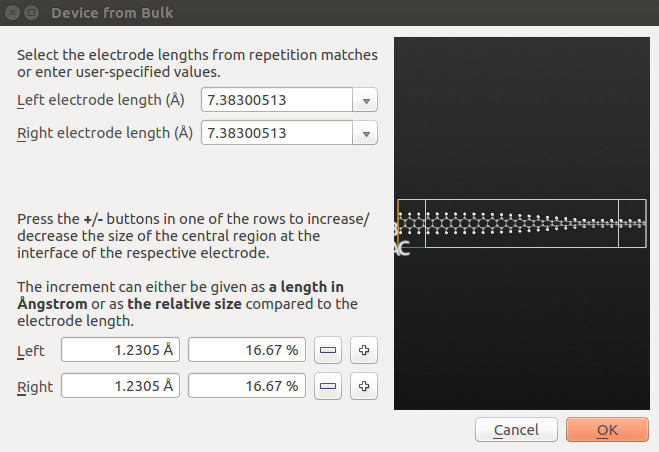
You will now calculate the transmission spectrum of the twisted graphene nanoribbon. First, you need to convert the twisteds ribbon into a device – use the tool for this.
Then rename the device configuration as GNR_twist and send it to
the Script Generator to create the required
ATK Python script.
In the Scripter, add the following script blocks:
- New Calculator
- Transmission Spectrum
Open the New Calculator block and use the following settings:
“ATK-SE: Extended Hückel (Device)” calculator;
1x1x100 k-point grid;
“Cerda.Carbon [graphite]” basis set for C and “Cerda.Hydrogen[C2H4]” basis set for H.
Select the following settings in TransmissionSpectrum block:
energy range of [-1,1] eV and 201 energy points;
Krylov self-energy calculator;
1x1 k-point grid.
Then save the script as GNR_twist.py and execute it using the
Job Manager. This calculation will take just a few minutes.
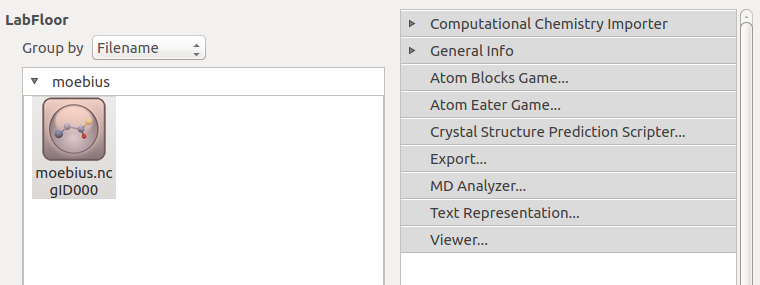
The HDF5 data file GNR_twist.hdf5 should now have appeared on the QuantumATK LabFloor.
Select the TransmissionSpectrum item and use the Transmission Analyzer plugin
to visualize the computed transmission spectrum.
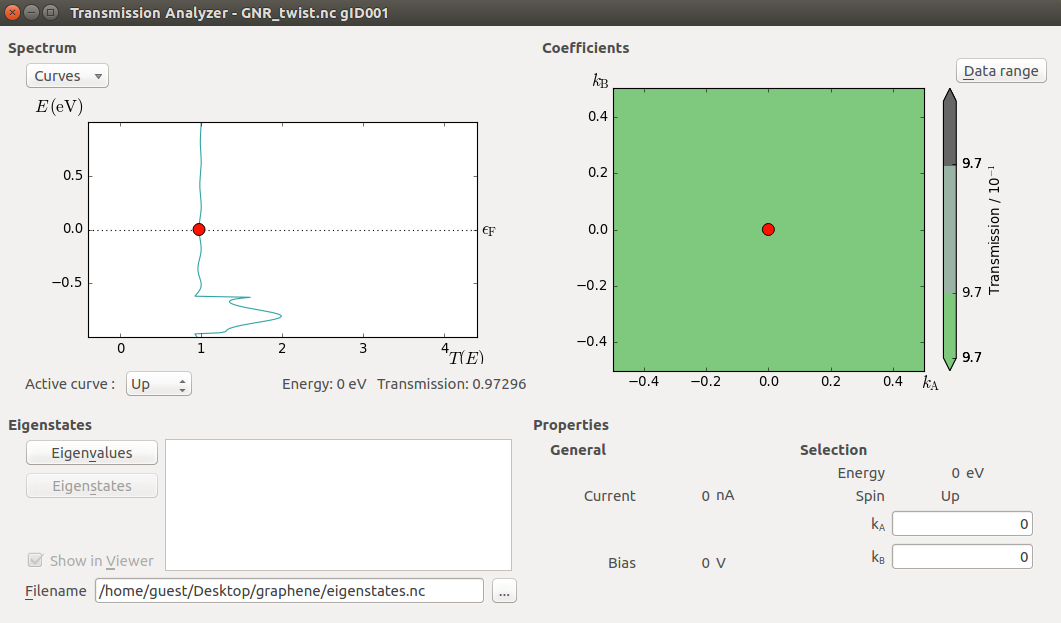
Note that the transmission peak has shifted down in energy as compared to the non-twisted ribbon. The twist represents a source of electron scattering, since it breaks the translational symmetry of the non-twisted ribbon electrodes along the transport direction.
Möbius nanoribbon
Next, we are going to create a Möbius nanoribbon. Download the script Moebius.py,
which is also reproduced below. The script loads a basic nanoribbon from the file
nanoribbon.hdf5, then performs the required operations of repeating,
twisting, and wrapping the ribbon, and finally saves the Möbius ribbon in
moebius.hdf5.
 1from NL.Math.Utilities import rotationMatrix
 2import math
 3from QuantumATK import *
 4
 5def twister_displacement(x, rotation_angle_per_z, rotation_axis,
 6                 rotation_axis_center, z_start, z_end):
 7    """
 8       Function for twisting a 1-d structure
 9       @param x : Coordinates of 1-d structure
10       @param rotation_angle_per_z : size of twist in angle/length
11       @param rotation_axis : axis to apply twist along
12       @param rotation_axis_center : center of the rotation axis
13       @param z_start : z value for starting the twist
14       @param z_end : z value for ending the twist
15    """
16
17    # do not twist for z > z_end
18    z = x[2]
19    z = min(z,z_end)
20    # do not twist for z < z_start
21    z = z - z_start
22    z = max (z,0.0)
23    # find twist angle
24    theta = z*rotation_angle_per_z
25    # calculate the rotation matrix
26    rotation_matrix = rotationMatrix(theta, *rotation_axis)
27    # apply rotation
28    return rotation_axis_center+numpy.dot(rotation_matrix, x-rotation_axis_center)
29
30def wrapping_displacement(x, width, wrapping_angle):
31    """
32       Function for converting a nanosheet coordinate into a partly wrapped nanotube
33       @param x : Coordinates of nanosheet atom
34       @param width : Width of the nano-sheet
35       @param wrapping_angle : maximum wrapping angle of the nanotube in radians
36    """
37    # calculate the average radius of the incomplete wrapped tube
38    radius = width/wrapping_angle
39    # find the angle of the current atom
40    angle = (x[2]-width/2.)/radius
41    # calculate the radius of the current atom
42    atom_radius = radius+x[1]
43
44    # return atom position of the wrapped atom
45    return numpy.array([x[0], atom_radius*math.cos(angle),atom_radius*math.sin(angle)])
46
47def Moebius(ribbon, n, m, repetition):
48    """
49       Function for generating a moebius molecule
50       @param n : Chiral vector index
51       @param m : Chiral vector index
52       @param repetition : Repetition along z
53    """
54
55    # build n,m ribbon
56    #ribbon = NanoRibbon(n,m)
57    ribbon = ribbon.repeat(1,1,repetition)
58
59    # get properties of the ribbon
60    lattice = ribbon.bravaisLattice()
61    elements = ribbon.elements()
62    cartesian_coordinates=ribbon.cartesianCoordinates().inUnitsOf(Angstrom)
63
64    # calculate the length of the 1-d structure
65    z_length = numpy.linalg.norm(lattice.primitiveVectors()[2].inUnitsOf(Angstrom))
66
67    # calculate twist parameters
68    rotation_angle_per_z =  math.pi /z_length
69    rotation_axis = numpy.array([0,0,1])
70    rotation_axis_center = numpy.sum(cartesian_coordinates,axis=0)/len(cartesian_coordinates)
71
72    # define a function of one variable, f(c),  for displacing the atoms
73    f = lambda c : twister_displacement(c, rotation_angle_per_z, rotation_axis,
74                                rotation_axis_center, 0.,z_length)
75    # apply the function to find new displaced coordinates
76    cartesian_coordinates = numpy.apply_along_axis(f, 1, cartesian_coordinates)
77    cartesian_center = numpy.sum(cartesian_coordinates,axis=0)/len(cartesian_coordinates)
78    cartesian_coordinates = cartesian_coordinates - cartesian_center
79
80
81    # define a function of one variable, f(c),  for displacing the atoms
82    f = lambda c : wrapping_displacement(c, z_length,2.0*math.pi)
83    # apply the function to find new displaced coordinates
84    cartesian_coordinates = numpy.apply_along_axis(f, 1, cartesian_coordinates)
85
86    return MoleculeConfiguration(
87            elements=elements,
88            cartesian_coordinates=cartesian_coordinates * Angstrom
89            )
90
91ribbon = nlread('ribbon.nc', BulkConfiguration)[-1]
92moebius = Moebius(ribbon,1,1,100)
93nlsave('moebius.nc', moebius)
You first need to build a basic nanoribbon. Use the
plugin and select, for example,
the chiral vector (n,m)=(6,6). Save the created ribbon in the Project Folder as
ribbon.hdf5.
Then make sure Moebius.py is also located in the Prpject Folder, and execute it using
the Job Manager or from the command line. The output file
moebious.hdf5 should appear in the Project Files list and the Möbius
configuration should appear on the LabFloor. Use the Viewer to visualize the
structure.

Buckling a graphene sheet
In this final section you will learn how to buckle a graphene sheet using the QuantumATK Buckler plugin.
First, create a nanosheet as shown above in section Build a graphene sheet. This time, repeat the nanosheet 30 times in the C direction.
Then open the plugin, and set the “Buckling amplitude” to 2 Å and the “Non-buckling zone” to 9 Å. Select “NY = 1” and “NZ = 1” to enable buckling along the Y and Z axes.
Click Apply to perform the buckling operation.
