MoS2 Nanotubes
A logical approach seems to be to first make a hexagonal sheet, just like graphene, and then wrap it into the shape of a tube. Indeed, such a TubeWrapper addon has been developed, and in this tutorial you will learn how to use it to build MoS2 and other transition metal sulfide TS2 nanotubes (T = W, Nb, Re), see Refs. [1] and [2].
Attention
The recipe is simple enough:
Create a bulk crystal of MoS2.
Change it into a monolayer.
Wrap it using the TubeWrapper addon.
This approach can then easily be adapted for other TS2 structures.
Step 1: Download the
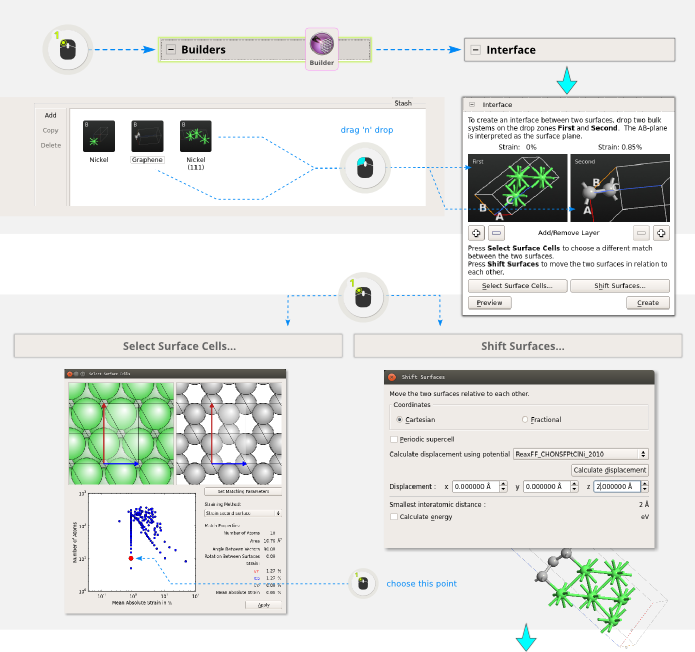
TubeWrapper.zipfile and install the addon following the instructions in the AddOns page.Step 2: Click and locate molybdenite. Add it to the Stash (clicking
 ). Use the mouse
to select and delete the three atoms to the right in the cell. This leaves
a single layer of MoS2. The cell is hexagonal cell, but to make the
tube it is necessary to have an orthorhombic supercell to work with.
Therefore, open and use the
settings illustrated below.
). Use the mouse
to select and delete the three atoms to the right in the cell. This leaves
a single layer of MoS2. The cell is hexagonal cell, but to make the
tube it is necessary to have an orthorhombic supercell to work with.
Therefore, open and use the
settings illustrated below.

Step 3: Open . You now have two choices: Repeat in A or B – this will give either armchair (A) or zigzag (B) tubes. Repeat some decent number, like 20 – the new size of the system in the repeated direction will directly determine the circumference of the tube.
Note
If you repeated in A, use and click A<->B then X<->Y to reorient the system. If you repeated in B, skip this step.

Step 4: Using , click C<->A then X<->Z (do this regardless of whether you repeated in A or B):

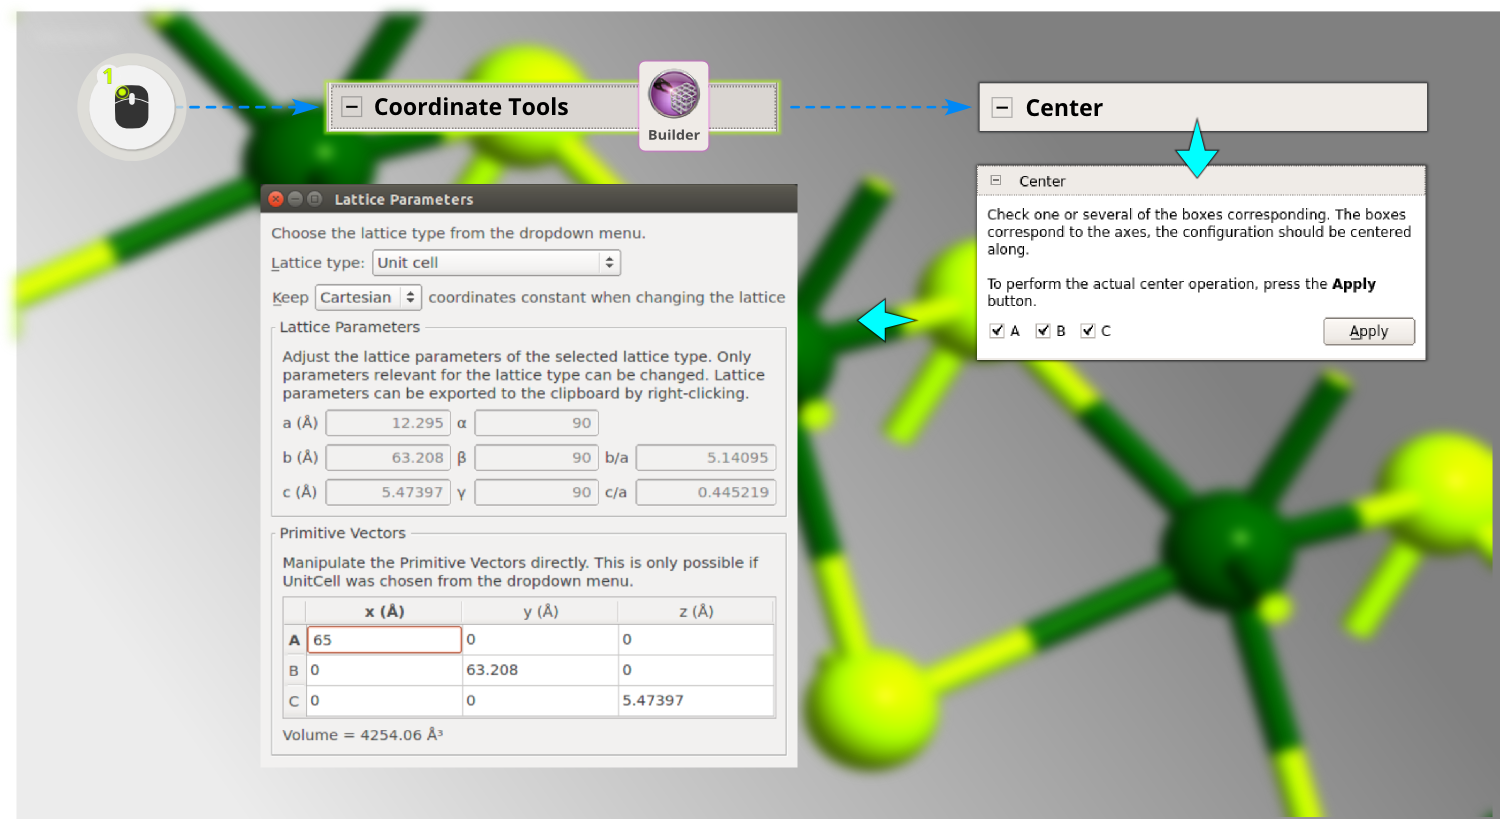
Step 5: Open and select Cartesian coordinates. Then change the first cell vector A so that the size of the cell in X is at least as large as in Y. Open and center the system.
Step 6: Finally, open the plugin you just installed, and wrap the tube. You can use 360 degrees directly to get a fully wrapped tube, or perhaps 180 degrees for some interesting novel work!

Step 7: In the end, it’s a good idea to adjust the cell size (it was necessary to keep it large during the building procedure) and then center the system in A and B and afterwards repeat in z direction:

Tip
What’s next? Now you can perform calculations on MoS2 nanotubes just as easily as CNTs. The DFTB model used in Ref. [2] is also available in QuantumATK, and you can request the Mo/S parameters from DFTB , and run QuantumATK with those. How to install DFTB parameters is described in another tutorial: The DFTB model in ATK-SE.
You can of course also use the method outlined here to make carbon nanotubes, even though the dedicated plugin is much faster to use for a perfect, simple CNT. An interesting example where the Tube Wrapper plugin is anyway useful also for CNTs is for the creation of Stone–Wales defects, which are much easier to define in for a mololayer sheet than for the rolled-up tube. Or, you can make “open” or partially wrapped nanotubes.
References