Installation Guide
Version: Y-2026.03
This guide describes how to install and configure QuantumATK on Windows and Linux. Note that you can skip some of the points if they do not apply in your case. We will describe the conditions for that in each section.
Note
Site information such as Site ID will be asked and checked by the installer, so it should be at hand when starting the process. You can find your site ID at the top of your license file or by contacting your site admininistrator.
If you experience any problems during the installation, first search the User Forum to see if a solution is posted there. If not, please file a case on the SolvNetPlus website (see below) or contact Synopsys QuantumATK support (quantumatk-support@synopsys.com).
QuantumATK can be expected to run out-of-the-box on Windows and Linux platforms (Windows 10+11 and all recent Linux distributions). In some cases, on Linux, there are a few libraries that may need to be installed, but this can always be done post-installation. Future support for platforms is outlined in the Synopsys Compute Platforms Roadmap
Access to SolvNet
The very first thing is to ensure that you have access to SolvNet, which is Synopsys’ software portal. Go to the SolvNetPlus website and create an account if you do not have one already. Note the following for account creation:
During the registration process you will need to provide your Synopsys Site ID. If you do not know your site ID, obtain it from your site administrator or from your sales representative.
You must provide your professional email address. GMail, Yahoo, and other general emails will not be approved.
Account activation can take up to 48 hours to be processed. If you have not received a confirmation email after this period, please contact securelogin@synopsys.com for assistance.
When you have successfully logged in, please proceed to the next step.
Access to a License Server
You now need to ensure that you have access to a license server. If there is already a license server running at your site, you may skip the section on installation of a license server. If you do not have access, you need to install a license server yourself to use the license. Proceed to either the guide for Windows or Linux, depending on the OS of the machine where you wish to install the license server.
Note
For Network or Nodelocked Licenses: Purchased licenses are issued as Network licenses. That means that a central server will handle the license, and any computer which can connect over the network to the server can check out a license and run the software. Evaluation licenses are nodelocked. The software is then constrained to running on a particular computer only.
Linux only: Download and use Synopsys Installer
In order to install EST images on your Linux system, a working installation of Synopsys Installer is required. The main reference should be Synopsys official documentation, here we summarize the most common steps:
In the official documentation linked above, find the link to the EFT directory and download the latest version of Synopsys Installer.
Inside the folder you will find a file named SynopsysInstaller_vX.X.run (where X.X is the version), execute it in a terminal with
./SynopsysInstaller_vX.X.run.The process will ask for the desired installation path and will quickly install Synopsys Installer at that location.
Execute Synopsys Installer:
If the text-based interface is sufficient, the installation is completed. Synopsys Installer executable is located at
<installation_path>/installerand can be executed in a terminal.If the graphical interface is desired, execute
<installation_path>/installer -guiand make sure a window is shown. If there appears any error related to a missinglibXss.so.1library (possible on a minimal installation), proceed to install the libXScrnSaver package.
The text-based and graphical interface will provide the same information and ask the same questions. There is also a batch mode (or unattended mode) available, to install EST images from a command line with limited human interaction. This mode can be useful when automating the installation on several machines and/or several products at the same time. For more information, see below the paragraph Batch Install on Linux.
Note
The EST image files should not be renamed, otherwise Synopsys Installer will not recognize them as valid product files. Therefore, the original name of the installation file downloaded from SolvNet should always be preserved.
Downloading, Installing and Configuring QuantumATK
You are now ready to install QuantumATK. First step is downloading the QuantumATK installation file.
Downloading QuantumATK
Log on to SolvNet
From the SolvNet front page click Downloads or point directly to https://solvnet.synopsys.com/DownloadCenter
Under My Product Releases choose the QuantumATK package assigned to your Site, i.e. a name of the form QuantumATK xxxxxx
Choose the latest product version from the list of available versions. i.e. the Y-2026.03 version.
After reading the legal page, Click on “Yes I agree to the above terms.”
Click the Download button next to the QuantumATK installation file corresponding to your operating system.
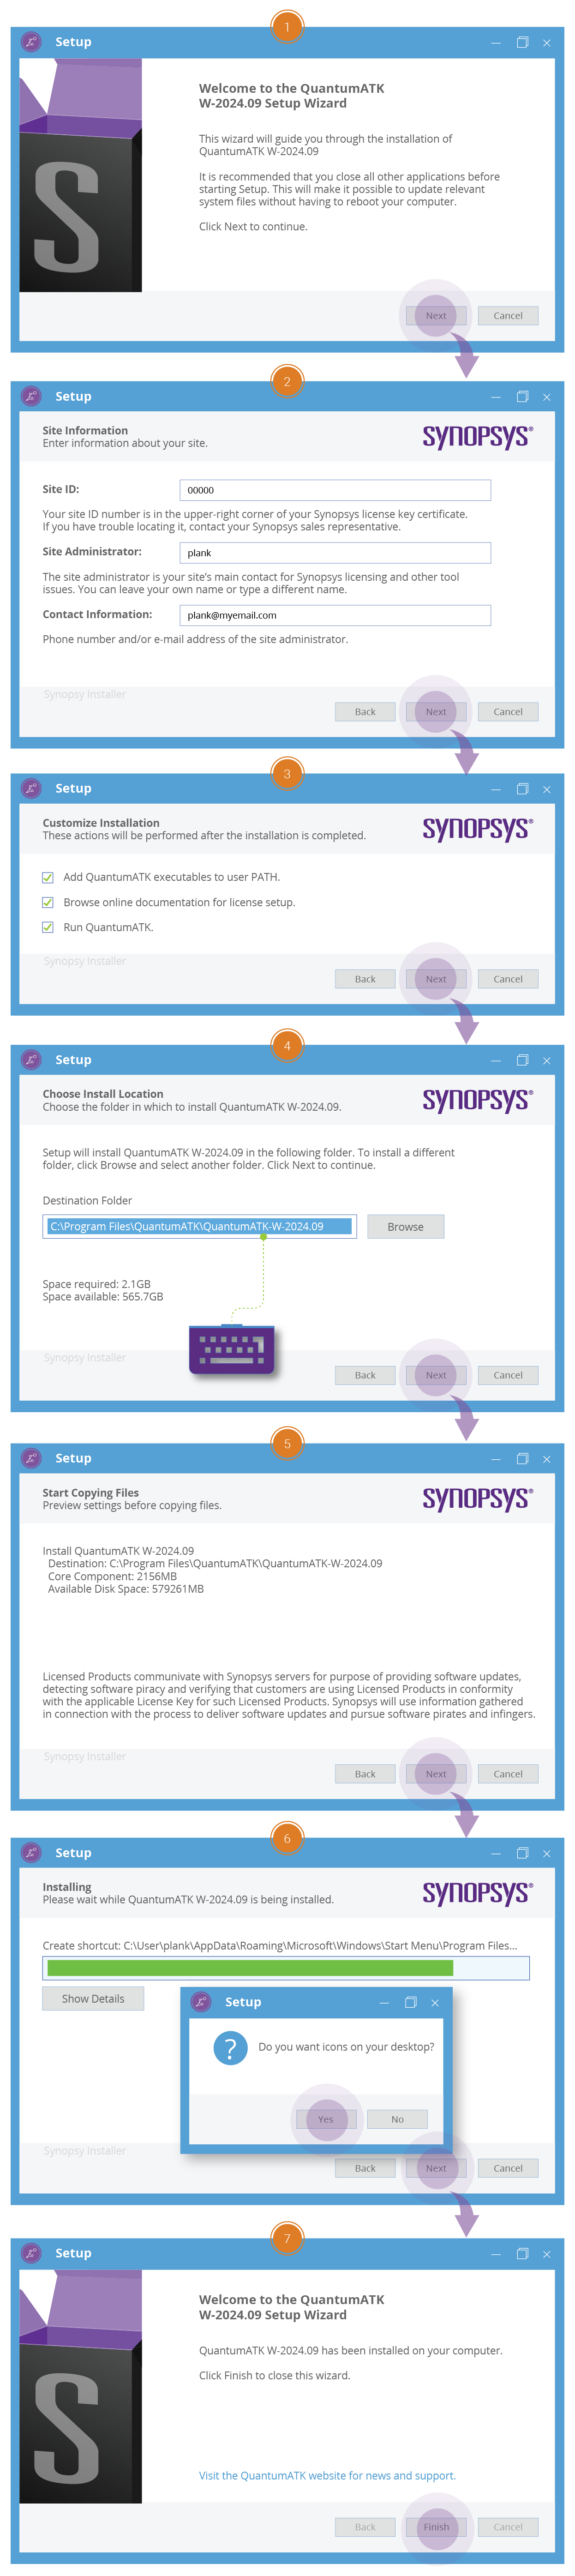
Installing QuantumATK
Windows
The installation file downloaded from SolvNet is a standalone executable. Right-click and choose “Run as administrator”, as QuantumATK must be installed with Administrator rights. Follow the step-by-step instructions to read and approve the license agreement, choose the installation directory, etc. From the final page of the installer you can open QuantumATK, and/or the license configuration tool.
Linux
The installation file downloaded from SolvNet is an EST image, with file extension .spf.
A working installation of Synopsys Installer is needed, in order to install an EST image.
If you do not have that available, jump to section Linux only: Download and use Synopsys Installer for additional instructions on this.
You can run the Synopsys Installer in text mode with the installer command, or in graphical mode with the installer -gui command.
The installer will guide you through the installation process by asking for the site information (site ID, administrator and contact), the location of the EST image (the .spf file cited above), the installation path and possibly additional options.
Note
On machines without a dedicated GPU and vendor-provided drivers, which might be the case for Linux and Virtual Machines, some users experience issues with the 3D graphics. For these machines, we recommend choosing “Software rendering” when installing and upgrading to a higher quality graphics setting after installation, if possible.
Silent Install on Windows
A silent install will not allow any of the customization steps of a graphical install apart from the choice of installation path. Open a CMD shell with administrator rights, it is important to use a CMD shell because the next step might fail in a PowerShell shell. Inside the shell run the following command:
.\path\to\QuantumATK-installer.exe /S /LICENSE="I accept"
The above command will install QuantumATK in the default location, you can choose a custom location with an additional command line option: /D=C:\path to\custom\location.
Note that this must be the last option on the command line and must not contain any quotes.
Batch Install on Linux
The main reference should again be Synopsys official documentation, but we summarize here the most common steps. In order to use the batch installer, a configuration file is needed. An initial template can be generated running the following command from the folder containing the EST image:
batch_installer -list -o <template_name>
Where <template_name> is the desired name for the configuration file and batch_installer is an executable shipped as part of Synopsys Installer.
The command above generates a template configuration file that can be customized.
The post-install arguments’ values can be modified as needed, since the default values are aimed at the interactive installation process.
Once the configuration file is ready, the batch install can be started with the command:
installer -batch_installer -config <template_name>
If the command complains about a missing -target argument, it can be provided followed by the chosen installation path.
Here is an example of how the generated configuration file will look.
SourceDir: /synopsys/downloads
SiteID: 000
SiteAdmin: admin
SiteContact: admin@your_company.com
PRODUCTS: quantumatk
RELEASES: Y-2026.03

quantumatk, Y-2026.03 {
  DESCRIPTION: Synopsys QuantumATK
  TARGETDIR: /home/user/synopsys
  POSTARGVALUE: softwareRendering (no)
  POSTARGVALUE: addToPath(yes)
  POSTARGVALUE: openLicenseDoc(no)
  POSTARGVALUE: runProgramAfterInstall(no)
}
Note
The batch installer will keep track of previous installations in a hidden folder at <installation_path>/.installer.
If there is a warning about an existing installation, but the actual QuantumATK installation folder no longer exists, try removing this hidden folder and execute the batch installer again.
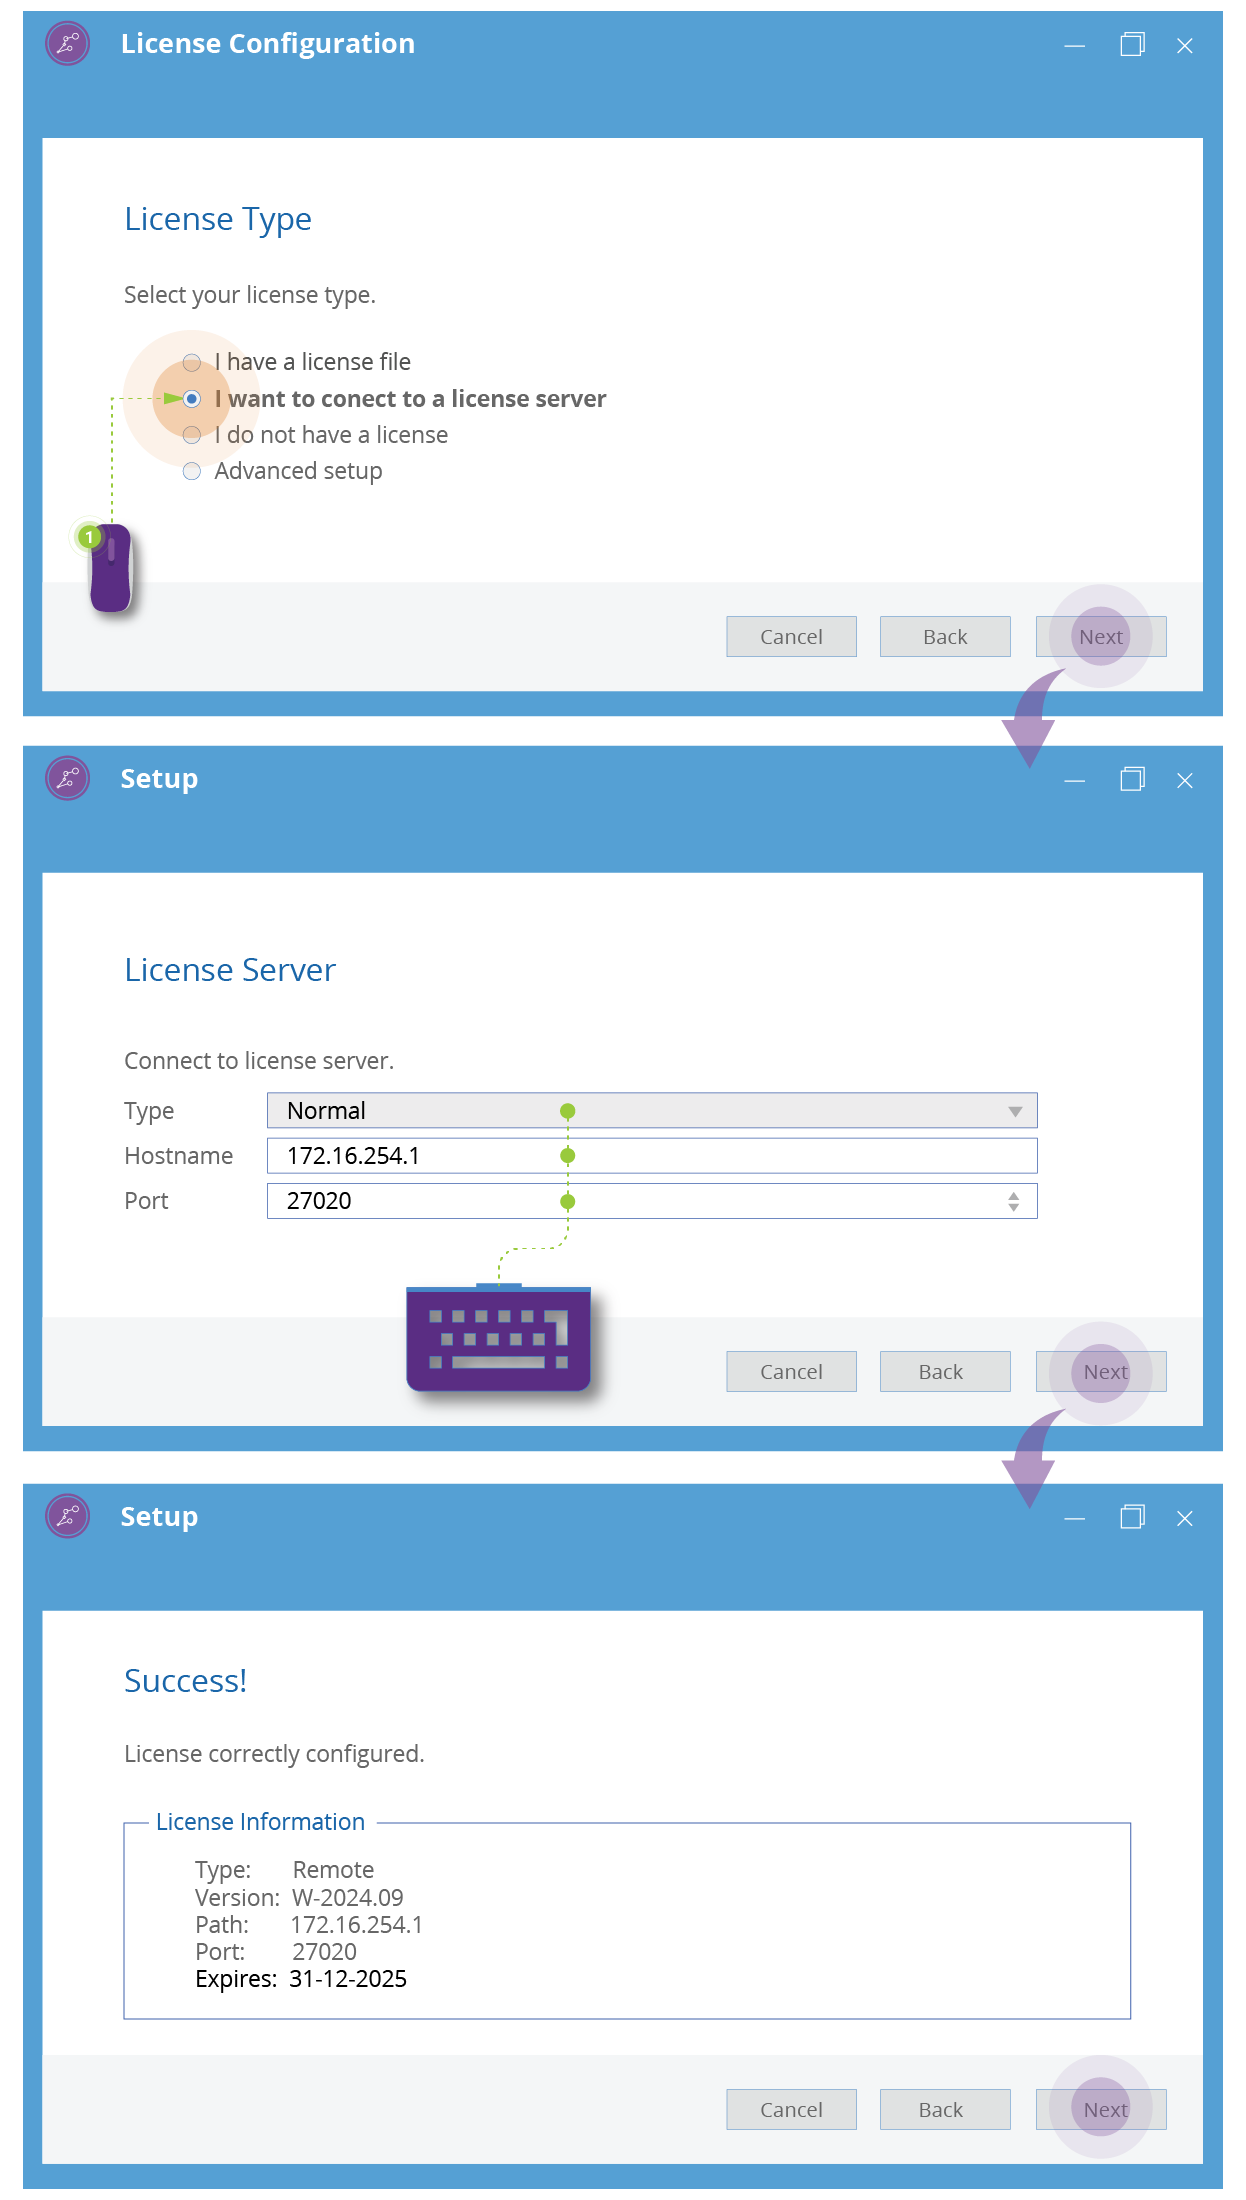
Configuring the QuantumATK License
If no valid license is detected when starting QuantumATK, then a step-by-step wizard will pop up and guide you through the license setup process. To connect to the license server, choose the corresponding option and enter the IP address or hostname of the license server. You only need to change the port number if the server is using a different port than the default 27020.
Note
If configuration is not successful you may want to verify the firewall of your machine or the one of the license server are not blocking port 27020 or whichever other port is used by the license server.
It is also possible to configure the license using environment variables on all platforms, though we recommend to configure the license system via the QuantumATK tool when possible.
Using environment variables is the only option on machines without any access to graphics, for example in some Linux-based clusters.
The license configuration can be controlled by the environment variable SNPSLMD_LICENSE_FILE.
Example for a Unix environment: export SNPSLMD_LICENSE_FILE="27020@mylicenseserver.edu"
System Requirements
For additional information about the technical characteristics of the system or platform that you want to install the software on, see the System Requirements section.
Using QuantumATK from the command line
Starting from QuantumATK X-2025.06, the installer will not add the QuantumATK executables to the system PATH on Linux and Windows.
The effect is that the newly installed QuantumATK executables are not available from the command line by default.
You can still run QuantumATK from the command line by using the full path to the executable, e.g. <installation_path>/bin/quantumatk or <installation_path>/bin/atkpython.
You can also opt to manually add <installation_path>/bin to the system path after the installation.
For example, on Linux using the Bash shell, one can add export PATH=<installation_path>/bin:$PATH to the ~/.bashrc file.
You can also use the QuantumATK environment script (activate_env) to prepare your command line environment. Users accustomed to Python virtual environments will find this approach familiar.
More on the QuantumATK environment script can be found in the Command Line Usage with QATK Shell Environments section.
Troubleshooting
- Slow Startup on Windows
- libGL.so: Cannot Open Shared Object File
- libGLU.so.1: Cannot Open Shared Object File
- Could Not Find or Load the Qt Platform Plugin “xcb”
- ATKError: Exceeded Maximum Number of Self-Consistent Iterations
- Failure to Initialize
- ImportError: No Module Named
- Pulay Mixing Inversion Failed. Using Only Last Step
- Why are so many k-points needed in the transport direction in a device calculation?
- ATKError: St9bad_alloc
- Runtime Terminates an Application
- Killed by Signal 9
- Not Enough Space to Allocate vblock
- Can’t Allocate Memory for Array
- ATKError: Bad Allocation
- ATKError: Inverse(DZMatrix const&) : Could Not LU Factorize!
- Cannot Run QuantumATK P-2019.03
- Network or Nodelocked Licenses
- License for QuantumATK Parallel Run
- Basic License Troubleshooting
- Advanced License Troubleshooting
- Maintenance, Updates and Support
- License and QuantumATK Upgrading
- Updating the License File
- License Server Cannot Be Started
- SSH License Server Access
- Restricting Access to a License Server