Building a molecular junction
Note
The work flow described below will walk you through a rather broad overview of the various tools in the Builder. The individual operations are not specific for this surface and this molecule, but can be applied to any other molecule or similar structure. This is the idea of the Builder - by applying a specific sequence of generic operations, you can easily build even highly specialized structures.
The recipe is quite simple and includes the following simple steps:
Construct the molecule. (Sometimes trivial, if you have it ready in the Database or as an external file; in our case we will modify benzene to make DTB.) Construct the surfaces, by cleaving the bulk crystal and creating a copy, to make two electrodes. Place the molecule on the surface of the left electrode, and connect the right electrode to the molecule. Finalize the device geometry.
The instructions below may appear a bit complicated, since each step contains many operations, but with a bit of training the whole process can be carried out in under 5 minutes. Also remember - if you make a mistake anywhere along the line, use Undo (Ctrl+Z)!
Benzene to DTB: Building the molecule
Step 1: Click and from the menu select . Locate benzene, and click the + icon in the lower right-hand corner to add the molecule to the stash.

Step 2: To convert the molecule to DTB, select two hydrogen atoms on opposite sides of the molecule by clicking them while holding down Ctrl. Then open the periodic table tool
 , and click Sulfur (S) element:

Step 3: Deselect all atoms by pressing Esc or clicking the background.
Step 4: The C-S bond lengths need to be adjusted. Select one pair of bonded C-S atoms, taking care to select the carbon atom first. So, Open and set the bond length to 1.75 Å. Note that the second selected atom moves, i.e. the S atom.

Step 5: Do the same for the other Carbon-Sulfur bond!
Cleaving gold into two surfaces
Step 6: Click and this time select from the menu. Locate Gold and add it to the stash.

Step 7: To cleave the gold crystal, open . Enter Miller indices h=1, k=1, l=1 and click .

Step 8: To make it easier to visually identify the three layers (ABC) in the fcc stacking sequence, change the gold atom in layer A to Ag and the one in layer C to Tl (these elements are just chosen to give nice colors).
Step 9: To make a large enough surface cell for the molecule, repeat the structure 3x3x2 times using . The 2x repetition in the C direction is needed so that we later can extract the electrode from the central region.

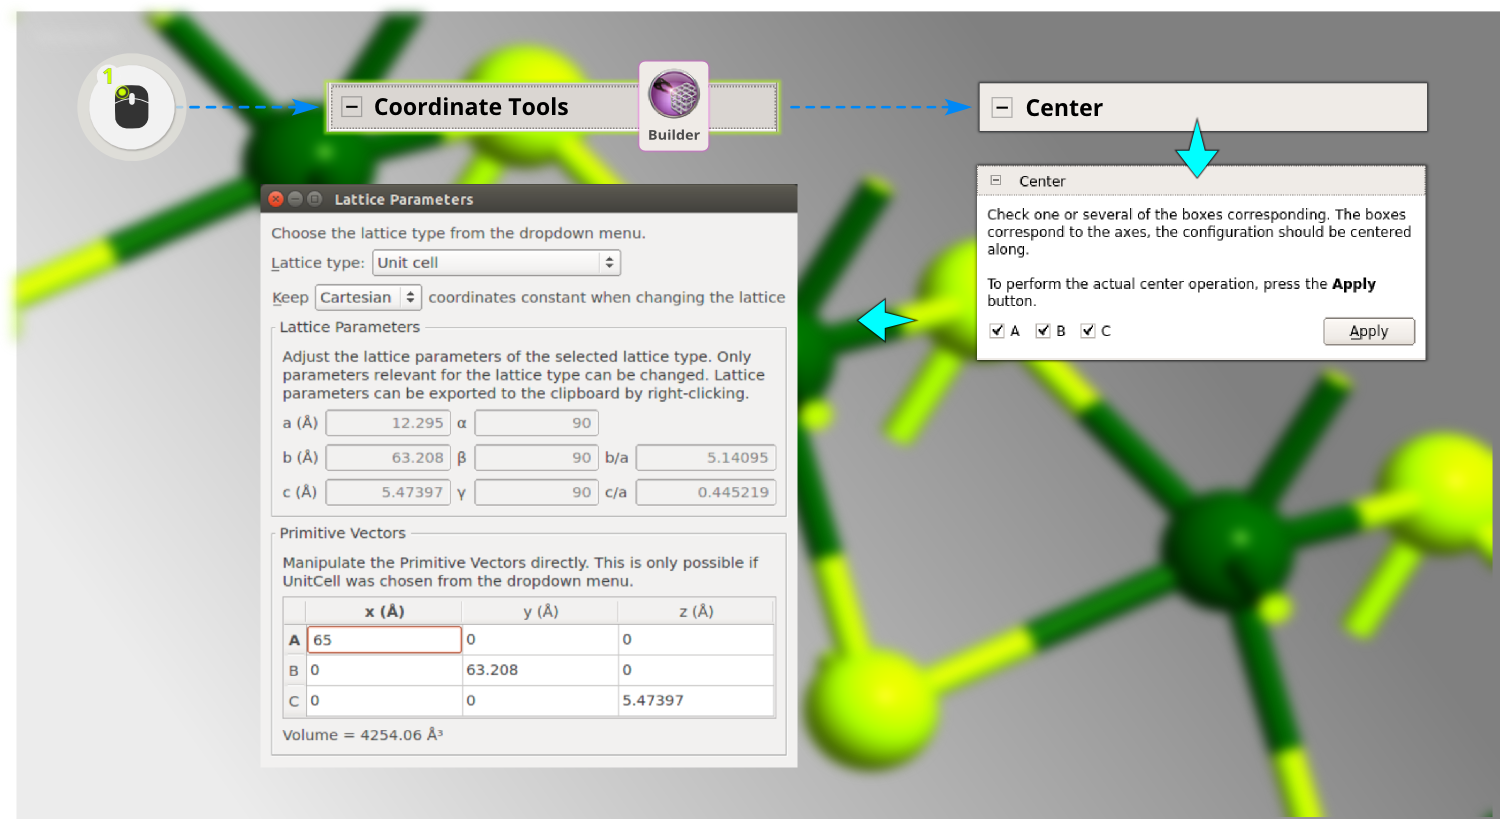
Step 10: You need to make some room for the molecule on the surface by adding vacuum. Open , select to keep Cartesian coordinates, and increase the C vector to 45 Å (still pointing along Z, as is necessary for a device).

You will now create an alignment point on the surface where we can attach the molecule.
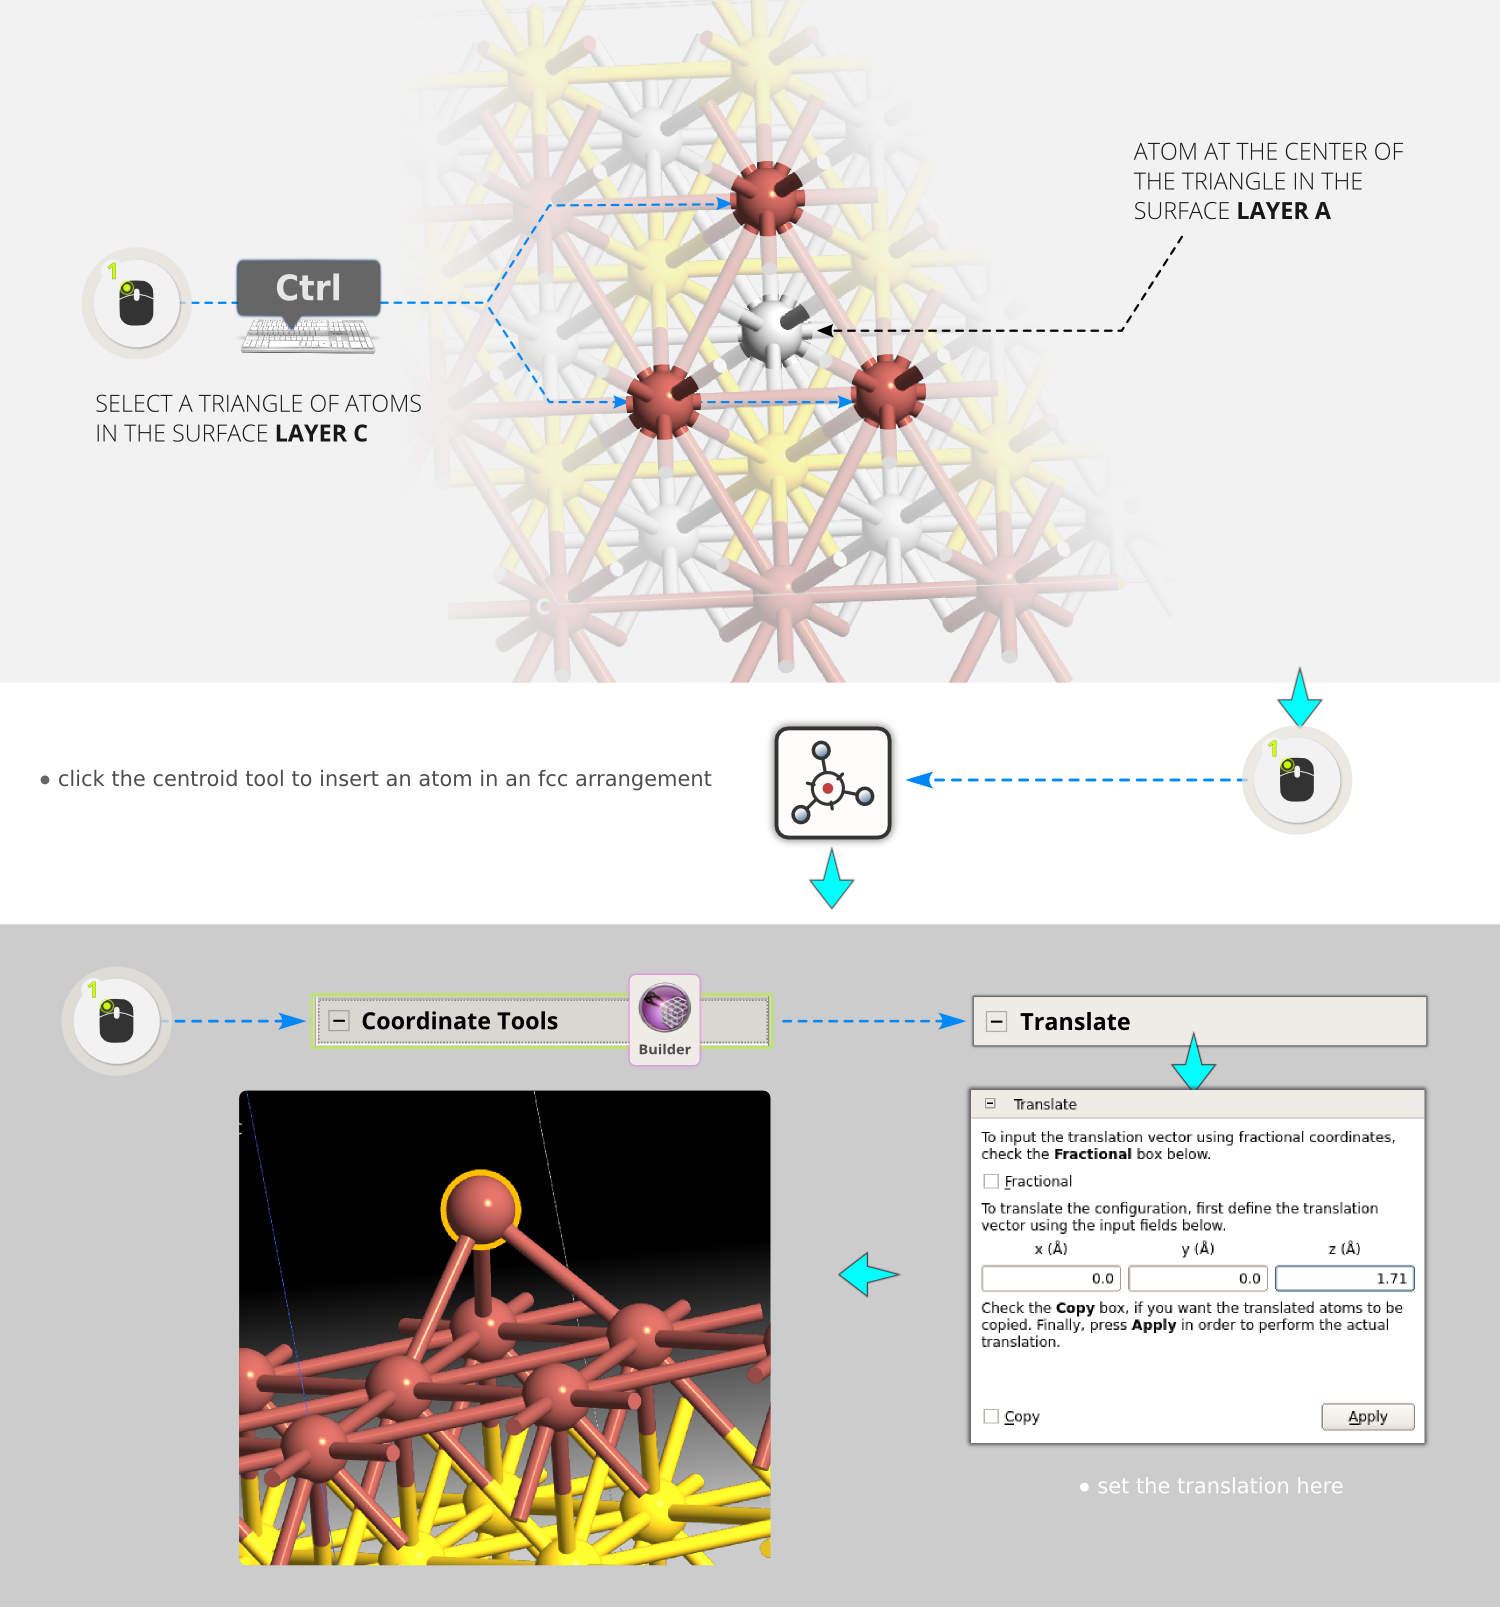
Step 11: Select three atoms in a triangle in the surface layer C (the Tl atoms), such that the center of the triangle is above a silver atom in the A layer. Press the centroid tool
 to insert another atom in the average position of the three selected atoms. By choosing these particular atoms, the inserted atom
sits in an fcc site, which is where we want to attach the molecule.
to insert another atom in the average position of the three selected atoms. By choosing these particular atoms, the inserted atom
sits in an fcc site, which is where we want to attach the molecule.Step 12: Use to move this atom 1.71 Å in the Z direction. (The value 1.71 Å gives an Au-S distance of 2.39 Å, taken from [1]).
Step 13: Press Ctrl+A to select all atoms, and switch them back to gold.
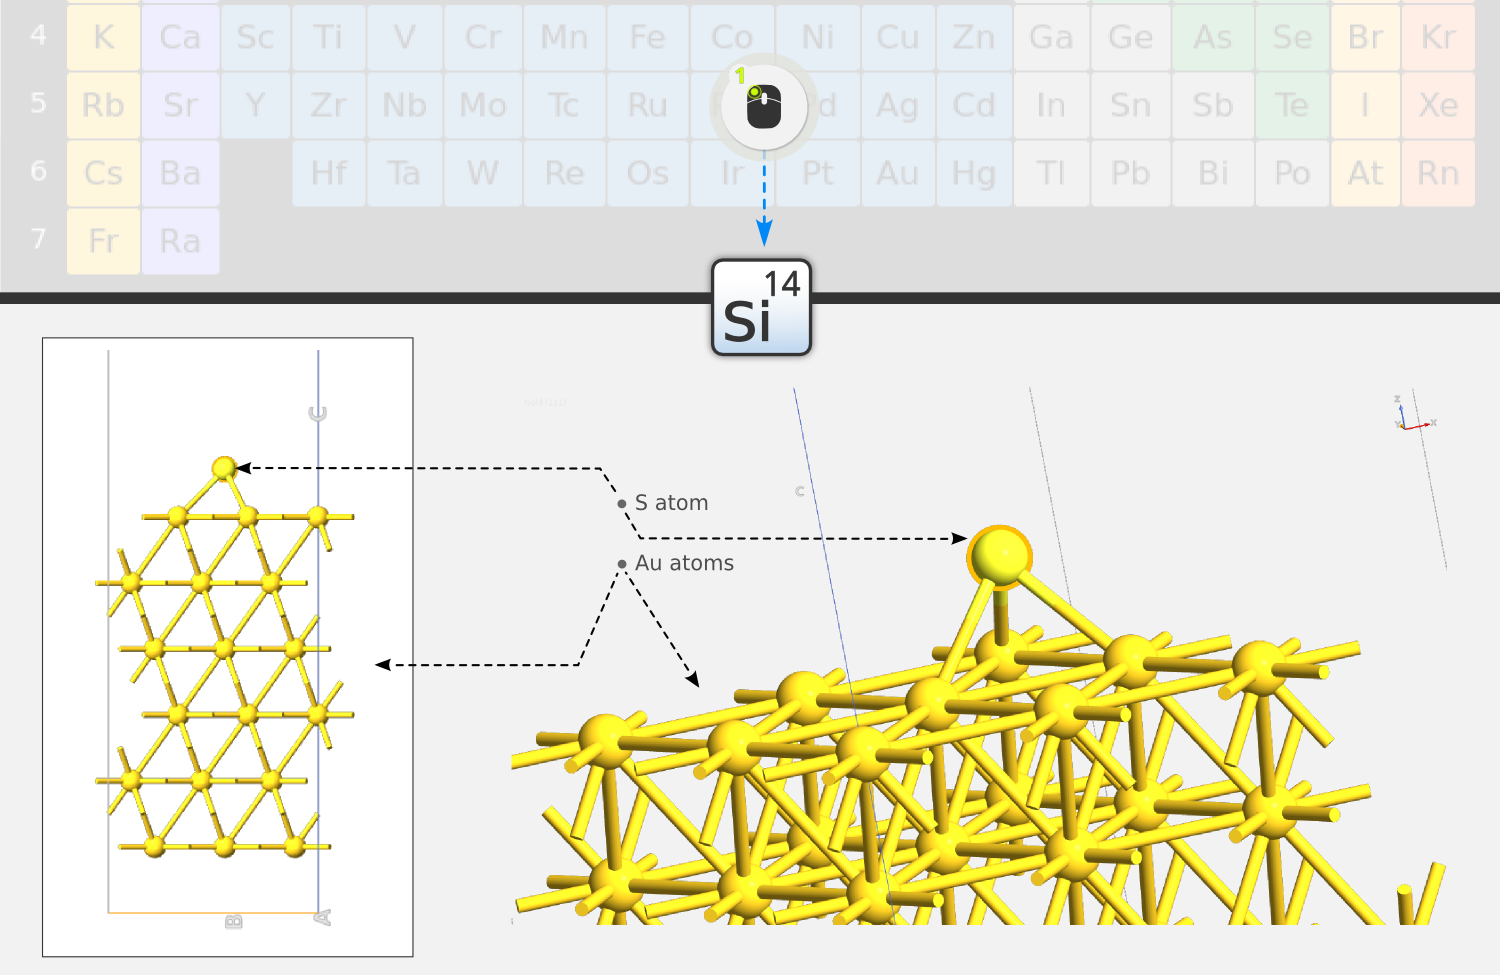
Step 14: Also, to make it easier to handle the alignment atom later on, convert it to sulfur.
Step 15: So far there is only one gold surface - there should be two. Therefore, press Ctrl+A again and open . Select “Fractional” coordinates and set P=[0,0,0.5]. Tick “Copy”, then press Apply.
Combining the molecule and the surfaces
Step 16: Add the benzene to the gold structure by dragging it from the stash onto the main window (where the gold surfaces are displayed). When the molecule is added, the Builder automatically activates Move mode.
Note
All atoms in the molecule are selected (indicated by the yellow circles around the atoms); in Move mode, you cannot change this selection, but you can appoint so-called anchor atoms which are used to translate and rotate the selection. Anchor atoms will be indicated by red circles.

Step 17: Click one of the sulfur atoms - it will become an anchor atom. Then drag it so that it ends up on top of the sulfur alignment atom on the left surface. Since “Snap” is on, it will latch on to the exact position of the alignment atom, indicated by the selection marker turning blue when the two atoms are on top of each other.
Step 18: Press Fuse - this removes one of the two overlapping sulfur atoms (the one in the surface is removed; atoms in the active selection are always kept when fusing).
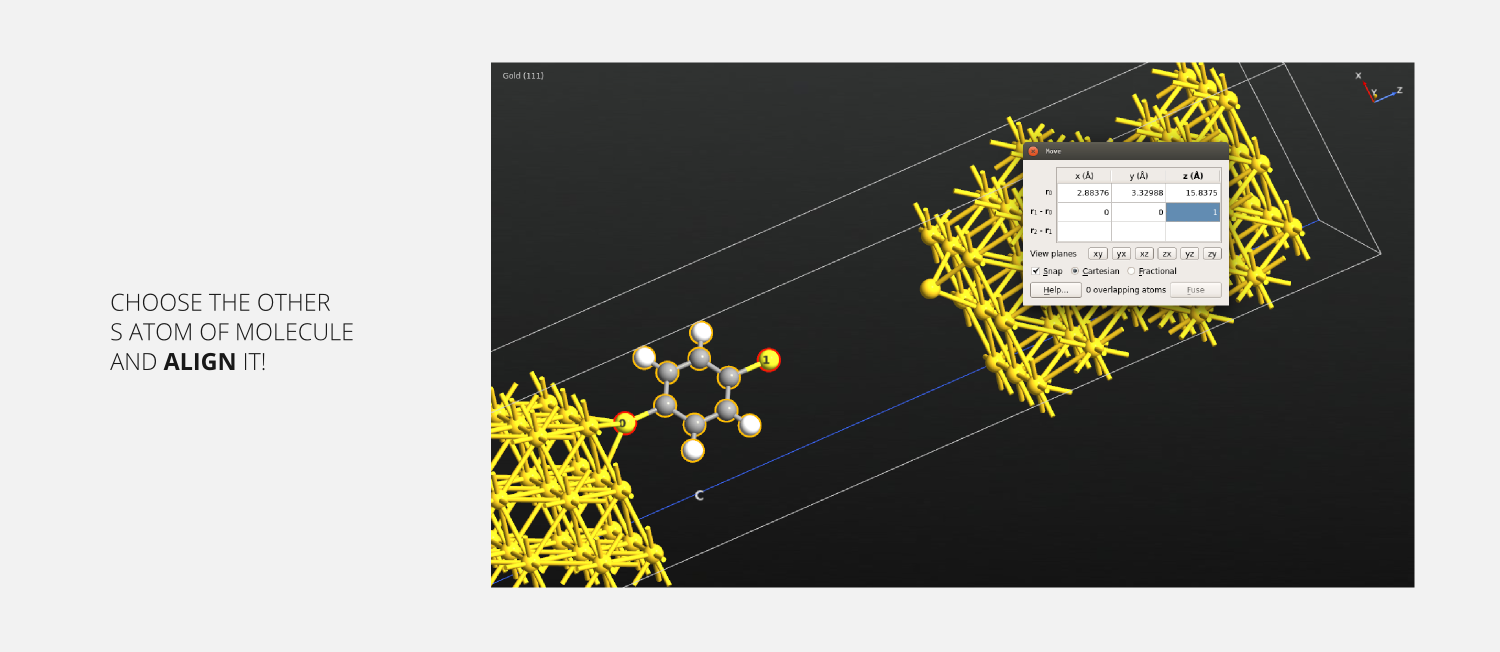
Step 19: Now click the other S atom (the first one will remain selected). Then enter [0,0,1] on the r1-r0 row of the Move tool widget. This aligns the two atoms - and hence the molecule along the Z axis. Close the Move tool widget.
Step 20: Select the second surface by holding down Ctrl while double-clicking one of the atoms in it. This selects all connected atoms.
Step 21: Enter Move mode
 again and click the sulfur alignment atom in the second surface to make it an anchor atom.
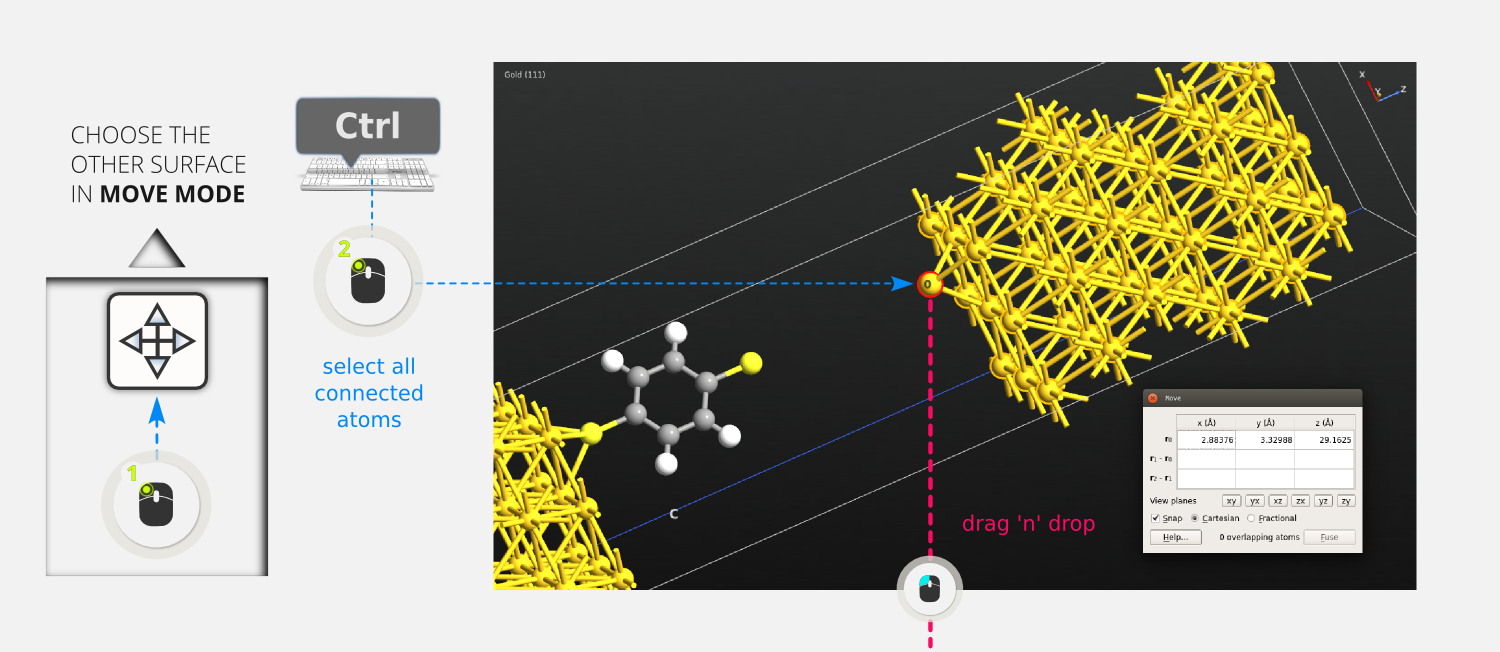
Step 22: Drag the right surface so that the anchor/alignment atom ends up on top of the sulfur atom on the free end of the DTB molecule.
Step 23: Press Fuse to remove one of the two overlapping sulfur atoms (the one in the molecule, this time). Close the Move tool widget.

You now have a complete central region, and the only thing remaining is to convert it to a device configuration.
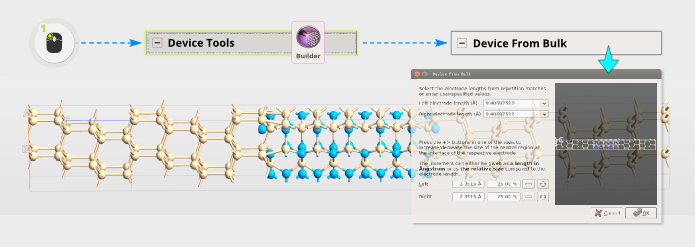
Converting the central region to a device configuration
Step 24 Open . The tool automatically figures out the size of the electrodes, since we repeated the gold (111) surface cell 2x in C.
Step 25: This is however a very large central region, which will take a long time to calculate. Therefore, reduce the left and right surfaces to four layers by clicking
 twice for each surface (left and right). Press OK and you are done!
Note
In order to optimize the geometry of the device you can read the Advanced device relaxation - manual workflow tutorial.