Polymer Builder
Version: Q-2019.12
In this tutorial you will learn how to use the  Polymer Builder
to build polymers such as
homopolymers and polymer blends, and how to include embedding
of molecules, nanoparticles, or a surface,
all using the Nanolab GUI.
The Polymer Builder is introduced with the Q-2019.12 version of QuantumATK.
After building the inital polymer model,
you can proceed to perform realistic atomistic simulations for studies
of the polymer properties such as polymer melting, glass transition temperature,
mechanical properties, miscibilty, and so on.
Polymer Builder
to build polymers such as
homopolymers and polymer blends, and how to include embedding
of molecules, nanoparticles, or a surface,
all using the Nanolab GUI.
The Polymer Builder is introduced with the Q-2019.12 version of QuantumATK.
After building the inital polymer model,
you can proceed to perform realistic atomistic simulations for studies
of the polymer properties such as polymer melting, glass transition temperature,
mechanical properties, miscibilty, and so on.
This tutuorial guides how to build an initial polymer
using the PolymerBuilder script block located in the
 Script Generator.
Procedure of the Polymer Builder
Open the
Script Generator.Add the
PolymerBuilder block under the Generator into the the templates.
Note
The PolymerBuilder object is located in Script
Generator not in  Builder.
Monomers of polymer sequences are stored in the Monomer Database
which is newly implemented in Q-2019.12.
You can also create and add customized monomers into the Monomer Database.
You will learn it in the Customized monomer section of tutorial.
Builder.
Monomers of polymer sequences are stored in the Monomer Database
which is newly implemented in Q-2019.12.
You can also create and add customized monomers into the Monomer Database.
You will learn it in the Customized monomer section of tutorial.
Decide the polymer sequences. In the Polymer Sequence A, you see
Homopolymer,Random,Alternating. TheHomopolymerbuilds one main monomer chain, whileRandomandAlternatingcan build the polymer chains consisting more than two monomers randomly or alternatively. When you click the small question sign, you get a short description such as the below figure.

Tacticity or Sequence contamination is in a range of 0 and 1.
And the number of monomer per chain and the number of chains are each 20 as a default.
You can also add the different polymer sequence clicking the button of Add Sequence.
When you select the monomer, start group, or end group,
Monomer Database will be pop-up automatically.
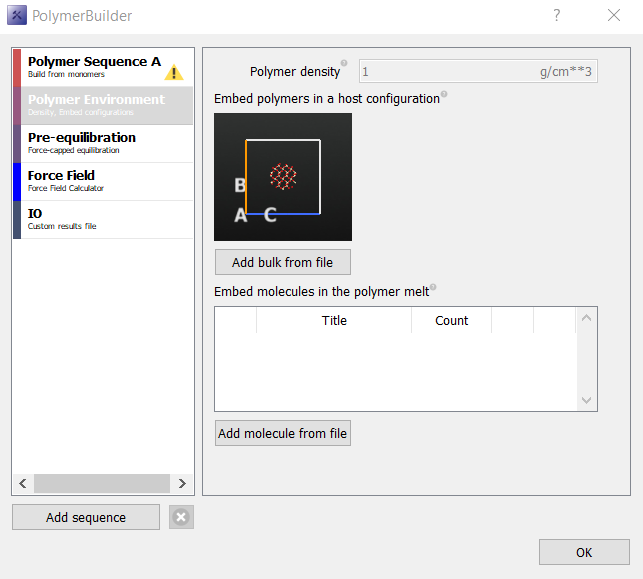
In the Polymer Enviroment, you can set up the polymer density and embeded host configuration and molecules. PolymerBuilder builds melted polymer with a defined density controlling a periodic box size. But in the embedded case with a host configuraiton, polymers are packed in the periodic box of host configuration. And many applications include not only polymer, but also nanoparticles, surfaces or molecules. You can setup to build polymer with embedded other material types.
Polymer Monte Carlo
PolymerMonteCarloBuilderruns with above defined conditions.Pre-equilibration is performed after Polymer Monte Carlo. It is using the Force-Capped Molecular Dyanmics
ForceCappedMolecularDynamics. Initial configuration by Polymer Monte Carlo includes overlapped atoms or artifically closed atoms. Optimization and Force-capped molecular dynamics run to make a reasonable configuration.PolymerBuilder runs by
DreidingorOPLSforce field. The desired polymer system should be parameterized inDreidingDreidingPotentialBuilderorOPLSOPLSPotentialBuilderforce field types.Run it using the
 Job manager.
Polymer is usually much larger than molecular/bulk system.
Due to the number of atoms and scale of size,
it takes a bit longer time, especially for the pre-equilibrium step.
Job manager.
Polymer is usually much larger than molecular/bulk system.
Due to the number of atoms and scale of size,
it takes a bit longer time, especially for the pre-equilibrium step.
Homopolymer
You will build polyvinylidene fluoride (PVDF) polymer as an example.
Open the
PolymerBuilder.In the Polymer Sequance A, see
Homopolymer. You can create a polymer model from a single monomer in this section.Click the
Select monomerto load the monomer. It is pop-up the Monomer Database which includes common monomers.Select
tetrafluroethyleneto build the polyvinylidene fluoride (PVDF). There is an option to define the tactic ratio.Isotacticis0andSyndiotacticis1. Default isAtaticwith0.5ratio of isotactic and syndiotactic. You can also customize the atatic ratio in theCustom.Move to the Polymer Environment. You can set the desired density with a unit of g/cm 3. Change the density into
1.78g/cm 3 in experiment for PVDF.
You can also see the Pre-equilibration section.
After generating an initial polymer model by Polymer Monte Carlo,
PolymerBuilder follows the pre-equilibration using the Force-capped equilibration method.
It is for preventing the overlapping or artifically closed atoms.
Detailed information is documented in the manual page, ForceCappedEquilibration.
You will keep the default condition for others.
Change the output file as
pvdf.hdf5and open the Editor to confirm the settings as an input script.
You can see the following information in the input python file.
The first part of script shows the definition of monomer configuration as MoleculeConfiguration
with information of tags and bonds using the Dreiding or OPLS force field.
QuantumATK PolymerBuilder includes the Dreiding or OPLS force field.
The Dreiding force field is much simpler than OPLS force field.
PolymerBuilder can automatically indicate the types of Dreiding force field.
Therefore, when you use Dreiding force field, you don’t need to add the tags manually.
But it is too simple not to describe the tacticity or partial charge.
On the other hand, the OPLS force field is able to consider the tacticity
and partial charge of atomic types.
It is more complex but more accuracy.
You can use it adding tags connected to the OPLS parameters
for monomer configuration.
PolymerBuilder uses the Dreiding and OPLS force field parameters
to build a polymer model using the Polymer Monte Carlo and
Force capped equilibration.
In the following section as shown in the below script, polymer Monte Carlo builder is defined.
After building an initial polymer, pre-equilibration will be performed
using the force capped equilibarion method.
Force capped equilibration will run 4 cycles.
Each simulation runs 40,000 times with 0.5 fs timestep as a default.
The OPLS potential is used in Force capped equilibration.
# -------------------------------------------------------------
# Polymer Monte Carlo Builder
# -------------------------------------------------------------
polymer_builder = PolymerMonteCarloBuilder(
    polymer_sequence=polymer_sequences,
    density=1.7800*gram/cm**3,
    monte_carlo_temperature=300.0*Kelvin,
    angle_sampling_points=20,
    repack_molecules=False,
    )
bulk_configuration = polymer_builder.buildPolymerConfiguration()

# -------------------------------------------------------------
# Calculator for Force Capped Equilibration
# -------------------------------------------------------------
potential_builder = DreidingPotentialBuilder(
    include_electrostatic=False,
    )
calculator = potential_builder.createCalculator(bulk_configuration)
bulk_configuration.setCalculator(calculator)

# -------------------------------------------------------------
# Force Capped Equilibration
# -------------------------------------------------------------
equilibration_method = ForceCappedEquilibration(
    temperature=300.00*Kelvin,
    md_steps_per_force_capped_simulation=40000,
    md_time_step=0.50*fs,
    force_capped_simulations=4,
    starting_factor=1.040,
    ending_factor=0.800,
    fixed_indices=None,
    )
bulk_configuration = equilibration_method.runEquilibration(bulk_configuration)
nlsave('pvdf.hdf5', bulk_configuration)

# -------------------------------------------------------------
# Calculator
# -------------------------------------------------------------
potential_builder = OPLSPotentialBuilder(
    lennard_jones_cutoff=10.0*Angstrom,
    electrostatic_accuracy=0.0001,
    )
calculator = potential_builder.createCalculator(bulk_configuration)
bulk_configuration.setCalculator(calculator)
nlsave('pvdf.hdf5', bulk_configuration)
Now you are ready to run the script.
Go to the Job manager
after saving the script as pvdf.py.
It takes around 15 minutes on your laptop.
After the job finishes, you can visualize the results using the  Viewer.
.. , when you select the
Viewer.
.. , when you select the pvdf.hdf5,
.. you can see 2 objects of BulkConfiguration_0 and BulkConfiguration_1
.. on the labfloor.
.. BulkConfiguration_0 is the configuration after polymer Monte Carlo
.. and BulkConfiguration_1 is the configuration after pre-equilibration process.
.. You can compare them in the Compare Configurations plug-in.
.. You can also visualize it using the Viewer.
As shown in the below figure, you can see the 20 chains with
20 monomers per each chain of PVDF with 1.78 g/cm 3 density.
The periodic box is automatically controlled to fit the requested density.
You may need to increase the Fuzz factor (ex. 1.15)
in the Graphics Properties of Viewer to see reasonable polymer chains.
And the default configuration shows unwrapped configuration.
When you check the wrap atom, you can see the wrapped configuration in a periodic box.
Polymer blend
Pactically, polymer blend is important to mix different polymers.
You can easily build the polymer blend using the PolymerBuilder.
We will blend Poly Methyl Methacrylate (PMMA) and Poly Vinyl Chloride (PVC)
in a periodic box as an example.
Open the
PolymerBuilder.Click
Add sequencein the botton side of PolymerBuilder widget.
Now you can make two different polymer sequences. If you need more different polymer sequence, you can add it more from here.
In the Polymer Sequance A, select the
Methyl Methacrylatein the Monomer Database.In the Polymer Sequance B, select the
Vinyl Chloridein the Monomer Database.
To demonstrate it in a short time, you will blend simply two different polymers of 5 chains possessing 20 monomers per chain.
Change the number of chains into
5in the Polymer Sequance A and B.Change the output file name as
pmma-pvc.hdf5. Other options are default.Open the
Editor.
You can see molecular configuration and parameters of 2 monomers
from polymer sequence a and b in the script.Save the script as
pmma-pvc.pyand run it in the Job Manager.
It takes around 20 minutes in your laptop. As shown in the following figure, you get the polymer blend system including 5 PMMA and 5 PVC chains.

Polymer with embedded molecules
In many cases, polymer is melted in liquid. The tutorial guides how to embed molecules into the polymer, as building the PMMA polymers with methane molecules as a simple example.
It starts with one monomer and one molecule.
In the Polymer Sequance A, select the
Methyl Methacrylatein the Monomer Database. And change the number of chain as5.Open the
Builder and import MethaneFrom Database of Molecules.In the Polymer Environment, click
Add molecule from filebutton.
You see saved configurations in your project and also
see MoleculeConfiguration Methane in the Builder_Stash.hdf5.
Select MoleculeConfiguration Methane and modify
Countas10.In the Force Field, change
OPLSintoDreidingforce field. Because the new embedded methane will run using the Dreiding force field without assigning the OPLS tag for methane manually.Save the output file as
pmma_methane.hdf5.Open the
Editor and confirm the script.
Embedded molecules are defined as called Included Molecule 1 with configuration and bonds information in the polymer Monte Carlo builder. In this condition, 5 PMMA chains will be generated by embedded 10 Methane molecules.
Run the job in the
Job Manager.
It takes around 15 minutes on the laptop. You can see 5 chains of PMMA and 10 methanes in a periodic box as shown in the below figure.

Nanoparticles in a melted polymer
There are two ways to embed nanoparticles in a melted polymer system.
Embed nanoparticles as a host configuration. The host configuration will be fixed during the polymer Monte Carlo and force capped molecular dynamics. Therefore polymer will be positioned in space defined by the host configuration.
Embed nanoparticles as molecules. Smaller sized nanoparticle can be assumed as molecules. You can load a nanoparticle from
Add molecule from file. Such as embedded molecules Polymer with embedded molecules, you can also add how many particles will be embedded. In this case, embedded nanoparticle configuration should be a type ofMoleculeConfiguration. And it is randomly positioned with polymers by Polymer Monte Carlo.
In this tutorial, you will embed about 15 Å sized Silica nanoparticle
with poly-stylene polymer.
You will firstly embed a nanoparticle using the host configuration.
Note
The host configuration is fixed, while polymers are generated into the host configuration by polymer Monte Carlo builder. You can import and embed any kinds of host configuration with polymers.
Polymer Monte Carlo is parameterized by Dreiding
or OPLS force fields.
Considering atomic types should be able to use in Dreiding
or OPLS force field parameter.
Open the
PolymerBuilder.In the Polymer Sequance A, select the
Stylenein the Monomer Database. And change the number of chains as10.In the Polymer Environment, click
Add bulk from filebutton.
You see saved configurations in your project. Import the host configuration here.
In this tutorial, download the 15 Å sized SiO 2 nanoparticle configuration
in a 35 Å x 35 Å x 35 Å periodic box, sio2_nanoparticle.hdf5 and use it.
Note
Once you use the host configuration selecting the Add bulk from file,
polymer density is inactive because polymer is packed in the defined
periodic box of host configuration.
Select the
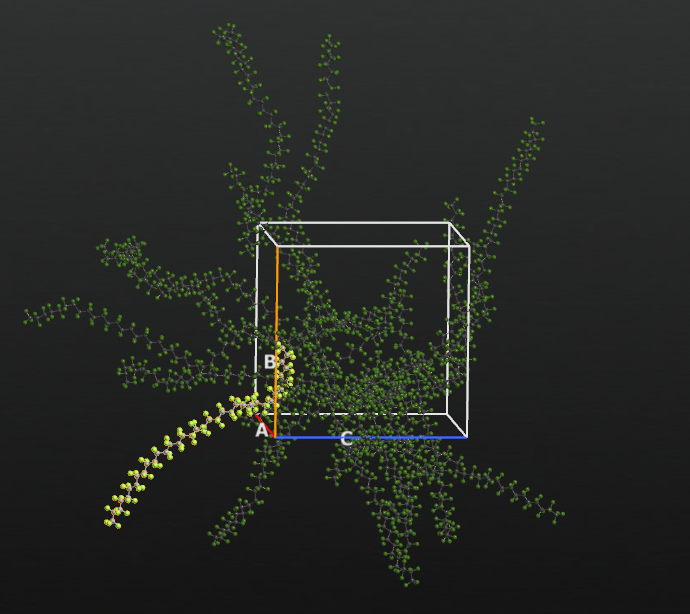
BulkConfiguration_0ofsio2_nanoparticle.hdf5. You can see the host configuration on the widget as the below figure.
In the Force Field, change
OPLSintoDreidingforce field. Because the new embedded nanoparticle will run using the Dreiding force field without assigning the OPLS force field manually and in the case of SiO 2 nanoparticle, OPLS will be in a trouble not to make a neutral charge in a total configuration.Save the output file as
host_nanoparticle_10ps.hdf5.Open the
Editor and check the script.
You can see Host configuration information.
Run the job after saving the input file as
host_nanoparticle_10ps.py.
It takes around 30 minutes on the laptop.
Note
Once the host configuation is large, it takes time to build it even in the MPI process. Polymer builder by polymer Monte Carlo takes a few minutes in your laptop, but force capped molecular dynamics takes time depending on the number of atoms. Such a large system probably needs more steps than default in pre-equilibration to have a reasonable configuration.
The configuration of SiO 2 nanoparticle with 10 PS is shown in the below figure.
You will now build nanoparticles in polymer as the embed molecules.
Open the
PolymerBuilder.In the Polymer Sequance A, select the
Stylenein the Monomer Database. And change the number of chains as10.In the Polymer Environment, click
Add molecule from filebutton.
You see saved configurations in your project. But unlike the host configuration, you need a molecular type of configuration.
Open the downloaded
sio2_nanoparticle.hdf5in the Builder.
It is the 15 Å sized SiO 2 nanoparticle configuration
in a 35 Å x 35 Å x 35 Å periodic box. We will remove the periodic box and save as a MolecularConfiguration.
Change the current configuration into a molecule configuration clicking the
 icon.
icon.Save the configuration as
sio2_nanoparticle_molecule.hdf5.Now when you click
Add molecule from filebutton again, you see it includingMoleculeConfiguration.Load the
MoleculeConfigurationinsio2_nanoparticle_molecule.hdf5.In this case, you will embed 2 nanoparticles. Change the
Countinto2.
As the below figure, you can visually check the embed nanaparticle configuration and the number of particles.

In the Force Field, change
OPLSintoDreidingforce field. Because you will not assign the OPLS force field on the nanoparticle manually.Save the output file as
2nanoparticle_10ps.hdf5.Open the
Editor and check the script.Run the job after saving the input file as
2nanoparticle_10ps.py.
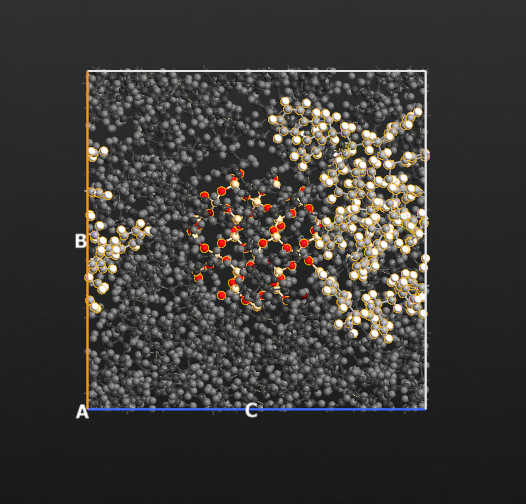
It takes around 30 minutes on the laptop. As shown in the following figure, 2 nanoparticles are randomly positioned with polymers. In this case, it is fit to the defined polymer density controlling the periodic box. And nanoparticles and polymers are relaxed by pre-equilibration process.

Polymers around a surface
Now you will see an advanced example using the Poly-stylene melt
with amorphous OH-terminated SiO 2 surface.
It is a same procedure to use a host configuration to import
the surface configuration as shown in the nanoparticle example.
Download the OH-terminated amorphous SiO 2 surface
configuration, sio2_surface.hdf5 and use as a host configuration.
You will build 20 poly-stylene chains of 40 monomers per chain
with embedded OH-terminated SiO 2 amorphous surface
configuration with 25 Å thickness of SiO 2 in
about 40 Å x 40 Å x 80 Å sized periodic box
as a host configuration.
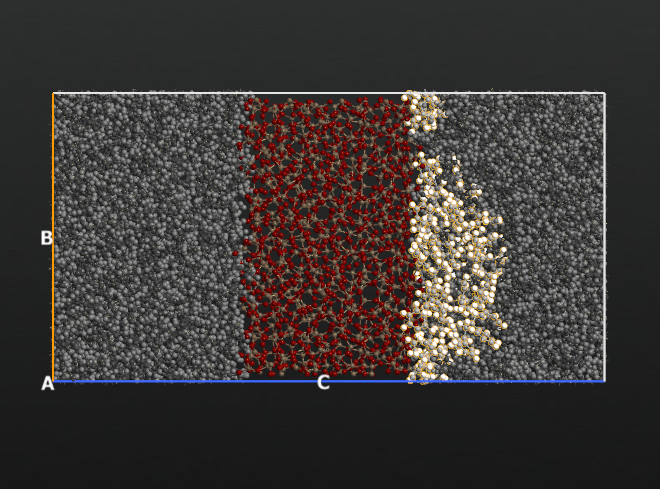
During the polymer Monte Carlo, the host configuration is fixed to generate 20 poly-stylene in a periodic box. After that, Force-capped molecular dynamics will be performed by force field parameters.
It has more than 16,000 atoms. Generation of random polymers by polymer Monte Carlo takes a few minutes on the laptop. But the force-capped molecular dynamics takes a quite long time even in the default condition. Probably you need more steps to get a reasonable configuration in the pre-equilbrium. The below figure shows the 20 Poly-stylene melt with amorphous OH-terminated SiO 2 surface with highligted one chain of Poly-stylene.
Customized monomers
The Monomer Database of QuantumATK includes several types of monomers.
But you may need to design and save customized monomers.
You can add customized monomer into the Monomer Database
in /.vnl/databases/monomers of user home directory.
Original shipped QuantumATK Monomer Database is located
in the /share/nanolab/monomers of installer directory.
You will see some grouping directories such
as Condensation_Monomers, Endgroups, or Vinyl_Monomers.
When you open one of monomer database (ex. Tert-Butyl Methacrylate.py),
you see the configuration information with tags.
Add tags include the information of atom type in a monomer such
as END, HEAD, TAIL, CONNECT, GROUP_A and so on.
You can design your own monomer. And add tags and bonds with a correct format
and save the python file
in /.vnl/databases/monomers of user home directory.
We guide the simple way to modify the monomer.
This tutorial demonstrates to add OH functional group
in the Tert-Butyl Methacrylate monomer.
In the /share/nanolab/monomers/Vinyl_Monomers,
Drag the
Tert-Butyl Methacrylate.pyinto Builder.
You see the Tert-Butyl Methacrylate monomer on the window.
Open the Tags in the Selection Tools plug-in.
You can see the existed tags of Tert-Butyl Methacrylate monomer.
When you choose one of tags, atom selection will be together.
Acoording to this tags, for instance, HEAD_GROUP_A and TAIL_GROUP_A
will finally overlap to formate the polymer.
You will modify one of hydrogens not to be effect on the formation
of main polymer chain.
Change
Hydrogenof atom number23intoOxygenatom.Click the
 icon of passivate the configuration with hydrogen.
You will see the OH group instead of hydrogen.
You need to define the atomic parameter using the Dreiding or OPLS force field.
Write new tag in Tags plug-on tool such as O (atom number
23) intoOPLS_OH_3, new H (atom number29) intoOPLS_HO_3. And remove or modify the previous tags for OH functional group. For instance, remove the changed hydrogen (atomic number23) inOPLS_HC_1tags and modify the carbon (atom number11) attached OH group intoOPLS_CT_11tag.
It is shown in the below figure.

Add tags should be very careful because you need to consider the polymerization
from the monomer. Otherwise force field type is not correct.
You can see in detail the Dreiding and OPLS potential parameters of QuantumATK
in the DreidingPotentialBuilder and OPLSPotentialBuilder.
Note
ATKPython has functions of DreidingPotentialBuilder and
OPLSPotentialBuilder
that tell the types that you have, and gives a short description of them.
Try the function printTotalTypes() on the DreidingPotentialBuilder
and OPLSPotentialBuilder.
It gives a table for all of the available types.
Monomers should have the right tags, then they work with it.
Open the script using the
Editor in the  Send to.
You will see new tags with OPLS_OH_3 for atom number 23, OPLS_HO_3 for
atom number 29, OPLS_CT_11 for atom number 11.
And you also add bond information. Atom number 29 needs
to make a new bond with atom number 23.
You should add it with the format of Add bonds.
# Add tags
monomer_1.addTags('ENDH_OPLS_CT_4', [0])
monomer_1.addTags('HEAD_CONNECT',   [0])
monomer_1.addTags('HEAD_GROUP_A',   [1])
monomer_1.addTags('H_C',            [20, 21, 22, 24, 25, 26, 27, 28])
monomer_1.addTags('OPLS_CT_11',     [11])
monomer_1.addTags('OPLS_CT_4',      [9, 10, 12, 16])
monomer_1.addTags('OPLS_CT_5',      [0])
monomer_1.addTags('OPLS_CT_8',      [4])
monomer_1.addTags('OPLS_CT_95',     [8])
monomer_1.addTags('OPLS_C_19',      [5])
monomer_1.addTags('OPLS_HC_1',      [ 1,  2,  3, 13, 14, 15, 17, 18, 19, 20, 21, 22, 24,
                                                  25, 26, 27, 28])
monomer_1.addTags('OPLS_HO_3',      [29])
monomer_1.addTags('OPLS_OH_3',      [23])
monomer_1.addTags('OPLS_OS_11',     [6])
monomer_1.addTags('OPLS_O_14',      [7])
monomer_1.addTags('TAIL_CONNECT',   [4])
monomer_1.addTags('TAIL_GROUP_A',   [16])
monomer_1.addTags('TAIL_GROUP_B',   [12])

# Add bonds
bonds = [[ 0,  1],
         [ 0,  2],
         [ 0,  3],
         [ 0,  4],
         [ 4,  5],
         [ 4, 12],
         [ 4, 16],
         [ 5,  6],
         [ 5,  7],
         [ 6,  8],
         [ 8,  9],
         [ 8, 10],
         [ 8, 11],
         [ 9, 26],
         [ 9, 27],
         [ 9, 28],
         [10, 20],
         [10, 21],
         [10, 22],
         [11, 23],
         [11, 24],
         [11, 25],
         [12, 13],
         [12, 14],
         [12, 15],
         [16, 17],
         [16, 18],
         [16, 19],
         [23, 29]]
monomer_1.setBonds(bonds)
Save the new monomer with new tags as
Custom_Tert_Butyl_Methacrylate.pycreating the new directory asCustomin the/.vnl/databases/monomersof user home directory.
Note
If you create a new directory in /.vnl/databases/monomers,
it will make a grouping with the directory name.
After creating a new monomer by user, you need to restart
the Script Generator.
Now you can load the customized monomer from the Monomer Database in the PolymerBuilder GUI.
Open the
PolymerBuilder.Click the
Select monomer.
Now you see the Custom Tert Butyl Methacrylate
in the momoner database as the below image.
When you click it, you also see the configuration
indicating how to connect the main chain and OH
functional group on the widget.
