Introduction to the Workflow Builder
The Workflow Builder is one of the core features of the QuantumATK NanoLab. It enables you to easily set up a calculation as a workflow of different calculation steps. These calculation steps can form one or more branches of execution, which can then be run though the Jobs tool.
With the Workflow Builder you will be able to create iteration loops and iterate over integers, floats, PhysicalQuantity values, and atomic configurations.
You will be able to group multiple calculation steps and save it for later use, as well as save and share the entire workflow with your colleagues.
In the next sections you will learn more about the Workflow Builder and its user interface through a set of simple examples. You will learn how to create workflows with one or more atomic configurations, you will learn how to split a workflow into more branches of execution, as well as how to run workflows though the Jobs tool and how to reuse results from the previous calculations.
In the Downloads & Links sidebar you will find a list of all the workflows that are created in the following examples.
Note
Users familiar with the Script Generator will find the Workflow Builder to be very similar. The Workflow Builder replaces the Script Generator that was available in the previous versions of the QuantumATK NanoLab.
The Workflow Builder supports all the features of the Script Generator, and it also introduces new ones,
such as support for multiple branches of execution or support for looping over custom PhysicalQuantity values or atomic configurations.
Table of Contents

What is the Workflow Builder?
The Workflow Builder is a powerful feature of QuantumATK NanoLab where you can easily set up and run calculations. It is placed in the side toolbar on the left in the main QuantumATK NanoLab window.
In this tool, you can create new objects called Workflows, which can be saved, shared, re-opened and edited within the Workflow Builder Valid workflow can be converted directly to one or multiple scripts that can be run through the Jobs tool.

Workflows are automatically saved as .hdf5 files and are visible in both the Workflow Builder and the Data tool.
To share a workflow, simply share its .hdf5 file.
A workflow consists of one or more components called Blocks. A block represents one or more calculation steps and it exposes calculation parameters. Calculation parameters can be edited from the Workflow Builder. Creating a workflow is as easy as assembling blocks from a catalog of built-in blocks. To read more about blocks, jump to the section What is a workflow block and how to edit it.
A workflow can contain sets of calculations. This is because a workflow block can contain lists of objects and their parameter values. A workflow can then iterate over the given lists to perform the same calculation with different inputs. To increase the calculation throughput, you also can split a workflow into more execution branches.
You can export a workflow as a single Python script or as multiple Python scripts. Each script would represent one branch of execution in the workflow. Having multiple scripts enables you to run a workflow in parallel instead of sequentially, which can significantly improve the calculation speed.
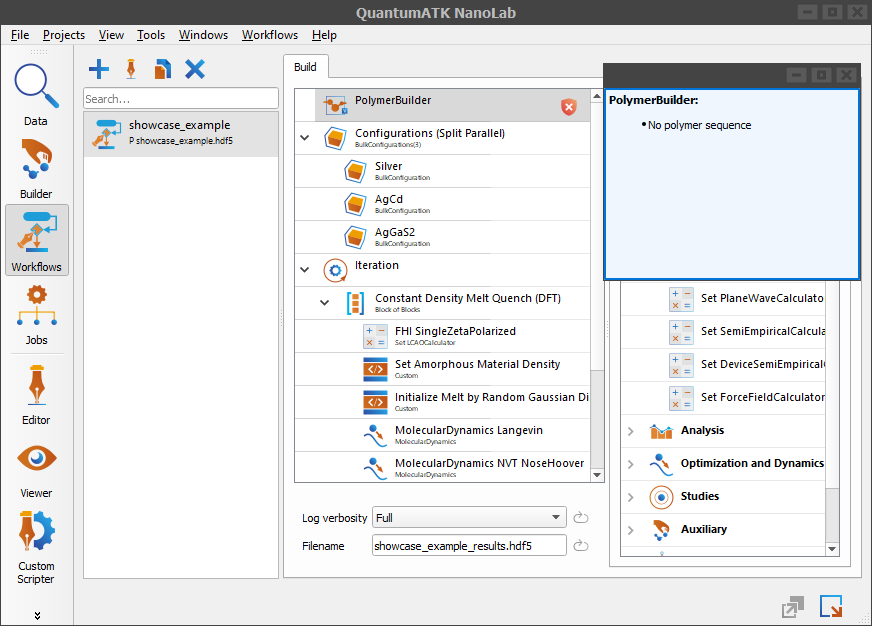
The Workflow Builder overview
This guide assumes you are familiar with the Data tool and the Builder tool in the QuantumATK NanoLab. The Data tool is used for managing files and analyzing results. The Builder tool is used for creating, manipulating and inspecting atomic configurations.
Start by opening the QuantumATK NanoLab and creating a new project. After opening the program, the first window you will see is a Data tool window.
To select the Workflow Builder, click the  icon located in the side toolbar on the left.
A new Workflow Builder window will appear with three main areas - Workflow Stash, Workflow Area and Workflow Catalogs.
icon located in the side toolbar on the left.
A new Workflow Builder window will appear with three main areas - Workflow Stash, Workflow Area and Workflow Catalogs.

The Workflow Stash is on the left highlighted in red. Here you will find all the existing project workflows. From here you can also create new workflows or delete, rename or duplicate the existing ones. The Workflow Stash is currently empty.
The Workflow Area is in the center under the Build tab, highlighted in blue. It shows the contents of the currently selected workflow in the Workflow Stash.
Note
There are three levels of the log verbosity - Full, Minimal and Silent. Use the Full verbosity for troubleshooting, Minimal for inspecting only the most significant steps and Silent when you do not need any calculation feedback.
The Workflow Catalogs of pre-made workflow blocks is on the right highlighted in green. These are the building blocks of a workflow. In the catalog you will find three tabs – QuantumATK, Templates and Blocks. The blocks from the catalogs are available across all projects.
The QuantumATK tab contains a list of built-in blocks divided into different categories, such as Structures, Calculators or Analysis. This list of blocks cannot be edited.
Note
If you are familiar with the Script Generator of previous QuantumATK NanoLab releases, you will recognize most of the blocks under the QuantumATK tab.
Each QuantumATK block can be a container of objects or a single object from the QuantumATK Engine, such as a BulkConfiguration, LCAOCalculator or a Bandstructure.
There are also special blocks, such as the  Iterator block or the
  Custom block.
To read more about workflow blocks, jump to the section What is a workflow block and how to edit it.
Custom block.
To read more about workflow blocks, jump to the section What is a workflow block and how to edit it.
The Templates tab contains built-in single blocks and groups of blocks chained together to calculate a specific property
such as a Constant Density Melt Quench (DFT) available in the Molecular Dynamics sub-category. Among the Templates you will also find
single blocks with specific parameters values, such as a Metal (Low) block which is an LCAOCalculator block with a low k-point density.
Note
If you are familiar with the Script Generator of previous QuantumATK NanoLab releases, you should note that the Templates play a similar role in the Workflow Builder as well. The difference is that Templates in the Workflow Builder cannot be modified and its list also includes single blocks.
The Blocks tab is a place where you can save your custom blocks across projects. Workflow Blocks can be grouped together in a container block called the Block of Blocks. Since Block of Blocks can can be saved, this allows for re-use of even very complex calculation setups. To learn how to save blocks under the Blocks tab, jump to the section How to save a block from a workflow.
What is a workflow block and how to edit it
A workflow block is a basic building unit of a workflow. It can be though of as one calculation step in a workflow. A block typically represents a single object from the QuantumATK Engine. It can require specific input QuantumATK Engine objects and can provide specific output QuantumATK Engine objects. Blocks are added one after the other to form a branch of execution in a workflow. If a block has an invalid input, it will show an error message.
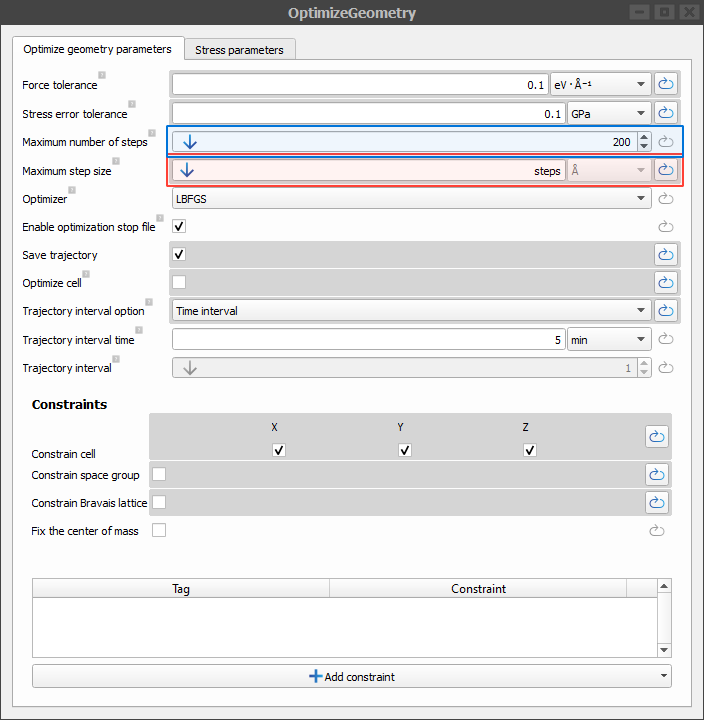
To edit a block in a workflow just double click it. All block editors indicate non-default values and allow for direct “reset” to default. Editors contain default settings of the underlying QuantumATK Engine object and can be changed by the user.
If you have made a change to some of the default settings and would like to revert to a default value instead, click the  reset button near the value you were editing,
like the Maximum step size parameter highlighted with red in the Optimize Geometry block (see the figure below).
reset button near the value you were editing,
like the Maximum step size parameter highlighted with red in the Optimize Geometry block (see the figure below).
You will know the value is default when the reset button becomes disabled (grayed out), like the Maximum number of steps parameter highlighted with blue.
Beside blocks which represent a single QuantumATK Engine object, there are also special blocks, such as  Configurations (Split Parallel) and Split Parallel blocks.
These blocks implement simple parallelization. They can contain a list of sub-blocks and then each sub-block in the list would belong to a separate branch of execution.
The resulting workflow script will loop over each sub-block, hence producing simple parallelization mechanism akin to loop unrolling.
Configurations (Split Parallel) and Split Parallel blocks.
These blocks implement simple parallelization. They can contain a list of sub-blocks and then each sub-block in the list would belong to a separate branch of execution.
The resulting workflow script will loop over each sub-block, hence producing simple parallelization mechanism akin to loop unrolling.
The simplest example is the Configurations (Split Parallel) block, that enables one to run the same (parallel) calculation for multiple atomic configurations.
Workflows with Configurations (Split Parallel) or Split Parallel blocks should be run in parallel as explained in the section Workflow with multiple branches.
Other special blocks include Iteration,  Block of Blocks, Custom blocks as well as the
  Load from file block.
With the Iteration block you can specify integers, floats, PhysicalQuantity variables of different types, and atomic configurations.
These values can then be used as inputs to some of the other blocks in the workflow. Using the Iteration block you can iterate over a different set of atomic configurations, basis sets, densities, etc…
The Block of Blocks can group existing blocks in the workflow. Use this block to save a sequence of blocks specialized to calculate or analyze a set of properties,
which you can later reuse in other workflows.
The Custom blocks are very powerful and flexible blocks.
They support insertion of custom QuantumATK scripts. The script, desired inputs and the produced outputs can be defined directly in the Workflow Builder.
The output from a custom block can also be used in subsequent blocks, thus allowing Custom blocks to serve as an interface to a complex calculation setup.
The Custom Block can also be saved to the Blocks catalog for easy reuse.
The Load from file blocks supports the inclusion of already calculated results.
All QuantumATK objects can be loaded and used directly within a workflow. The obvious example is the calculation of additional analyses from an already updated configuration.
Creating a simple workflow
Let’s create a simple workflow which calculates a Bandstructure of a BulkConfiguration using an LCAOCalculator.
To do this we would need to add three workflow blocks, each representing one of these QuantumATK Engine objects.
We will start by adding a BulkConfiguration from the database in the Builder.
Sending an atomic configuration from the Builder to the Workflow Builder
Let’s load a BulkConfiguration from the Builder to the Workflow Builder.
Start by opening the Builder by clicking the  icon from the side toolbar on the left. This will open a new window.
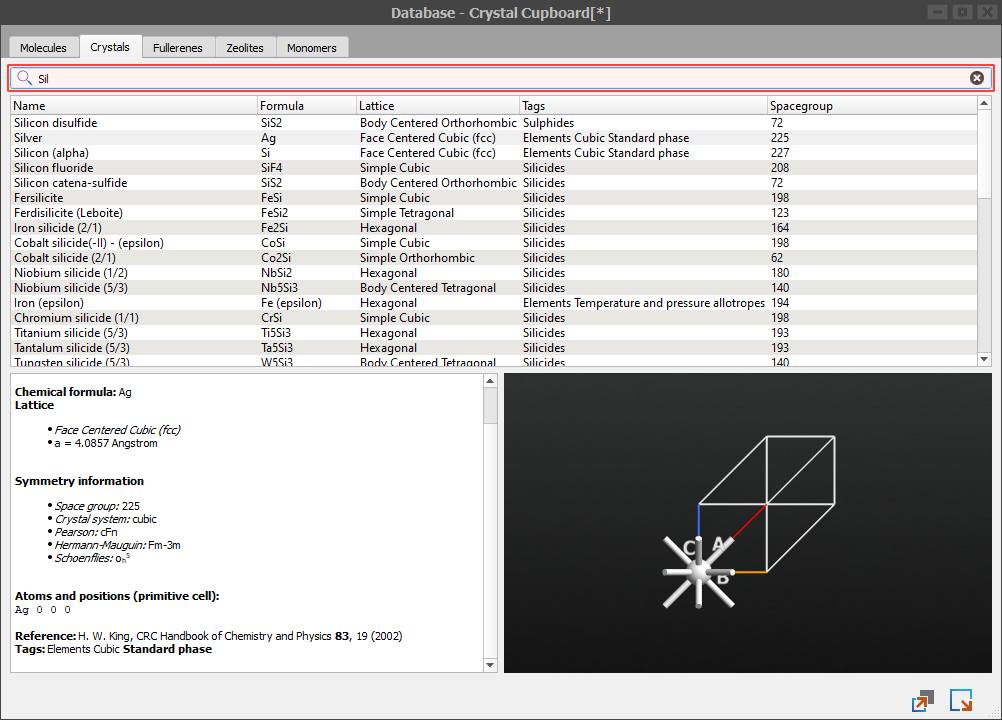
Once we are in the Builder click the  Add icon and select From Database.
This will open a Database with a list of built-in atomic configurations we can load in the builder stash.
Add icon and select From Database.
This will open a Database with a list of built-in atomic configurations we can load in the builder stash.
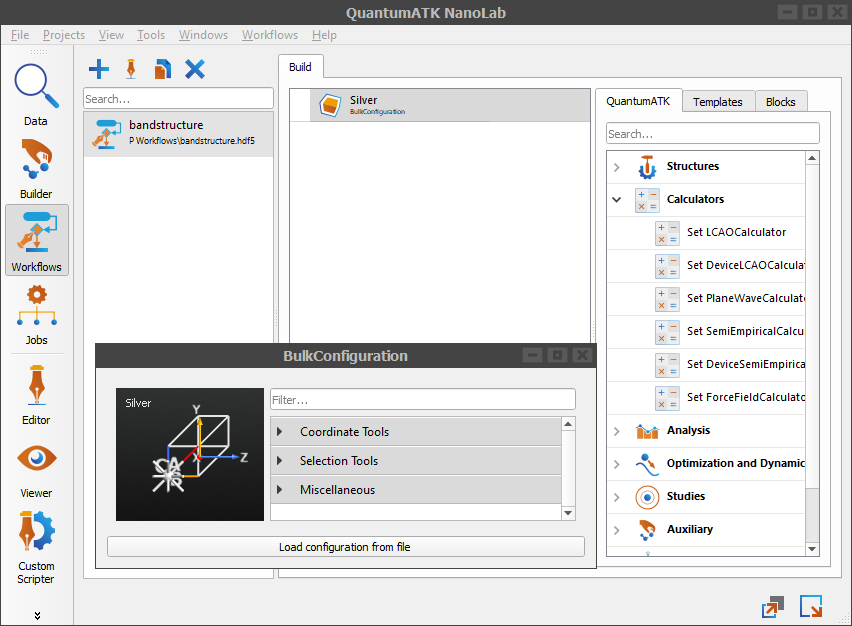
Let’s load an atomic configuration called Silver. You will find Silver under the Crystals tab. To quickly find it type Silver in the  Search.
To add Silver to the builder stash just double click it. You will see the atomic configuration in the builder stash and its graphical representation in the 3D Viewer.
Search.
To add Silver to the builder stash just double click it. You will see the atomic configuration in the builder stash and its graphical representation in the 3D Viewer.
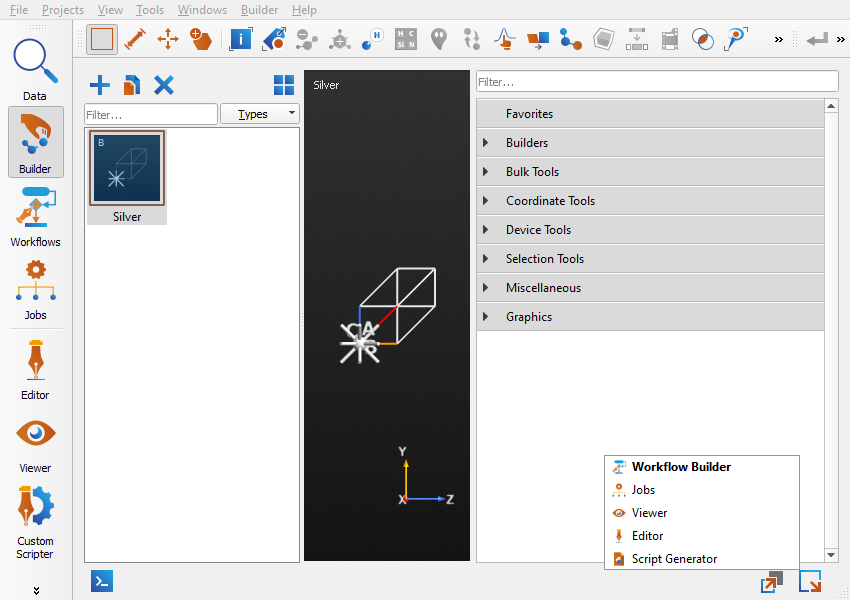
To send the Silver configuration from the Builder to the Workflow Builder, click the  in the lower right corner and select Workflow Builder.
Selecting this option will open the Workflow Builder window. In the Workflow Builder you will notice a new workflow object called Silver in the Workflow Stash on the left.
It was automatically created after sending the Silver configuration. The workflow contains one 
BulkConfiguration block which represents the Silver configuration.
Let’s rename the created workflow. In the Workflow Stash, click the  to change the name of the current workflow to bandstructure.
It is important to know that the workflows in the Workflow Stash are project-specific.
You can still import workflows from other projects like you would import any other .hdf5 file in the QuantumATK NanoLab.
Jump to the section How to share a workflow to learn more about exporting and importing workflows.
Note
To see the file location of a workflow, right click it in the Workflow Stash and select Open location.
Currently, we have one workflow with one BulkConfiguration block called Silver. This will be our atomic configuration block.
At this point we can inspect the configuration from the block’s editor.
Let’s now open an editor of the configuration block in the bandstructure workflow. From there we can visualize and inspect the added atomic configuration.
To open the editor, double click the Silver configuration block in the central window of the Workflow Builder, i.e. the Workflow Area.
The loaded atomic configuration will appear in the list of atomic configurations on the left and the 3D window will display its graphical representation. In the Definition list you will see a summary of its properties such as type, unique elements, tags, lattice type and regions.
To add new tags or regions to the atomic configuration, use the Tags or Spatial Regions plugins in the right window.
We have now added an atomic configuration to the workflow. The next step is to create a calculator and attach it to the loaded atomic configuration.
How to add a calculator
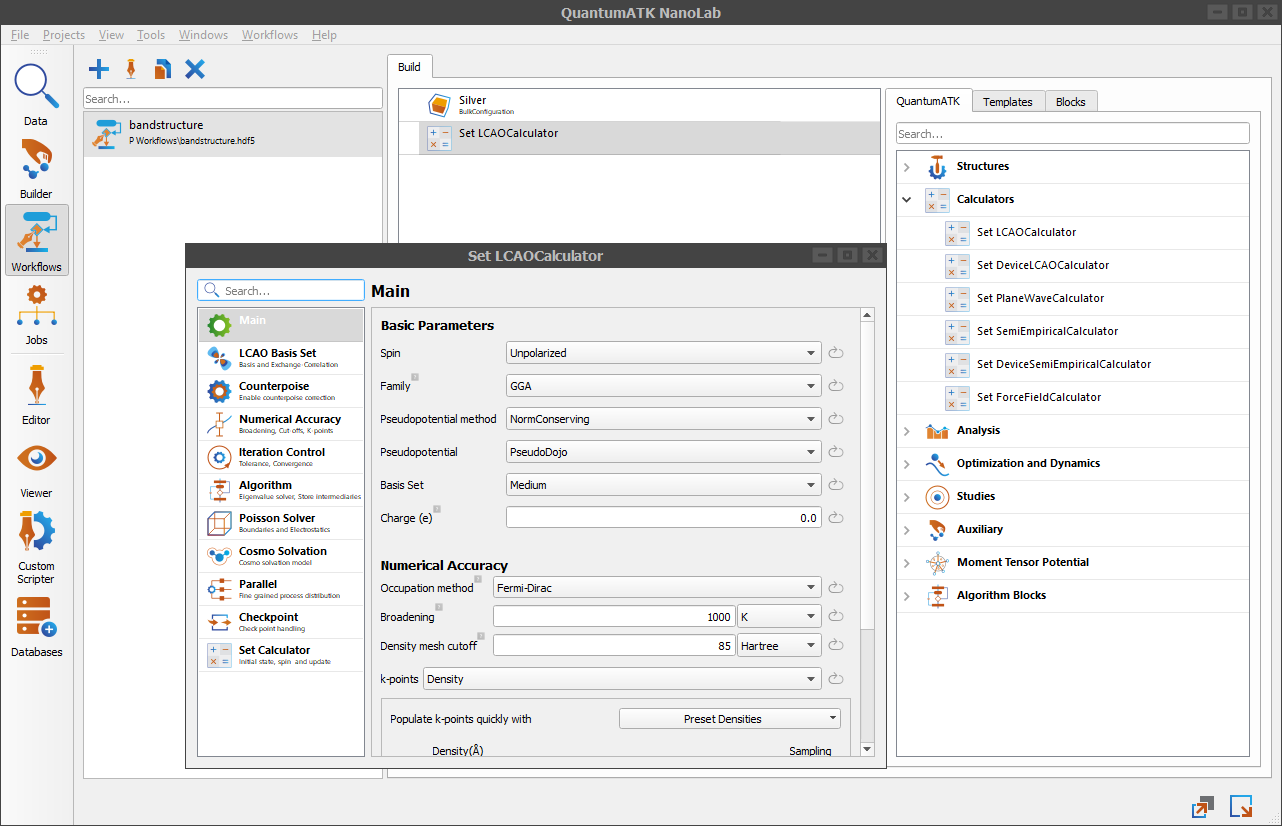
To add a calculator, go to the catalog of QuantumATK blocks, expand the  Calculators category
and choose Set LCAOCalculator block from the list of available calculators.
Calculators category
and choose Set LCAOCalculator block from the list of available calculators.
Adding the Set LCAOCalculator block requires an atomic configuration as an input. It outputs the same atomic configuration
with an attached LCAOCalculator.
The calculator block uses the default parameters of the underlying LCAOCalculator object.
Double click the block to see its default values. Here you can inspect or edit calculator properties.
In this example, we will continue with the defaults.
Our workflow currently contains an atomic configuration and a calculator attached to it. The next step will be to perform an analysis on the given configuration.
How to add an analysis object
A complete list of all analysis blocks can be found in the catalog of QuantumATK blocks under the  Analysis group.
Let’s add a Bandstructure analysis block to the workflow.
To find a 
Bandstructure analysis block in the long list of analysis blocks, we recommend a text search.
Then double click or drag and drop the Bandstructure block from the catalog onto the Workflow Area.
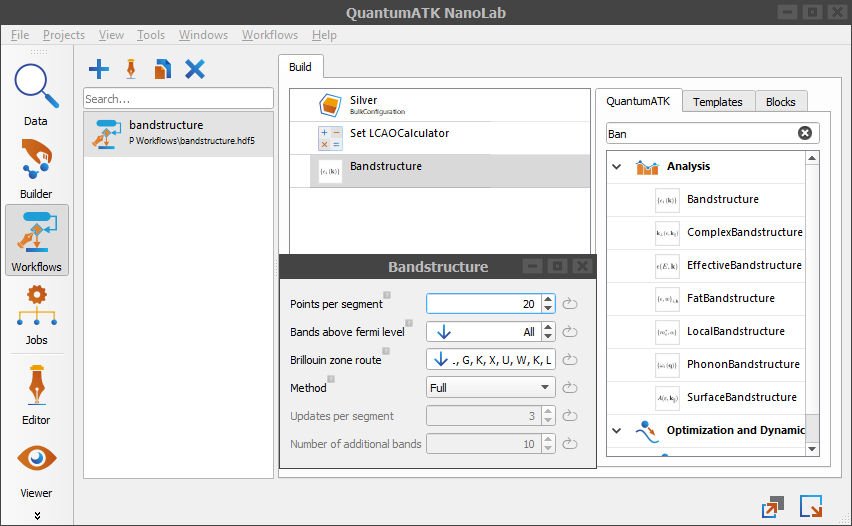
The Bandstructure block requires a BulkConfiguration with an attached calculator as an input. It outputs a Bandstructure analysis object.
The block uses the default parameters of the underlying Bandstructure object. We will not edit the block’s parameters and will continue with the default values.
Since the block input is valid and it reports no errors, let’s run the current workflow.
How to run a workflow
A workflow can be exported as a Python script, which can be run with the Jobs tool.
To execute the bandstructure.hdf5 workflow from the current section, click the button in the lower right corner and select Jobs as script.
This will launch an Export to script window where you can specify Script exporting options.
Let’s change the result filename to bandstructure_results.hdf5. Leave the rest of options to default and click OK.
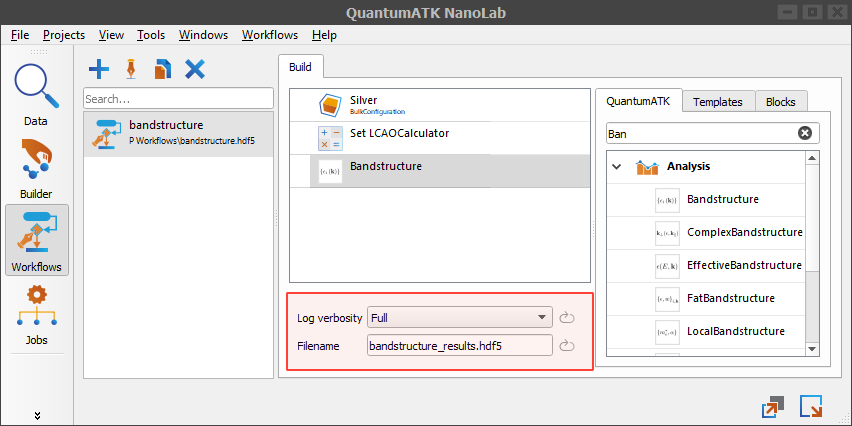
Note
Using the options highlighted in red at the bottom of the Workflow Area window you can specify a default name of the result file and the log verbosity of the calculation.
After setting the export options you will need to follow the steps to send a script to the Jobs tool.
Start by clicking the Ok button in the Export to script window. This will open a save dialog. Choose a place to save your script and click Save. Next you will see the Submission Settings window where you can select run options, such as the machine where the script will be run. After you have set the submission options, click the Submit button.
To learn more about running scripts through the Jobs tool, follow the Jobs tool guide.
After the Jobs tool finishes, the result file bandstructure_results.hdf5 should appear in the Data tool. The result file should contain two saved objects –
a BulkConfiguration with an attached LCAOCalculator and a Bandstructure object.
Re-running a workflow
Let’s make a change to the bandstructure.hdf5 workflow from the previous section. Go ahead and double click the Bandstructure block to open its editor.
Increase the sampling by setting Points per segment to 25 and set the Brillouin zone route to K, L.
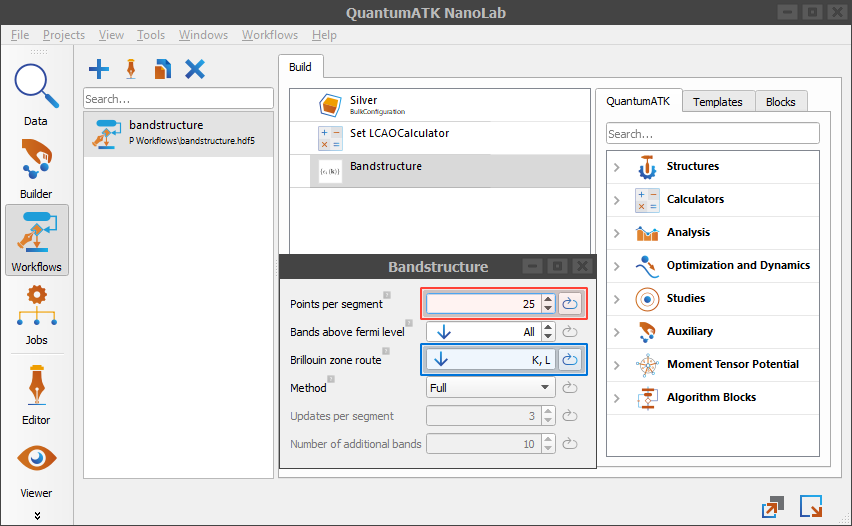
After the change, there are two ways to re-run the workflow.
Run the entire workflow from scratch
Reuse some of the saved objects from the previous calculations
We can always run the entire workflow from scratch. This way we are not going to use any of the results saved in the previous run. This is the easiest way, but not a very economic one.
The other way is to use some of the saved objects from the previous calculation found in bandstructure_results.hdf5.
It is crucial that the object we intend to reuse in a new calculation are not affected by the change.
The previous calculation saved two objects – a BulkConfiguration with an attached LCAOCalculator and a Bandstructure object.
In this example, it is easy to see that the first object can be used again in the new workflow, because it is not affected by the changes in the Bandstructure block.
To include this object in the workflow, we will reuse a Load from file block.
The second way is obviously economical and can be faster, but you need to be extra careful when cherry-picking object to use in the new calculation.
Load from file
This block is very simple, but powerful. It enables you to reuse already calculated parts after making a change to the same workflow. With this block you can simply load an object from a result file.
In the previous section Re-running a workflow, we have modified the bandstructure.hdf5 workflow by changing one of the properties in the Bandstructure block.
Now we want to re-run the workflow using the same configuration object with the attached calculator, which were unaffected by the change.
Let’s start by creating a duplicate of the bandstructure.hdf5 workflow by clicking  Copy.
button in the Workflow Stash on the left. This will duplicate the current workflow.
Change the name of the copy to bandstructure_rerun. Then go ahead and delete the existing configuration and calculator blocks.
We will provide both objects from the result file of the previous calculation.
Copy.
button in the Workflow Stash on the left. This will duplicate the current workflow.
Change the name of the copy to bandstructure_rerun. Then go ahead and delete the existing configuration and calculator blocks.
We will provide both objects from the result file of the previous calculation.
In the catalog of QuantumATK blocks under the  Algorithm Blocks group find the Load from file block
and place it as the first block in the workflow. You should now have only two blocks in the workflow - Load from file block and the Bandstructure block.
Algorithm Blocks group find the Load from file block
and place it as the first block in the workflow. You should now have only two blocks in the workflow - Load from file block and the Bandstructure block.
Note
To change the order of the blocks in the workflow, just drag and drop them within the Workflow Area window.
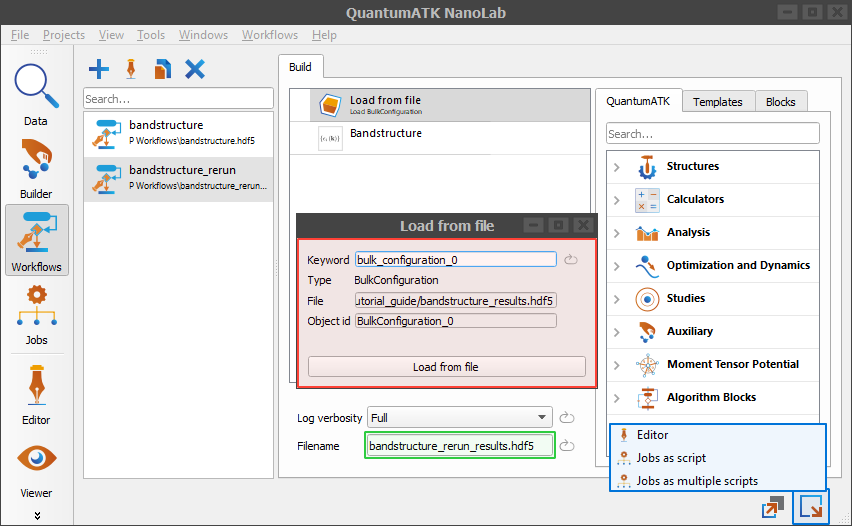
You will notice that both blocks have errors. A Load from file block is missing a file
to load QuantumATK Engine objects from, and a Bandstructure block needs a BulkConfiguration with an attached calculator.
To resolve errors, we need to load a bulk configuration with an attached calculator using the Load from file block.
To open its editor, double click the Load from file block. To load objects click the Load from file button at the bottom of the editor.
Select the result file from the previous calculation, bandstructure_results.hdf5, and load the bulk configuration with the attached calculator.
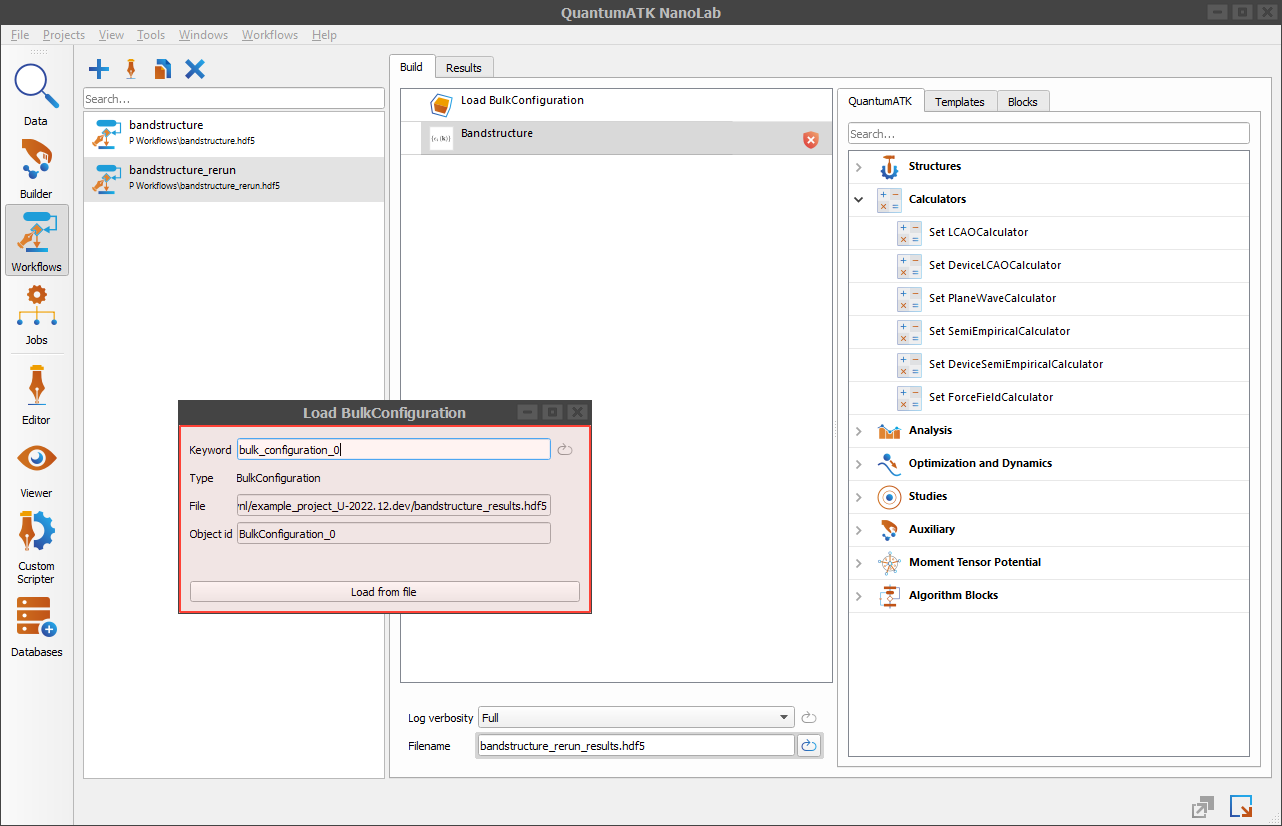
After loading the bulk configuration in the Load from file block, all the errors should be gone
and you will see some details in the editor window like the bulk configuration type, its file location and its object id.
Change the result file name of the new workflow to the bandstructure_rerun_results.hdf5. The filename option is placed at the bottom of the Workflow Area window.
Run the workflow by clicking the button to send it to the Jobs tool.
Select Jobs as script option and follow the script export steps and Jobs tool steps the same way as in the previous section.
After the Jobs tool finishes, you should get results similar to the bandstructure_rerun_results.hdf5.
Workflow with multiple branches
The new workflow feature makes it much easier to run several calculations with only a small difference,
e.g., calculating the Bandstructure for the same atomic configuration, but with different calculator settings.
To do this we could make copies of the same workflow and then tweak calculator settings in each of the copies. This is not a very good way, because keeping the track of all the workflows can become very cumbersome.
What we should do instead is split the workflow into multiple branches of execution. To do this we will need to use the Split Parallel block
from the Algorithm Blocks section in the QuantumATK catalog of blocks.
Let’s start by creating a new workflow with one BulkConfiguration block and one Bandstructure block.
Send a Silver configuration from the Builder to the Workflow Builder as described in Sending an atomic configuration from the Builder to the Workflow Builder. This will create a new workflow with one configuration block.
Now add a Bandstructure block as described in How to add an analysis object.
Rename the created workflow to multiple_calculators, since we will be using multiple calculators in the same workflow.
We want to have two separate branches of execution. Each branch of execution should calculate a Bandstructure of the same Silver configuration, but with different LCAOCalculator-s.
To split the execution of the workflow, go ahead and drop Split Parallel block from the QuantumATK catalog under the Algorithm Blocks group.
In the workflow, the new block needs to be placed between the BulkConfiguration and the Bandstructure blocks.
Double click the added Split Parallel block in the Workflow Area to open its editor (see the figure below).
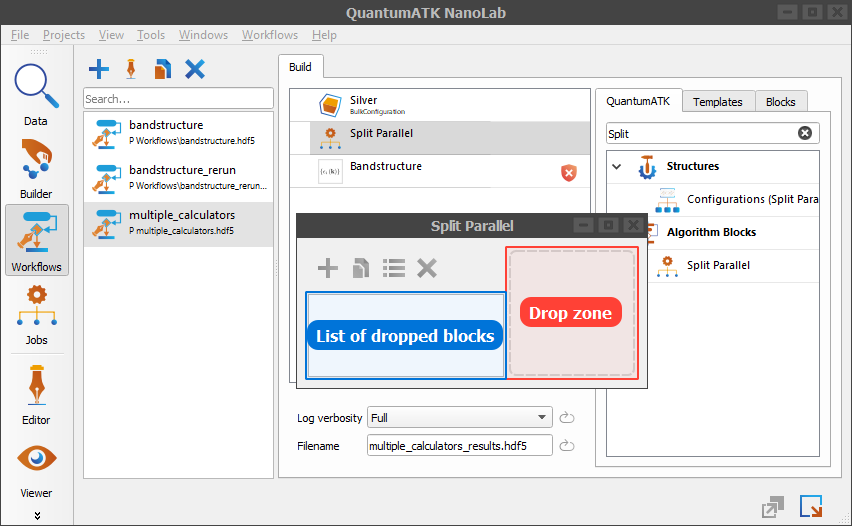
On the right highlighted in blue you will see a drop zone – an empty space to drop blocks from the catalog of blocks. On the left highlighted in red is a list of dropped blocks, which is currently empty.
Each block in the list will belong to a separate branch of execution. In other words, each block in the list will create one branch of execution. If we add one block in the list, there would be only one branch of execution. If we add ten blocks, we would be creating ten branches, etc…
We want to have two separate branches of execution, each containing different LCAOCalculator-s. To do this, we will add two calculators to the Split Parallel block.
To add the first LCAOCalculator calculator, find an LCAOCalculator block in the QuantumATK catalog under the Auxiliary group
and drop it to the drop zone.
To add the second calculator, just click the button. This will create a copy of the first calculator block (see the figure below).
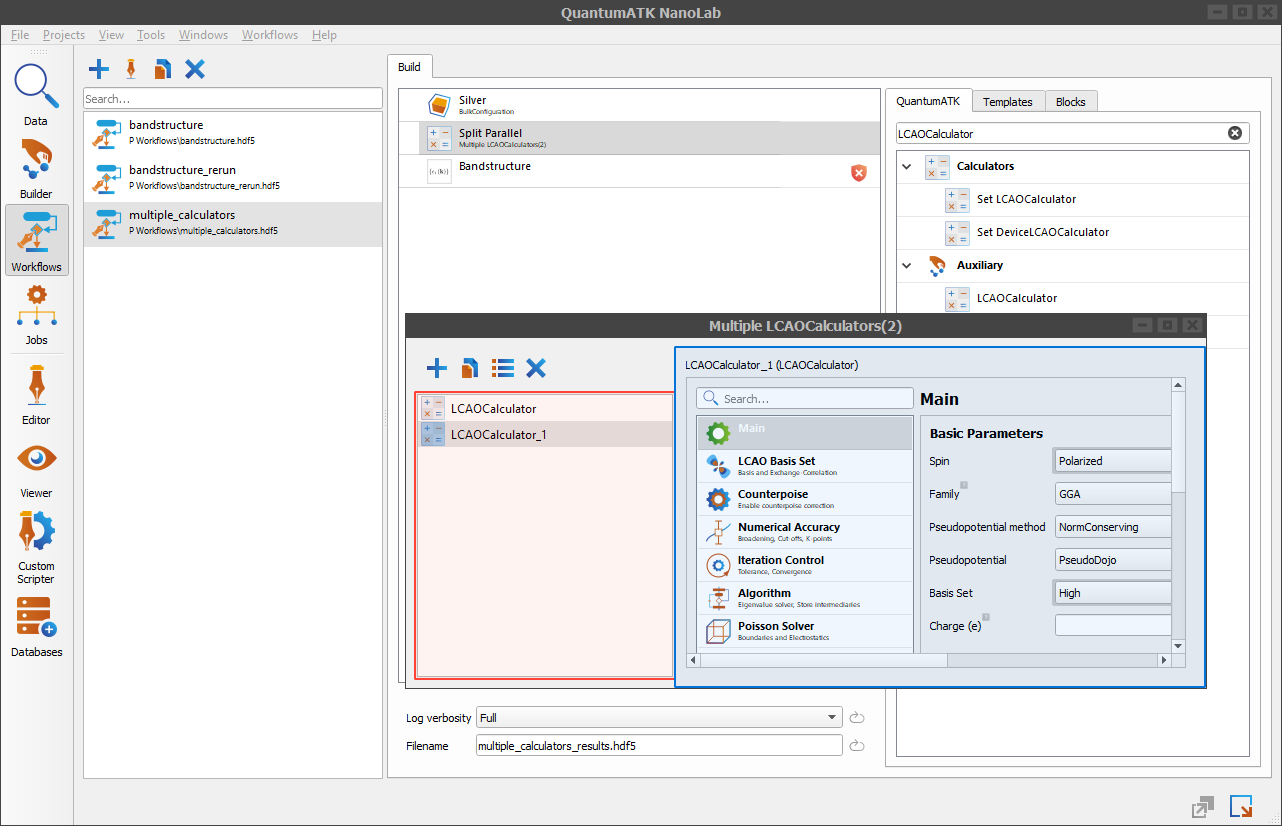
In the list of blocks highlighted in red on the left, we now have two LCAOCalculator blocks, one named LCAOCalculator and the other named LCAOCalculator_1.
In the same window on the right highlighted in blue you can see an editor of the selected calculator block in the list. We can use the editor displayed on the right to change the settings of the calculators.
Let’s change some of the settings in the second calculator. Select the second calculator in the list on the left and change its spin from Unpolarized to Polarized and the Basis Set from Medium to High. Both options are under the Main editor tab.
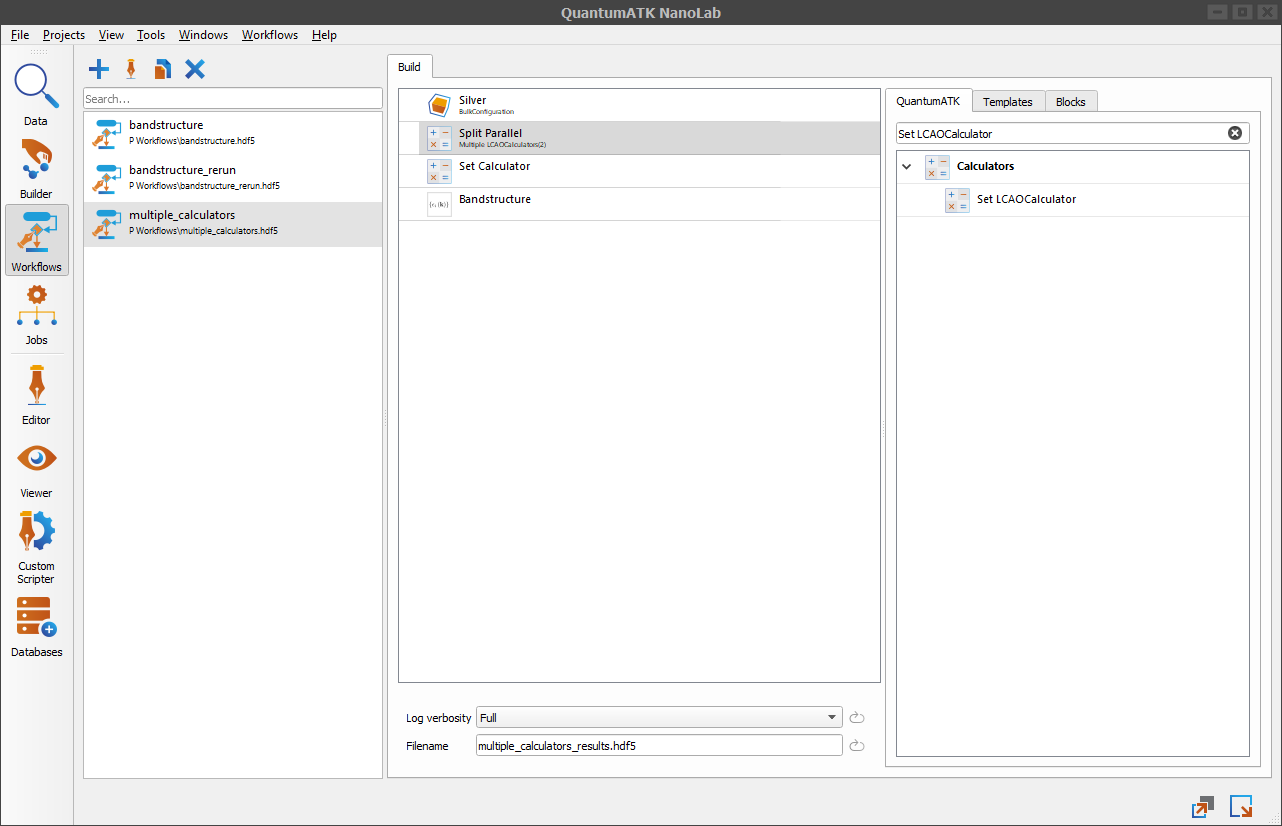
In the workflow you will notice some errors reported by the Bandstructure block saying that a BulkConfiguration with an attached calculator is missing.
Even though we do have both the BulkConfiguration and the LCAOCalculator-s, we haven’t linked them. To resolve this problem,
add a Set Calculator block right after the Split parallel block.
The Set Calculator block requires two inputs – an atomic configuration and a calculator. Its only purpose is to attach the calculator to the configuration.
Note
Note that there are LCAOCalculator and Set LCAOCalculator blocks. The first one just creates an LCAOCalculator and the other both creates the calculator and attaches it
to a configuration.
Note
Note that the icon of the Split Parallel block has changed to , since the block has two calculators inside.
In the workflow you should now have four blocks - BulkConfiguration block, Split Parallel block, Set Calculator block,
and Bandstructure block.
The workflow should now be ready for execution. There are different ways to execute it, as described in the section How to run a workflow.
The recommended way to run the workflow is to run it in parallel, as described in the next section Running a workflow with multiple branches.
After the Jobs tool finishes workflow execution, you will get results similar to multiple_calculators_results.hdf5.
Running a workflow with multiple branches
Workflows containing Split parallel blocks can have multiple branches of execution - one for each sub-block in the list.
The recommended way to run such workflows is to export them as multiple scripts, send them to the Jobs tool and run them all at once.
Each exported script will contain one branch of execution.
Note
The Configurations (Split Parallel) block also causes multiple branches of execution - each branch for every loaded atomic configuration.
In the lower right corner, click and select Jobs as multiple scripts. Follow the script export process, which is similar as exporting a workflow as a single script.
See Script exporting options for more script exporting details.
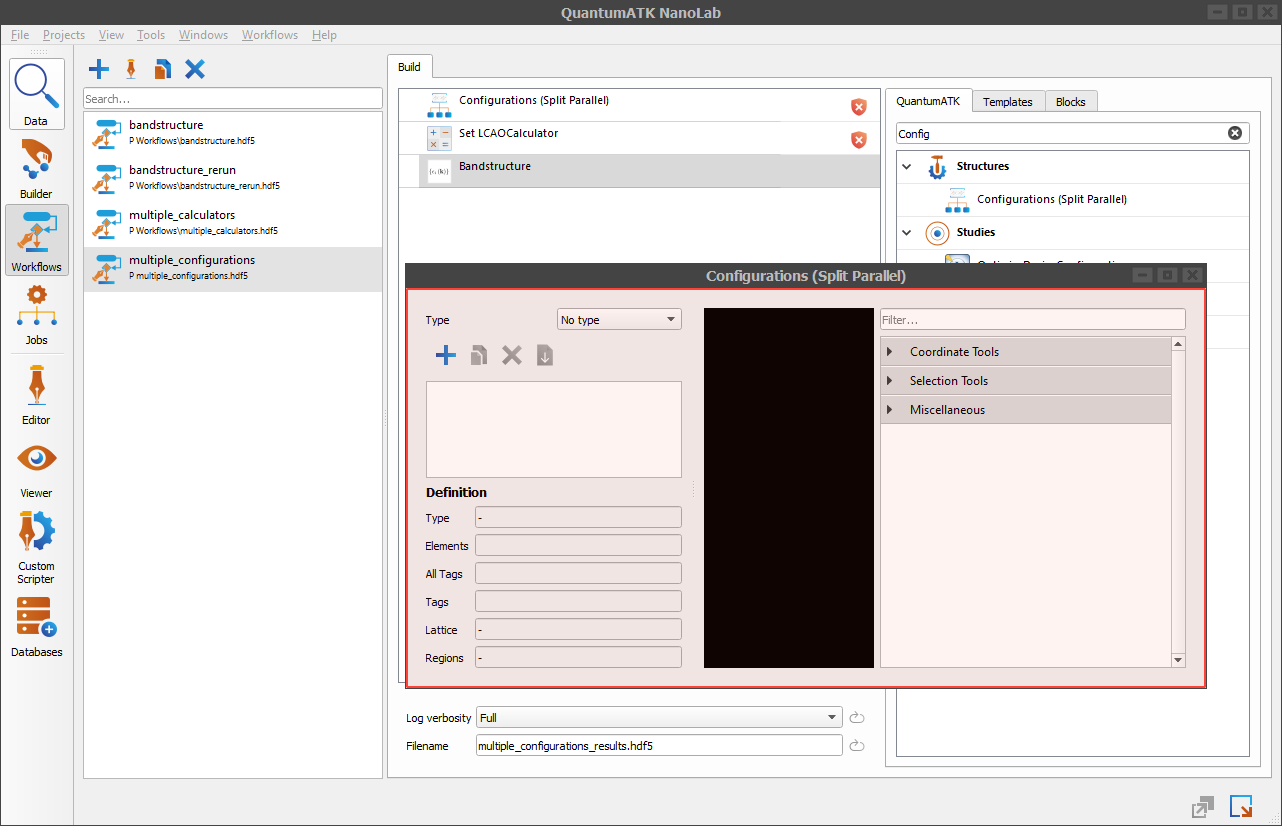
Workflow with multiple configurations
You can increase the calculation throughput by increasing the number of configurations.
To show an example, let’s first make a copy of the first workflow we have created: bandstructure.hdf5. Rename the copy to multiple_configurations.
Note
Alternatively you can create a new workflow with a default LCAOCalculator and a Bandstructure blocks.
Follow the section How to create a new workflow to check how to create a workflow from scratch.
We will need to add more than one configuration to the workflow. The first block in the copied workflow is limited to hold only one configuration. Go ahead and delete that block.
To add more configurations to the workflow, we will need to use the Configurations (Split Parallel) block.
You can find this block in the catalog of QuantumATK blocks under the  Structures group.
Add the block by double clicking it or dragging and dropping it from the catalog to the Workflow Area. The block should be the first one in the workflow.
After adding the block, you will notice an  error icon. Double click the icon to see the error message.
The message should say that a configuration is missing. This is because the block is initially empty and does not have any atomic configurations, which is not very useful.
error icon. Double click the icon to see the error message.
The message should say that a configuration is missing. This is because the block is initially empty and does not have any atomic configurations, which is not very useful.
We will load two atomic configurations from the Builder_Stash.hdf5 file.
Note
The Builder_Stash.hdf5 file is automatically created by the QuantumATK NanoLab. It is project-specific and it contains atomic configurations from the builder stash in the Builder tool. You can find the file in the project folder. It is also present in the Data tool.
Before we can load atomic configurations from a Builder_Stash.hdf5 file, we will need to create them in the Builder tool and add them to the builder stash.
To achieve this, we are going to use the Crystal database from the Builder tool. The steps to load a configuration from the Crystal database to the builder stash are similar to what we already did in the section Sending an atomic configuration from the Builder to the Workflow Builder.
In the Builder, in addition to the Silver configuration, load the AgCd configuration as well. After you load these configurations from the Crystal database, you should see the two configurations in the builder stash under names Silver and AgCd.
When you load the Silver and AgCd configurations in the builder stash return to the Workflow Builder window by clicking the icon located in the side toolbar on the left.
We are now ready to load two atomic configuration from a Builder_Stash.hdf5 file.
To load configurations, open the block’s editor by double clicking the Configurations (Split Parallel) block in the Workflow Area.
In the editor click the button. This will open a file browser within the current project directory.
The central window of the file browser contains a list of files in the current directory. Note that the file list also includes the Builder_Stash.hdf5 file. The window on the right displays the contents of a file selected in the central window of the file browser.
Select the Builder_Stash.hdf5 file and choose two BulkConfiguration-s from its contents - the Silver and AgCd.
Click Load to load the selected atomic configurations.
Note
If you do not see these configurations in the Builder_Stash.hdf5 file, go to the Builder and load the Siliver and AgCd configurations from its database. Follow the Builder guide if you are unfamiliar with the tool.
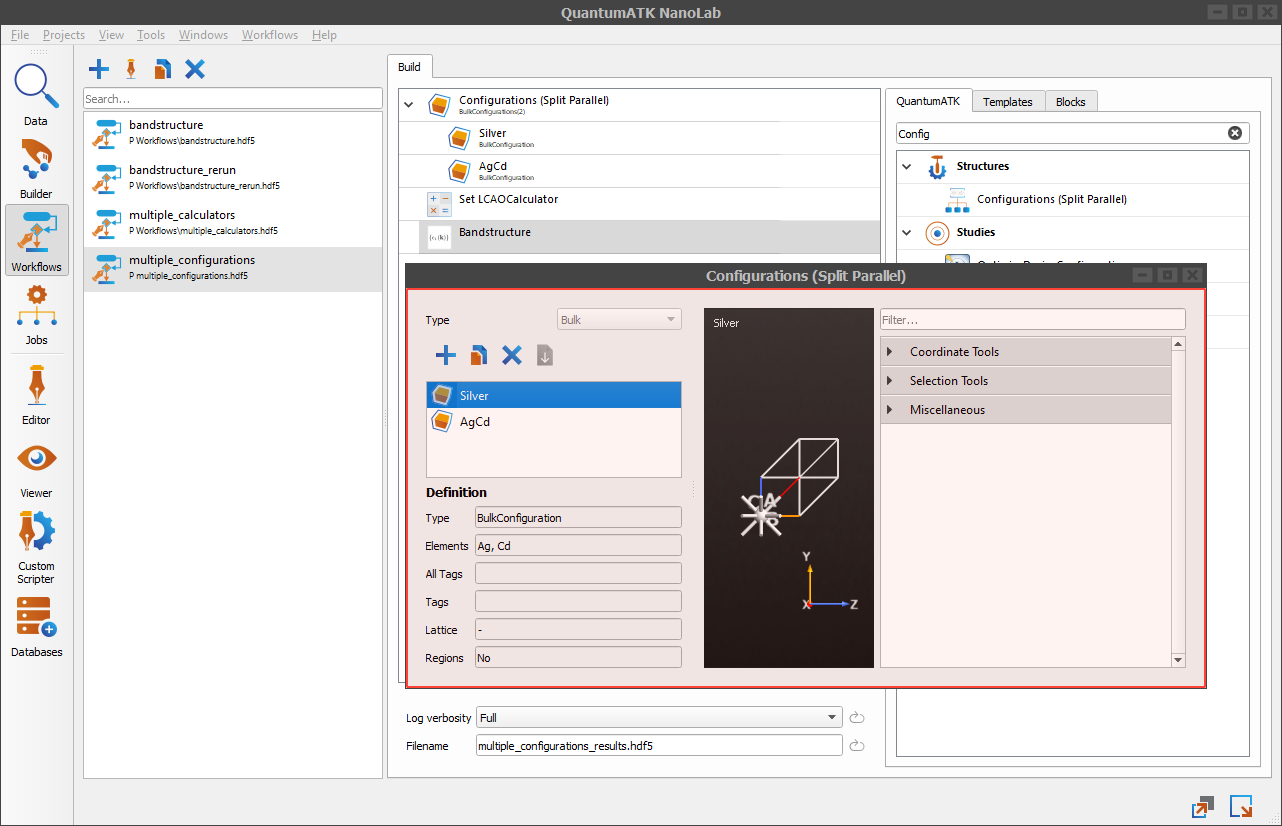
The loaded atomic configurations will appear in the list of atomic configurations on the left and the 3D window will display graphical representation of the currently selected one.
In the Definition list you will see a summary of the configuration properties common for both of the atomic configurations in the list. The type, tags, lattice and regions show common properties found in each configuration, while the elements and tags include unions of all the unique elements and tags.
To add new tags or regions to any of the atomic configurations from the list, use the Tags or Spatial Regions plugins in the right window.
Adding additional atomic configurations in the same block is similar as before.
The only constraint now is that subsequent atomic configurations have to be of the same type, i.e. BulkConfiguration.
If you now close the block editor and look at the Workflow Area, you will notice some changes in the block –
the block’s icon has changed from to BulkConfiguration,
and two sub-blocks, one called Silver and the other called AgCd, corresponding to the just loaded BulkConfiguration-s.
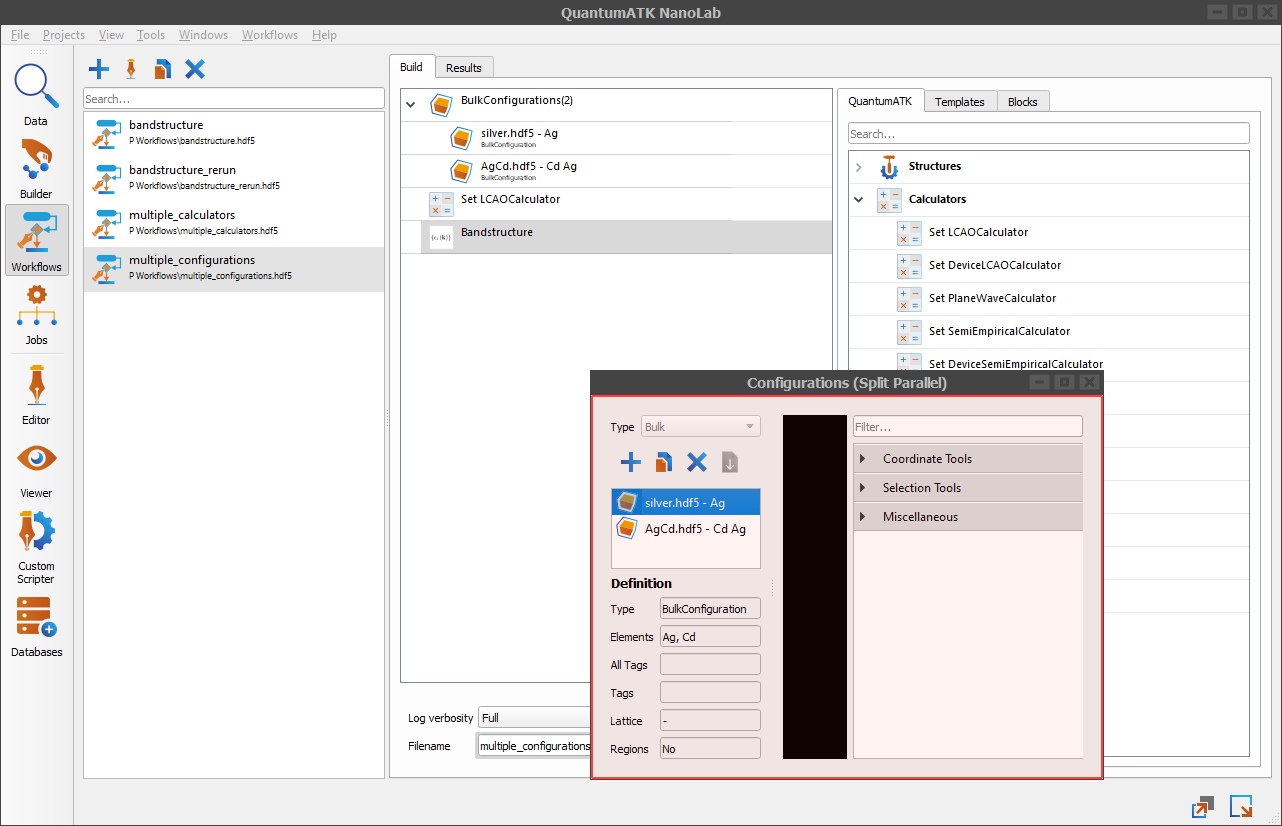
We can now run a Bandstructure calculation for each of the BulkConfiguration-s from the Configurations (Split Parallel) block.
Adding two bulk configurations creates two branches of execution, which we can run in parallel for better efficiency.
Change the result file to multiple_configurations_results. Run the workflow in parallel as described in the section Running a workflow with multiple branches.
After the Jobs tool finishes execution of the workflow, you should get the same results as in the multiple_configurations_results.hdf5 file.
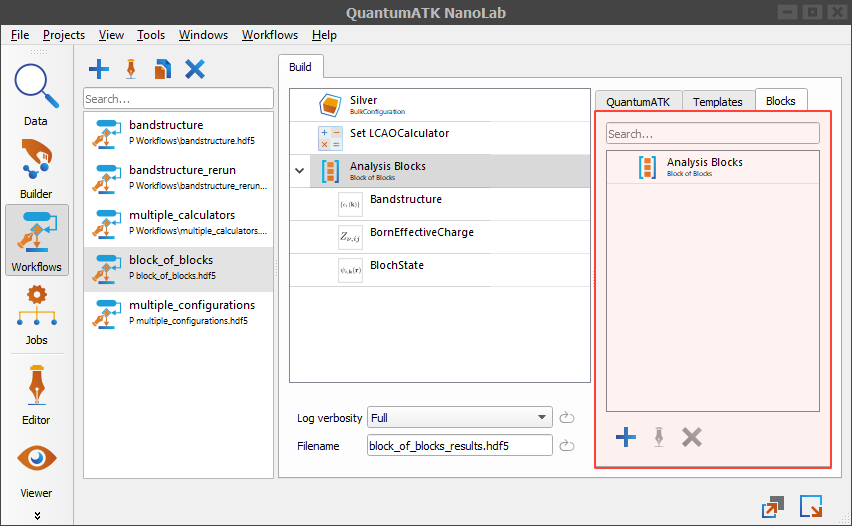
Block of blocks
Let’s append more analysis blocks in the bandstructure.hdf5 workflow. In addition to the Bandstructure, let’s also calculate BornEffectiveCharge and BlochState.
Start by duplicating the bandstructure.hdf5 and rename the copy to block_of_blocks - the name will make more sense a bit later.
Now append the two new analysis blocks to the workflow. You can find both blocks in the catalog of QuantumATK blocks under the Analysis group.
We can now look at the workflow as a three step calculation – bulk configuration loading, attaching an LCAO calculator and analyzing.
We can group the last three analysis blocks under a single block. To do that, we will use Block of Blocks.
You can find it under the Algorithm Blocks category.
Add the Block of Blocks at the end of the workflow and then drag and drop analysis blocks under it.
The analysis blocks should appear as three sub-blocks under the Block of Blocks.
Rename the Block of Blocks to Analysis Blocks by right clicking it and selecting Rename from the drop down menu.
The Block of Blocks is used for grouping multiple blocks into one for easier managing.
Use this block to save a sequence of blocks specialized to calculate or analyze a set of properties,
which you can later reuse in other workflows. To learn how to save custom blocks for later reuse, see the section How to save a block from a workflow.
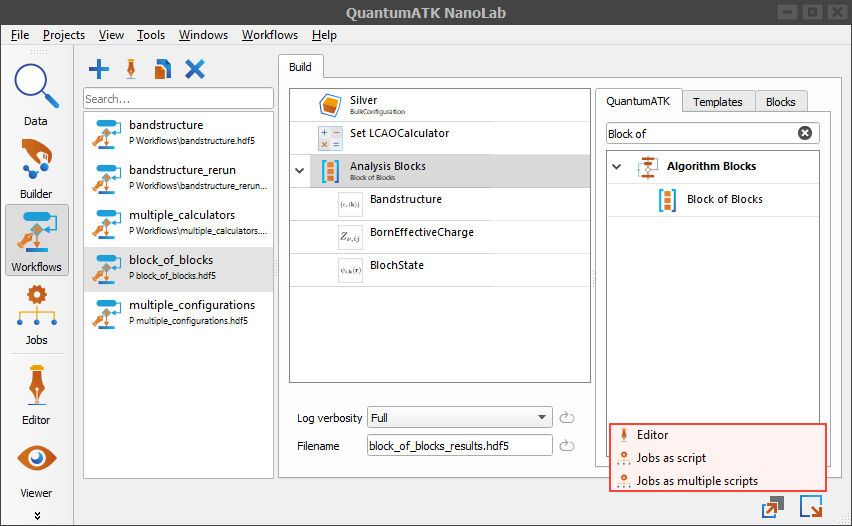
We can now run a calculation with multiple analysis objects. Change the result file to block_of_blocks_results. The workflow contains only one branch of execution, so we can only run it sequentially.
Let’s send the workflow to the Jobs tool. Click the in the lower right corner and select Jobs as script. Follow the script export process.
See Script exporting options for more script exporting details.
After the Jobs tool finishes execution of the workflow, you should get the same results as in the block_of_blocks_results.hdf5 file.
Note
Note that the last workflow example can contain only one branch of execution.
This is because the Split Parallel block requires blocks of the same type and the analysis objects in the workflow had different types.
Common operations in the Workflow Builder
In the next sections you will learn about the common operations you will use in the Workflow Builder, such as how to create a workflow from scratch, how to save a current workflow and a custom workflow block, as well as how to share saved blocks and workflows.
You will also learn about the workflow exporting options, as well as the ways to run a workflow through the Jobs tool.
How to create a new workflow
To create a new workflow click the in the Workflow Stash window. A new workflow should appear in the Workflow Stash with a generic name.
Since the new workflow is empty, the Workflow Area does not show any contents yet. Click the  to change the name of the workflow to bandstructure.
The workflows in the Workflow Stash are project-specific. You can import workflows from other projects like you would import any other .hdf5 file.
Note
To see the file location of a workflow, right click it in the Workflow Stash and select Open location.
How to save a workflow
All workflows are saved automatically, and every change is permanent. There is no Save button.
You can find workflows in the Workflow Stash in the Workflow Builder or in the Data tool.
It is important to know that the workflows in the Workflow Stash are project-specific.
You can still import workflows from other projects like you would import any other .hdf5 file.
How to share a workflow
Workflows are saved as .hdf5 files, which means they can be exported and imported like all other QuantumATK objects or files.
You can find your workflows among files in the Data tool and in the Workflow Stash of the Workflow Builder.
Workflow files can be easily spotted in the Data tool by the icon.
To find a location of a workflow file, just right click it from the Data or from the Workflow Stash in the Workflow Builder and select  Open location.
Once you know the location of the workflow file, you can import it in the current project by selecting File -> Import File from the top menu.
When you import the workflow file, it will automatically become available in the Data tool and in the Workflow Builder, as the QuantumATK NanoLab takes care of finding workflow files present in the current project folder.
How to save a block from a workflow
Let’s say you have a calculator block with a specific set of settings or a group of blocks which do some specific analysis you would like to reuse,
like the Analysis Blocks block in the block_of_blocks.hdf5 workflow.
To save a block, simply drag and drop it from the Workflow Area to the Blocks window in the catalog of blocks.
Let’s save a block in the block_of_blocks.hdf5 workflow. Drag and drop the Analysis blocks on the catalog window under the Blocks tab.
You can rename the saved block, or add it under a new category.
This way the block is permanently saved and can be reused in new workflows.
It is important to note that the saved blocks are shared across all projects.
How to run a workflow
A workflow can be sent to the Editor or the Jobs tool. To send a workflow to either of these two tools,
click the send to button in the bottom right corner of the Workflow Builder.
This will show a send-to-menu with three options:
Editor
Jobs as script
Jobs as multiple scripts
The first option will open the workflow as a single Python script in the Editor. From here you can inspect, edit or save the workflow script.
Option Jobs as script and Jobs as multiple scripts would export a workflow as a single or multiple Python scripts. You can control the export options such as saving calculation objects at different calculation stages or keeping object unique names. Follow the section Script exporting options to read more about the exporting options.
The advantage of multi-script export versus single-script export is obvious in cases when a workflow contains multiple configurations. One script would be generated for each execution branch of the workflow containing a different configuration. These multiple scripts can then be executed in parallel using the Jobs tool.
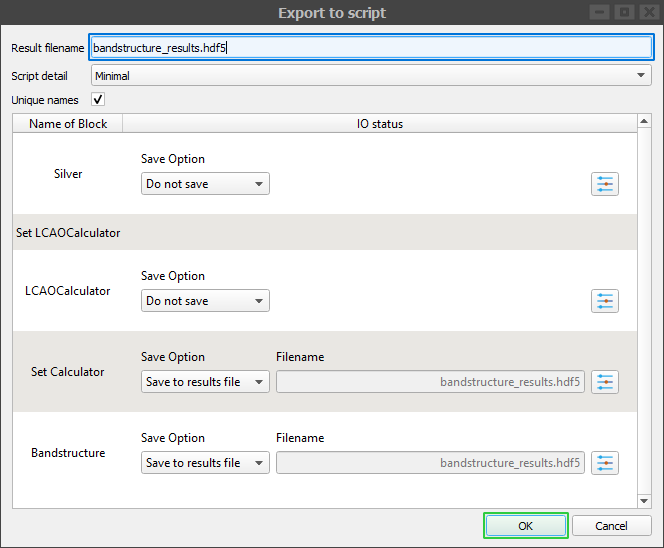
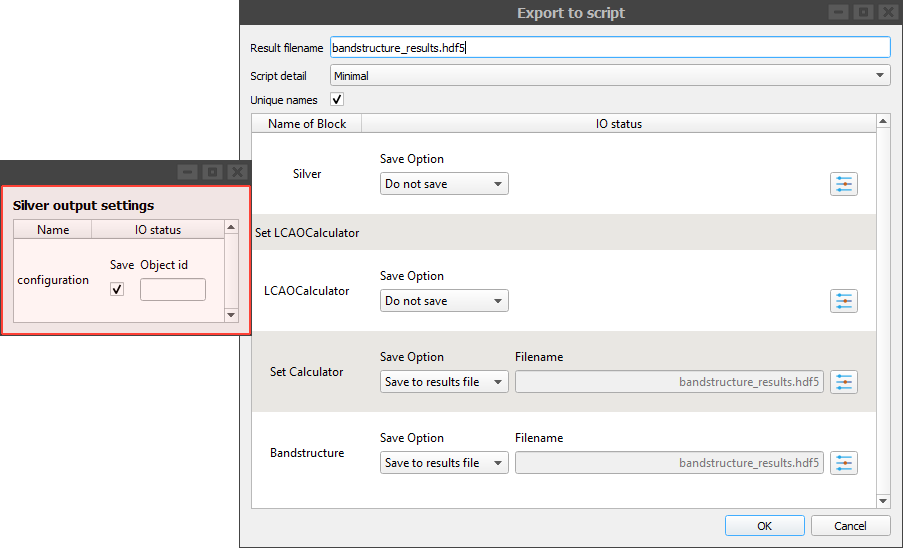
Script exporting options
To generate a script based on the current workflow, click and select Editor from the drop menu.
A new Export to script window will open where you can tweak some of the exporting options. In the following section you can read about script exporting options:
Result filename
Script details
Unique names
Save options
Output savings
In the next sections we will refer to the figure below. It shows script exporting options available for the bandstructure.hdf5 workflow in the section How to run a workflow.
Result filename
This will be the filename of the calculation results file. A default filename is the same as the filename field at the bottom of the Workflow Area window of the Workflow Builder.
Script details
A script can be generated with higher or lower level of detail. The Report all option will script all the default values, while the Minimal option should only script the values directly or indirectly changed by the user.
Minimal option will result in a more compact script with only the most important parameters visible, while the Report all option will give a long and detailed script, which can be useful for troubleshooting.
Unique names
If checked, the script will have unique object names. Otherwise, it will overwrite them once they are not needed anymore by the previous calculation. A typical scenario is when there is more than one configuration in a configuration list. With this option unchecked both configuration variables would have the same name.
Save options
During the calculation you might want to save objects from a workflow not only at the end of calculation, but also at specific calculation stages. This can help when analyzing results and re-starting a calculation with certain parameter changes.
For example, the result file in the bandstructure.hdf5 workflow would include objects such as a BulkConfiguration, an LCAOCalculator and a Bandstructure.
Beside saving the Bandstructure and a final BulkConfiguration object with an attached LCAOCalculator, you could also save the initial BulkConfiguration before attaching the calculator.
This way you could reuse the same configuration for another calculation with a different calculator.
Saving objects during certain calculation stages can be useful and this is what the save options enable you to do. You can save an object in the final result file, a custom file or skip its saving.
For example, each row in the referenced figure corresponds to a block in the bandstructure.hdf5 workflow, and each block corresponds to an QuantumATK Engine object at a certain stage:
Silver - controls the saving of the Silver configuration right after its construction
Set LCAOCalculator - a header for the next two rows
LCAOCalculator – controls the saving of the calculator object
Set Calculator - controls the saving of the Silver configuration after attaching the
LCAOCalculatorto itBandstructure - controls the saving of a
Bandstructureanalysis object.
Output settings
When saving a QuantumATK Engine object to a file you can index it by specifying a unique identifier. This helps finding a specific object when reading the file later.
To set the object identifier, click on the  . This will open a Silver output settings window - highlighted in red in the referenced figure from this section.
From this window you can set an object id field - the object identifier.
. This will open a Silver output settings window - highlighted in red in the referenced figure from this section.
From this window you can set an object id field - the object identifier.