Graphics in QuantumATK
Tip
When encountering any graphics related issues, it is recommended to first ensure the latest drivers are installed for your graphics hardware. Vendor-specific drivers supporting hardware-accelerated OpenGL should always be preferred over generic drivers shipped with the OS, such as the MesaGL drivers.
3D graphics renderers
Depending on the capabilities of the computer running QuantumATK, there can be up to three different options for rendering 3D graphics (in order of highest to lowest capability):
Renderer |
Description |
|---|---|
High shaders |
This option offers the highest performance and all 3D rendering features in
QuantumATK by using shaders. It is only available if the OpenGL version is 3.3
or higher, which is the case on most laptops (see note below if you are running
on integrated graphics hardware).
|
Low shaders |
This option allows rendering of 3D graphics with shaders when the OpenGL version
is limited to OpenGL 2.1, which is the case in many virtual machines. It offers
all 3D rendering features in QuantumATK.
|
No shaders |
This option is always available, and renders 3D graphics without the use of
shaders, to OpenGL versions at least as low as 1.5 (lower OpenGL versions are
untested). It is not feature complete as it cannot render Density-type data (
EffectivePotential, ElectronDensity, etc.). Also, it does not handle rendering
many atoms at once, and thus comes with an additional setting to limit the
Maximum atoms to render without shaders.
|
Upon installation, the first time QuantumATK is started, the highest possible renderer option will be selected automatically. This can then be changed in the File->Preferences dialog under Graphics.
Important
Changing the renderer option requires a restart of QuantumATK.
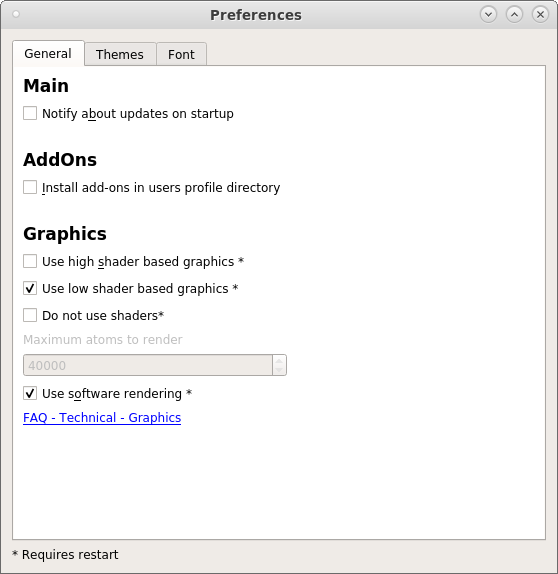
The Preferences dialog in QuantumATK U-2022.12. Preferences can be found in the File menu.
In the case when preferences cannot be accessed because QuantumATK cannot be opened due to a graphics issue, there is the option to manually edit the QuantumATK main.ini file to change the renderer. This file is located in your .quantumatk folder (located in your user folder). Under the header [3DGraphics], look for the following options:
Parameter |
Description |
|---|---|
shaders_on |
true/false. If true, high shaders will be used. |
force_opengl_2_1 |
true/false. If true, low shaders will be used |
no_shaders |
true/false. If true, no shaders will be used |
Only one of these options should be true at a time. For example, to set no shaders, the lines should look like
[3DGraphics]
shaders_on=false
force_opengl_2_1=false
no_shaders=true
Note
In order to provide all the renderer options, QuantumATK requires the OpenGL profile be set to Compatibility Profile. Setting the OpenGL profile is normally handled by QuantumATK itself, but in case of graphics issues, it can be prudent to double-check that the OpenGL profile is correct. See Checking OpenGL information to learn how to check the OpenGL version, profile, etc. on your computer.
Note
Some integrated graphics cards can have issues running with the OpenGL 3.3 renderer option. One may experience lock-ups when trying to interact with 3D objects, or general sluggishness whenever 3D objects are on the screen. The best solution to this issue is to set QuantumATK to use a non-integrated graphics card via the operating system. If this is not possible, we recommend switching the renderer to the OpenGL 2.1 option, which has been tested on Iris XE, before trying the Basic option. If all else fails, there is also the possibility to switch to software rendering mode (see Software rendering).
Software rendering
Since QuantumATK R-2020.09, there is an option to run QuantumATK using software rendering, with Mesa graphics drivers. This is useful if we want to run QuantumATK on a computer without graphics hardware, for instance on a remote compute cluster via an SSH tunnel. Software rendering will generally be much slower than hardware rendering, but is able to use any of the renderer options.
Important
Changing the software rendering mode requires a restart of QuantumATK.
QuantumATK U-2022.12 or later
Windows |
For Windows, the Mesa DLLs are available in the installation folder under
<QuantumATK_installation>/lib/mesa/. In order to enable software renderingthey have to be manually copied to
<QuantumATK_installation>/atkpython/. |
Linux |
On Linux, software rendering can be chosen during installation as well as in the
QuantumATK File->Preferences. During installation, choose Fallback
software rendering for the default 3D graphics rendering mode.
|

3D graphics rendering mode selection dialog, shown during QuantumATK installation.
Checking OpenGL information
Basic information about the OpenGL capabilities of the computer are provided in the Help->About and File->Preferences dialogs in QuantumATK.
For more detailed information, use the methods described below. Detailed information can be useful to include when reporting any graphics related bugs to the developers.
Windows |
|
Linux |
Use the terminal command
glxinfo to get a printout of the computer’s OpenGLcapabilities. If you are getting
command not found when running this, tryinstalling
mesa_utils. You can also test your OpenGL installation by runningthe utility
glxgears. If this fails, QuantumATK will probably not runproperly on your system and you should review the system configuration.
|
Glossary
For a more detailed explanation of the following terms, please visit the official OpenGL homepage.
Term |
Definition |
|---|---|
OpenGL vendor |
The manufacturer of the graphics drivers.
|
OpenGL renderer |
This is actually the name of the drivers currently installed,
which often shares the same name as the actual graphics hardware.
In software rendering mode, this will often be
llvmpipe.Listed as GPU in QuantumATK.
|
OpenGL version |
The version number of the OpenGL implementation. The first and
second components, are the major and minor version numbers,
respectively. This line may also contain the OpenGL profile. If
using software rendering, this line may also contain the Mesa
version number.
|
OpenGL profile |
There are two OpenGL profiles, Compatibility profile and
Core profile. For QuantumATK, this should always be
Compatibility Profile; this is set by QuantumATK itself.
|
Shading language version |
The version number of the shading language (GLSL), which may be
different from the OpenGL version number. This is only relevant
when using shaders for 3D rendering.
|
Running QuantumATK on a Virtual Machine
Enabling 3D hardware acceleration of graphics can be tricky if running on a virtual machine or on a remote machine through an SSH tunnel. There are different solutions depending on your QuantumATK version.
QuantumATK U-2022.12 or later
Since QuantumATK U-2022.12, the recommendation is to first try the OpenGL 2.1 renderer option if graphics hardware is available on the virtual or remote machine. If this does not work, then try the Basic renderer option. Finally, try switching to software rendering.
QuantumATK R-2020.09 to QuantumATK T-2022.03
If graphics hardware is not available, switching to software rendering mode a possibility since QuantumATK R-2020.09. See Software rendering on how to do this.